Catalyst V4

L'arte del progresso

Il Catalyst è l’aquilone per chiunque si avvicini a questo sport o per i rider alla ricerca di un kite divertente e sicuro di sé con facilità d’uso e accessibilità.

Trova un rivenditore
Estimated current manufacturing time: 26 days

Divertente, facile e intuitivo

  • Rilancio semplice e veloce
  • Grande range di vento
  • L’aquilone preferito per i principianti ed intermedi

Il Catalyst V4 è ultra stabile e intuitivo da lanciare, atterrare e volare.

Design ad arco aperto

Il design leggero con uno strut combinato ad una forma ad arco aperto offre una potenza fluida con incredibili capacità di volo nel vento leggero che ti fanno alzare facilmente in piedi.

Ampia gamma di vento e depower progressivo

L’ampio range di vento e il progressivo de-power rendono confortevole la guida in condizioni variabili o rafficate, mentre le ottime prestazioni di bolina ti danno più tempo da dedicare al miglioramento delle tue abilità!

Primi salti

Dopo che le basi sono state padroneggiate e stai cercando di espandere il tuo gioco, rimarrai sorpreso dalle capacità di salto del Catalyst. Il sollevamento fluido con feedback preciso sulla barra semplifica l’apprendimento dei tuoi primi salti.

Il rilancio è semplice

Ruotando la barra o utilizzando le palline di rilancio sulle back line, l’aquilone si gira facilmente nella posizione di rilancio.

Nuovo sistema delle briglie posteriori retrattili

Un nuovo sistema di linea di briglia posteriore retrattile riduce la possibilità di grovigli, aggiungendo tensione alla linea posteriore durante la guida aumenta la reattività agli input della barra.

Sistema di rilascio

Il nostro collaudato sistema di rilascio Front Line Flag Out è semplice ed efficace, è lo stesso sistema presente su tutta la nostra gamma di kite pump. Quando il Click-in Loop viene rilasciato, il kite si sventa su una prima linea, rilasciando immediatamente tutta la potenza.

Comprovata combinazione di materiali rip-stop

Il Catalyst presenta la nostra collaudata combinazione di materiali rip-stop. Il materiale utilizzato in rip-stop ha un rivestimento ultra flessibile che migliora il feedback in condizioni di raffica per una guida più fluida. Il dacron tecnico rip-stop è super resistente, utilizzato sul bordo d’attacco e sugli Strut migliora la resistenza, la durata e la longevità.

Gonfiaggio veloce One-Pump

Il sistema di gonfiaggio One-Pump Fast Flow rende la configurazione e l’imballaggio facili e veloci. È dotato di gonfiaggio/deflazione a punto singolo e di un’elevata portata d’aria tra il tips e la Leading Edge, con clip per sigillare i tubi ed evitare la perdita d’aria indesiderata in caso di danni.

Eccezionale costruzione nella nostra fabbrica Ozone

Eccezionale costruzione nella nostra fabbrica Ozone

Costruzione di livello mondiale nella nostra fabbrica, utilizzando materiali di altissima qualità e controllo qualità in ogni fase di produzione. La Fabbrica Ozone produce anche la nostra gamma di parapendio e tute alari; gli stessi processi di controllo qualità vengono utilizzati in tutti i prodotti.


Progettato con OZ-CAD

Progettato con OZ-CAD

Il FUTURO È ORA - Tutti gli aquiloni e le ali di Ozone sono progettati e sviluppati utilizzando il nostro software CAD personalizzato altamente avanzato. I nostri progettisti sono in grado di lavorare con caratteristiche su misura per le forme e le strutture uniche degli aquiloni e delle ali tecniche gonfiabili e foil. Parte del nostro team di progettazione è dedicato all'aggiornamento del codice CAD e all'aggiunta di nuovi moduli e funzionalità al programma mentre lo sviluppo dei nostri prodotti continua.

Sistema senza puleggia a 4 linee

Sistema senza puleggia a 4 linee

NO pulegge, NO problemi. Progettiamo tutti i nostri aquiloni gonfiabili senza pulegge, per ereditare la sensazione e le prestazioni uniche di Ozone in tutta la nostra gamma.

Rinforzi interni

Rinforzi interni

Anche ciò che c'è all'interno conta: rinforzi interni per una maggiore resistenza e durata; come una cucitura di chiusura a doppio strato Dacron + Insignia con bordi d'attacco e fili ad alta resistenza.

Sovrapposizione di cuciture piatte

Sovrapposizione di cuciture piatte

La costruzione della cucitura piatta sovrapposta migliora il controllo della vela con un profilo del tessuto piu' pulito.

Pannelli di distribuzione del carico

Pannelli di distribuzione del carico

I rinforzi Dacron vengono utilizzati su tutte le aree caricate per una migliore distribuzione del carico. Ciò significa che tutti i carichi sono distribuiti uniformemente nella vela assicurando che l'aquilone voli e funzioni al meglio.

Connessione diretta degli Strut

Connessione diretta degli Strut

Il nostro metodo di costruzione di connessione diretta degli strut migliora la distribuzione del carico tra leading edge, strut e tessuto. Gli strut sono collegati direttamente alla leading edge con rinforzi interni ed esterni. Questo metodo di costruzione unico garantisce che i profili puliti siano mantenuti con la tensione ottimale del tessuto.

Leading Edge e Struts rinforzati

Leading Edge e Struts rinforzati

la Leading Edge d'avanguardia e gli strut sono rinforzati nelle aree ad alto stress per garantire che il tessuto del kite rimanga in forma e funzioni al meglio.

Bordo d’uscita rinforzato

Bordo d’uscita rinforzato

Trailing Edge a doppio strato con rinforzo Dyneema interno leggero : questo riduce l'usura del tessuto e aiuta a mantenere la tensione ottimale del bordo come progettato. La linea Dyneema riduce anche qualsiasi potenziale allungamento sul Trailing Edge.

Costruzione unica del Bladder

Costruzione unica del Bladder

I nostri Bladder sono costruiti nella nostra fabbrica con saldatrici progettate su misura. Le sezioni con doppio strato vengono applicate a qualsiasi potenziale aree di usura.

Scuff Pad aerodinamici a basso profilo

Scuff Pad aerodinamici a basso profilo

Gli Scuf Pad sulla Leading Edge sono spesso oggetti cosmetici grandi e non necessari. In Ozone costruiamo i nostri aquiloni e ali per prestazioni e durata utilizzando i migliori materiali e componenti disponibili. Tutte le aree che richiedono protezione da graffio utilizziamo un materiale leggero e durevole con una resistenza all'abrasione superiore, pur mantenendo un profilo basso al fine di ridurre la resistenza e mantenere le prestazioni.

Sistema di gonfiaggio One-Pump a flusso rapido

Sistema di gonfiaggio One-Pump a flusso rapido

Il sistema di gonfiaggio One-Pump Fast Flow rende la configurazione e l'imballaggio facili e veloci. È dotato di gonfiaggio/deflazione a punto singolo e di un'elevata portata d'aria tra il tips e la Leading Edge, con clip per sigillare i tubi ed evitare la perdita d'aria indesiderata in caso di danni.

Deflettori di linea anti-intoppo

Deflettori di linea anti-intoppo

I deflettori di linea Anti-intoppo impediscono alle briglie e alle linee di aggrovigliarsi intorno alla punta del tip. La sicurezza aumenta quando si lancia il kite con un partner e il rilancio dell'acqua è facilitato.

Geometria della briglia regolata

Geometria della briglia regolata

Lavoriamo molto durante il nostro processo di ricerca e sviluppo per sviluppare una gamma di misure in sintonia fra di loro. Ogni aquilone ha un layout a briglia unico, testato individualmente e messo a punto per massimizzare la sensazione e le prestazioni.

Connettori di linea infallibili

Connettori di linea infallibili

I connettori di linea infallibili impediscono il montaggio errato delle linee di volo all'aquilone.

Water Kite Technical Bag

Water Kite Technical Bag

  • Borsa tecnica con molto spazio
  • Tasca esterna per la barra
  • Tasca interna
  • Cinghie per tavola e pompa
  • Tracolla regolabile

Current production colours

Custom Colours

We can make any combination of colours using the colour chooser below. The manufacturing time for these special kites is 30 days. Design your kite, share with your friends and ask your dealer to place your order.


Colour Chooser

If you want to order your amazing design then your dealer will need the colour codes to get it right. Please send them this code:

Tutto è possibile…

Ottieni il tuo kite personalizzato – l’ultimo cartellone pubblicitario

Milioni di persone vanno al mare o al lago ogni anno e il kitesurf è lo sport da spiaggia visivamente più spettacolare in circolazione, attirando gli occhi dell’attenzione di tutti. I Kite sono grandi ed i Kite con un design personalizzato possono essere incredibili spazi pubblicitari.

Volando su e giù per la spiaggia, il park o la neve tutto il giorno, questi spazi pubblicitari possono essere utilizzati per pubblicizzare aziende locali e internazionali, scuole di kite o semplicemente per il tuo kite con un design che ti si addice perfettamente e ti fa distinguere un po ‘di più dalla massa. Se hai una tua azienda puoi aggiungere il logo ai tuoi kite, il che ti permette anche di scaricare il costo come spese operative aziendali. Quanto è bello!

Per le aziende tradizionali l’opportunità di investire in un Kite è piu’ conveniente in quanto risulta essere pari ad una frazione del costo di una normale pubblicità. Finora abbiamo realizzato molti Custom Kite per molti marchi famosi nel mondo o realizzando kite per i piloti sponsorizzati da marchi tradizionali che vedono i vantaggi negli sport del kite.

Per saperne di più su ciò che possiamo offrire, fai clic su Visualizza design kite personalizzati

Come posso ordinare?

  • E’ facile, contattate il rivenditore Ozone più vicino o l’importatore nazionale cliccando sul link qui sotto…
  • Il nostro rivenditore ci invierà quindi via e-mail le informazioni e otterrà un preventivo entro 5 giorni lavorativi.
  • Una volta concordato si paga il costo Kite + Logo in modo che la produzione del kite possa iniziare.
  • Il tuo ordine verrà spedito entro 2-4 settimane (a seconda di quanto è impegnata la fabbrica) dalla data di pagamento.

TROVA UN RIVENDITORE

Quanto costa?

Le quotazioni variano a seconda della complessità e delle dimensioni del logo o del design. Possiamo fornire un preventivo solo una volta che abbiamo le informazioni (vedi sopra)

LOGO INCOLLATO:

Affinché i loghi siano attaccati solo su 1-2 kite, stampiamo il logo sul materiale sticky-back rip-stop bianco. Quindi il logo viene ritagliato e poi attaccato sul kite. Gli adesivi in genere si attaccano molto bene, tuttavia non possiamo garantirli per tutta la vita del kite.

CUCITO NELLA VELA:

Se il logo non è troppo complicato possiamo in-tagliarlo nella vela nella singola superficie (o entrambe le superfici di kite foil). I loghi sembrano incredibili e la luce brilla magnificamente. Il prezzo dipende dalle dimensioni e da quanto è complicato il logo. Si prega di notare che possiamo utilizzare solo i nostri tessuti di colore standard. Chiedi fattibilità al tuo distributore locale.

trovare il distributore locale

Un design pulito e semplice, caratterizzato da un sistema di trim facile da usare e dal nostro innovativo Click-In Loop Quick Release.

Trova un rivenditore
Estimated current manufacturing time: 12 days

Thank you for purchasing this Ozone product. Our mission is to design and build quality products with cutting edge performance that are easy, fun and safe to use.

At Ozone we are passionate about sports, and it is this passion that drives our design team to perfect and develop products that we love to ride with. We are proud of the quality of our products, and are constantly searching for the best components and materials to use in our designs. We manufacture in our own high-quality production facility in Vietnam, which guarantees a build quality that we are proud to put the Ozone name on. A close look at one of our products reveals that same superior quality and construction that ensures that every Ozone product will enjoy a long life, with consistent performance and aesthetics. To view the factory video visit our website www.flyozone.com. Many dynamic action sports carry inherent risks but with common sense and education from qualified instructors means you can easily enjoy these incredible sports. Accidents generally happen due to a lack of experience, changing weather conditions or from using equipment not suited to the riders’ ability and/or conditions. Always take the time to learn safely with qualified instruction and you will progress far quicker. Ride safe Team Ozone

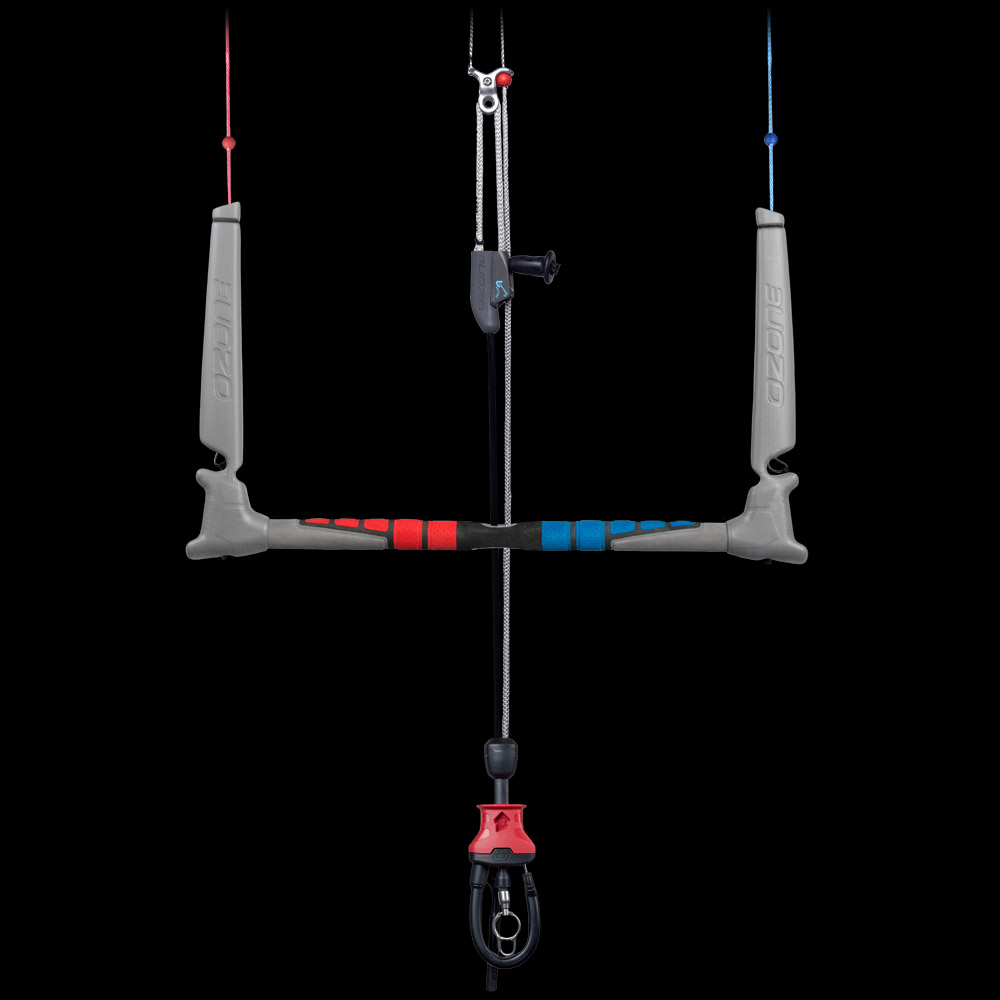
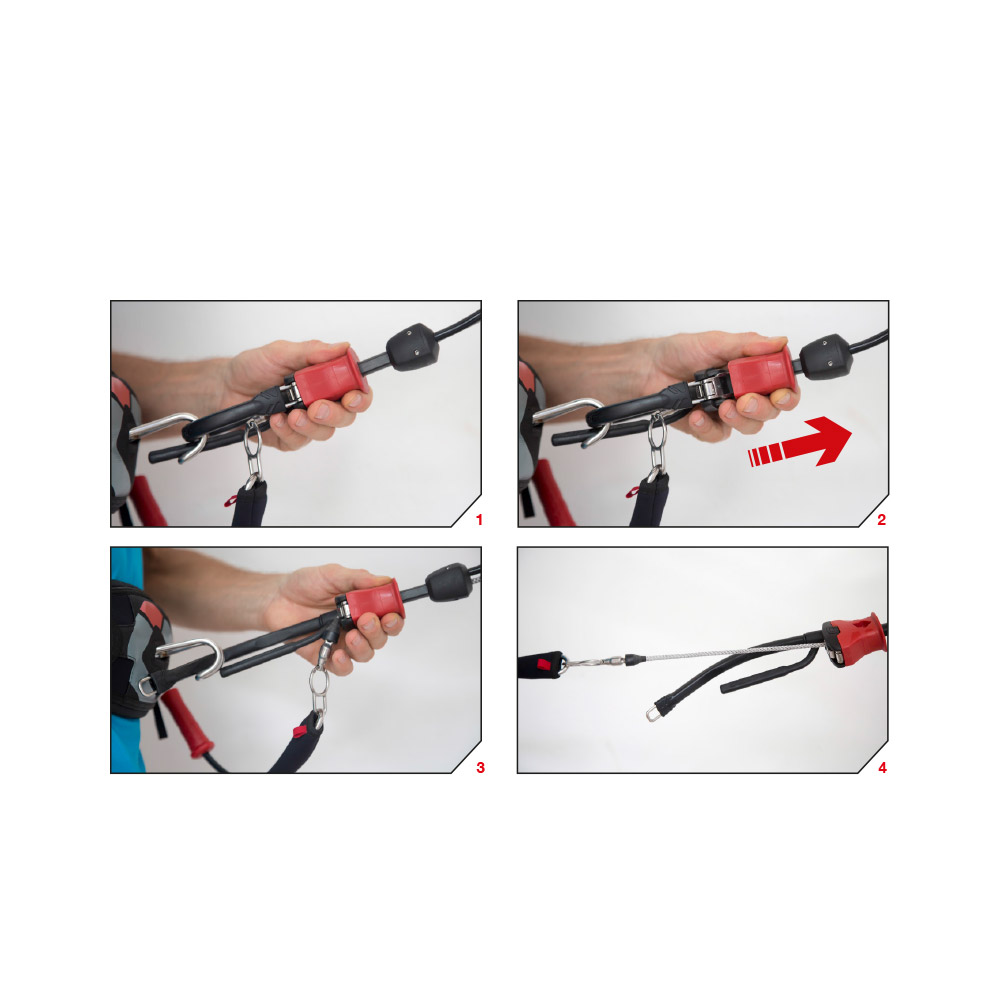
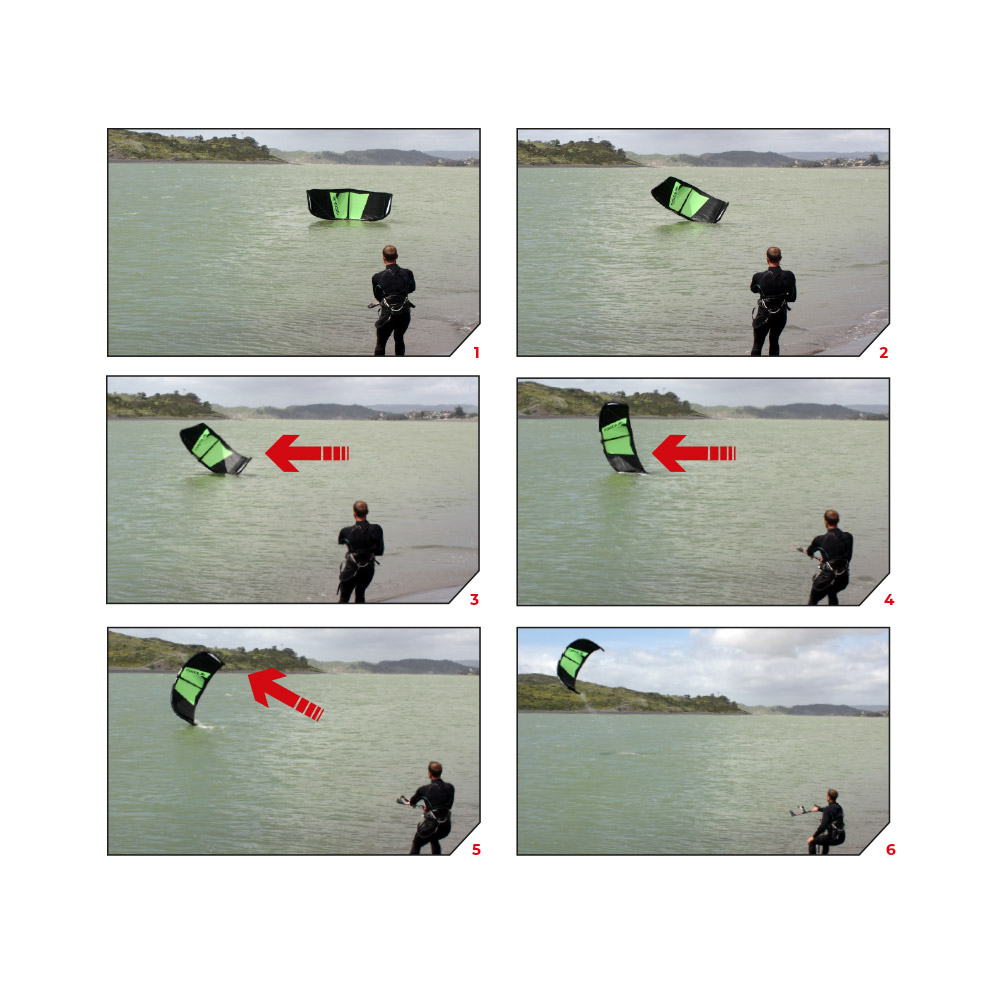
Release of Liability

OZONE KITESURF LTD / OZONE KITES LTD RELEASE OF LIABILITY, CLAIM WAVIER, ASSUMPTION OF RISK

By assembling and/or using this Ozone product, you agree that you have read and understood the entire Ozone product owners manual, including all instructions and warnings contained in that manual, prior to using the Ozone product in any way. You additionally agree that you will ensure any additional or subsequent user of your Ozone product will read and understand the entire Ozone product owners manual, including all instructions and warnings contained in that manual, prior to allowing that person to use your Ozone product.

ASSUMPTION OF RISK

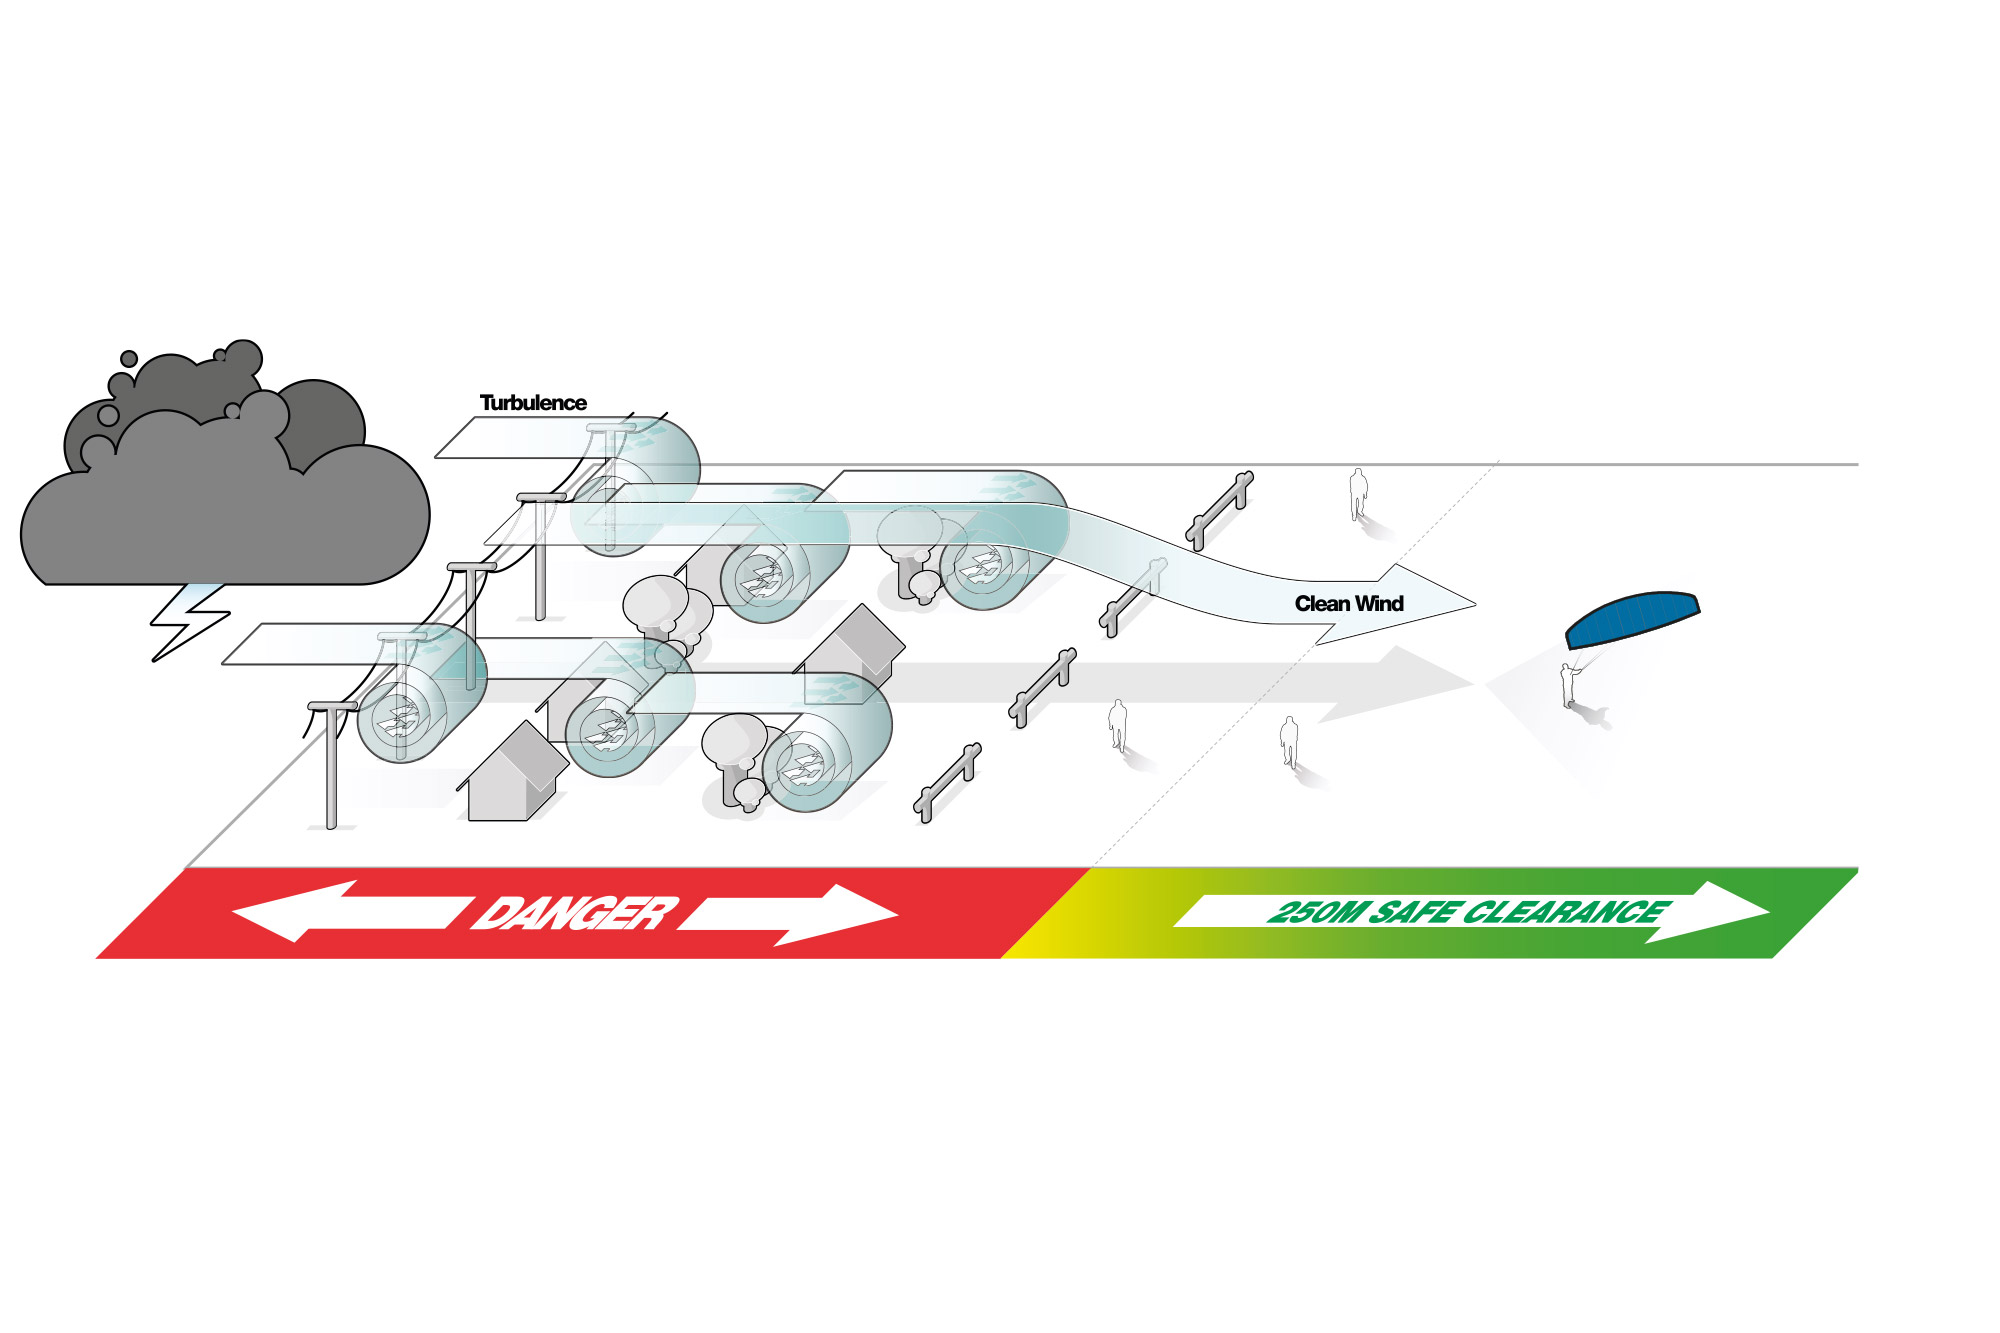
Use of the Ozone product and any of its components involve certain risks, dangers, and hazards which can result in serious personal injury and death to both the user and to non-user third parties. In using this Ozone product, you freely agree to assume and accept any and all known and unknown risks of injury to you and third parties while using this equipment. The risks inherent in this sport can be greatly reduced by abiding by the warning guidelines listed in this owner manual and by using common sense.

RELEASE AND WAIVER OF CLAIMS

In consideration of the sale of the Ozone product to you, you herby agree to the fullest extent permitted by law, as follows;

TO WAIVE ANY AND ALL CLAIMS that you have or may in the future have against Ozone Kitesurf LTD or Ozone Kites LTD and all related parties resulting from use of the Ozone product and any of its components.

TO RELEASE Ozone Kitesurf LTD or Ozone Kites LTD and all related parties from any and all liability for any loss, damage, injury or expense that you or any users of you Ozone product may suffer, or that your next of kin may suffer, as a result of the use of the Ozone product, due to any cause whatsoever, including negligence or breach of contract on the part of Ozone Kitesurf LTD or Ozone Kites LTD and all related parties in the design or manufacture of the Ozone product and any of its components.

In the event of your death or incapacity, all provisions contained herein shall be effective and binding upon your heirs, next of kin, executors, administrators, assigns, and representatives. Ozone Kitesurf LTD or Ozone Kites LTD related parties have not made and expressly deny and oral or written representations other than what is set forth herein and the Ozone product owners manual.

Warranty

Ozone warrants this product according to the laws in force against any major manufacturing defect. This warranty is subject to the following limitations:

  • The warranty is valid only when the product is used for its intended use, and does not cover products used in rental or teaching operations.
  • Ozone will make the final warranty determination, which may require inspection and/or photos of the equipment, which clearly show the defect(s). If necessary, this information must be sent to the Ozone dealer, postage prepaid.
  • If a product is deemed to be defective by Ozone, the warranty covers the repair or replacement of the defective product only.
  • Ozone will not be responsible for any costs, losses, or damages incurred as a result of loss of use of this product. The warranty does not cover damage caused by misuse, abuse, neglect or normal wear and tear including but not limited to; assembling with other than Ozone components, damage due to excessive sun exposure, damage caused by improper handling or storage, and damage caused by anything other than defects in material and workmanship.
  • This warranty is voided if any unauthorized repair, change or modification has been made to any part of the equipment. The warranty for any repaired or replaced equipment is good from the date of the original purchase only. The original purchase receipt must accompany all warranty claims.
  • The name of the retailer and date of purchase must be clear and legible.
  • There are no warranties that extend beyond the warranty specified herein.

WARRANTY CLAIMS

  • Warranty claims must be sent to Ozone by an official Ozone dealer or country distributor.
  • Warranty claims must be processed and be issued a return authorization prior to shipping to the Ozone dealer the product was purchased from.

Warnings & Safety Precautions

This manual refers to the current product it comes with. No information contained herein applies to previous and/or other products or components. Always read and understand all warnings and instructions for any other product or component being used. To read previous product manuals go to www.flyozone.com

Read the following points before assembling and/or using this product:

General Warnings:

  • Before using this product you must take lessons from a certified instructor/school.
  • Always wear a Coast Guard approved Personal Flotation Device when using this product near or on the water.
  • Always carefully inspect all of your equipment before using it.
  • The use of this product exposes the user to many unavoidable and unexpected risks, dangers and hazards.
  • Always use extreme caution when using this product.
  • Misuse of this product can cause serious injury or death.
  • Only use this product if you are in good physical health.
  • Never act in a careless manner when using this product.
  • You are responsible for your own safety and the safety of others around you when using this product.
  • If you are under the age of 18 you should have your parents or legal guardian read all warnings and instructions. You should not use this product unless you are under proper guidance and supervision.
  • Do not use this product if you are under the influence of alcohol, drugs or medications.

Kite and Control System Warnings:

  • Always have a partner when launching and landing your kite.
  • Always learn to use a small trainer kite before attempting to use a larger power kite.
  • Never allow anyone who is not familiar with power kites to use this product.
  • Never use this product without a safety leash system. A loose kite is extremely dangerous.
  • The kite/control system is equipped with passive safety systems, which need to be activated by the user for them to work.
  • The leash system is not a permanent attachment to this product. Never permanently attach yourself to the kite or any of its components.
  • Never use this kite with another control system or safety leash. Only use the control system that is supplied with this kite. Other brands are not compatible with this design therefore and the safety system will not work.
  • Always wear protective equipment when using this product, for example; helmet, gloves, shoes, protective eyewear etc.
  • Always use a high quality and well maintained kite specific harness.
  • Get yourself used to the way all quick release devices work by testing them often in a non-emergency situation.
  • Rinse all quick release devices in fresh water after each use. Quick release devices have a limited lifetime and must be checked and replaced often.
  • Always activate and re-load all safety systems to familiarize yourself with how they work. This is the only way to be sure that you know how to use them in all situations, and that they are correctly loaded and safe for use.
  • The quick release trim loop and kite leash equipped with a quick release must be replacement after 250hours of use. Replace them before if you see any sign of wear. The wearing of quick release devices is not considered a warranty issue.
  • Never touch the flying lines when the kite is in use. Flying lines are extremely dangerous while under tension and can cause serious injury or death.
  • Never use this product with worn lines. A line that breaks while under tension can cause serious injury or death.
  • Always check your flying lines for knots before each use. Knots greatly reduce the strength of the lines.
  • Stay away from tangled flying lines unless the kite is secured to the ground. An unsecured kite can self launch unexpectedly, and can cause serious injury or death.
  • Never allow yourself, or anyone else, to get between the control bar and the kite when using this product.

Choose safe weather conditions and locations:

  • Be aware of the general risks associated with action sports.
  • Ensure you understand all weather forecasts and prepare for changes in weather.
  • Never learn to use this product in more than 10 knots of wind.
  • We highly recommend you purchase a wind speed indicator to be able to measure wind speeds. Study the wind guide to understand wind speeds.
  • Never use this product in high winds.
  • Never use this product in thunderstorm and lightning conditions.
  • Only use this product when you can remain in a standing position.
  • Never use this product in wind conditions that are above your ability level.
  • Never use this product near or on the water in offshore wind condition unless you are an expert swimmer.
  • Always observe local rules and regulations when using this product.
  • Never use this product near power lines, telephone poles, trees, bushes, roads, automobiles or airports.
  • Only use this product when you have at least 100m of clear space downwind, and on both sides of your launching position. The power of the kite can pull you downwind unexpectedly with great force.
  • Do not fly your kite over other people or pets. Spectators should remain upwind of you when using this product.
  • Never use this product on crowded beaches or fields.
  • Practice launching and landing procedures, and self rescue techniques before using this product near the water.


Set Up:

Attach The Lines To The Kite As Shown In These Diagrams.
View Is Of The Kite When Flying.

A: Pump Leash

B: Leading Edge

C: Trailing Edge

1 & 4: Back Lines

2&3: Front Lines

Set Up The Kite And Bar Face Down On The Beach With The Bar Downwind From The Kite.

1 & 4: Back Lines

2&3: Front Lines

A: Clamcleat Trimmer

B: Flag Out Line

C: De-Power Line

D: Quick Release Handle

E: Quick Release Loop

F: Flag-out Loop

G: Finger

Set Up

  • Attach the pump leash to the looped line at the centre of the leading edge.
  • Make sure all one-pump hose clips are open before you start inflating.
  • Inflate using the IN valve.
  • Refer to the recommended inflation pressure located next to the inflate/deflate valve.
  • Do not over inflate above the recommendation.
  • Do not under inflate or it will not perform as designed.
  • Close the top valve cap. Double check the valve is tightened firm and is sealing.
  • Close the protection cover.
  • Close all one-pump hose clips. This isolates each strut from the leading edge, so if you get a puncture in one part of the kite the rest of the kite will remain inflated.
  • Once the kite is fully inflated, turn the kite over and secure the kite using sand or sand bags on either side of the centre strut.
  • Never leave a kite unattended without sand or sand bags on the kite.

WARNING:

Do not ride the kite with the one pump clips undone. If you get a puncture the whole kite will deflate! Always close the one pump clips inside the neoprene covers after pumping up. Do not under inflate the kite or it will not perform to its designed trim and will not relaunch easily.

Attaching The Control Lines

  • With the kite on the sand and leading edge facing upwind start to unwind all the lines from the bar walking downwind.
  • Put your bar in the sand with red side of the bar on the right and start untangling the flying lines, walking upwind towards the kite.
  • We label each line with numbers which correspond to the same numbers on the kite. Use a larks head knot to attach the lines making sure the line label system matches >>  4 to 4; 3 to 3; 2 to 2; 1 to 1. The line labels are on the bar, lines and kite to make rigging stress free and easy.
  • The frontlines have stitched loop ends and the back lines have knots so it is very difficult for you to attach the lines incorrectly.

All line to kite connections are made using a “LARKS HEAD” knot.

Always double check your lines before launching. Wrongly attached lines will stop the kite flying correctly and could therefore mean you have no control of the kite putting yourself in a dangerous situation.

Security

Quick Release Connection

The Quick Release is the primary connection to the kite. Make sure you connect to the Quick Release using the finger as shown in the pictures.

Below the Bar Release (Recommended Mode)

All riders should attach their Kite Leash to the Flag Out System. This is the small eyelet on the Stainless Steel Swivel Ring.
When the release is activated, the kite will flag out and fall to the water/ground.

In all situations make sure that all lines are clear of all working release systems and the kite leash is connected in the right way.

Advanced Riders (Use at your own risk, not recommended) 

Riders performing unhooked tricks or who are more confident and have spent many hours Kiting can attach in Expert mode, where the loop part runs through the large eye of the steel ring. When letting go of the bar in Expert mode (without activating the release e.g. missed handle pass) the kite will depower but WILL NOT flag out.

Be aware in this situation, the Quick Release will be out of reach and can therefore not be released. When hooked in and activating the Quick Release the steel ring automatically slips off and the kite will flag out.

1st Stage of  Release

Activate the Quick Release as shown in the pictures. Providing your leash is attached to the flag out system the kite will 100% depower.

Reloading the Quick Release

Final Stage of Release (in an extreme emergency)

In the case of an extreme emergency where you need to completely release from the kite, use the quick release on the kite leash. This will completely detach the kite and control system from the user, and could therefore hit anything or anyone downwind causing damage, serious injury or death. RIDE RESPONSIBLY.

1st FLY 

WARNING:
NEVER LAUNCH A KITE DIRECTLY DOWNWIND OF YOU IN THE POWER ZONE!

Launching and Landing

Instruct your partner on how to handle the kite and agree on a sign together for the release and landing. They should hold the kite in the center of the leading edge at the edge of the window and double check that all lines are clear. It is possible for lines to get wrapped around the tip so make sure they understand that all lines must run clearly from each attachment point.

Before you give the signal to release make sure you are 100% confident that all lines are clear. Then give your pre-agreed signal for your partner to release the kite and gently launch the kite to the top of the window.   

Landing the kite use the same principles >> Most importantly keep your head clear, be smooth and controlled with the kite and land before you are too tired or overpowered.

WARNING:
Make sure you grab the correct side of the bar
– we colour code the bar red for left.

Water Relaunching

Once the kite is face down with the leading edge touching the water:

  1. Pull the bar in towards you to increase back line tension.
  2. Pull one of the rear lines (line attached to bar ends) towards your body with constant tension. Look at the kite as you pull the rear line and be ready to release some tension as the kite flips up onto its tip.
  3. Once on its tip the kite will work its way to the edge of the wind window. This requires some skill and finesse in order to not stall the kite backwards onto the water.
  4. When the kite is at the edge of the window make sure you have the bar pushed at least half de-powered and steer the kite gently to the top of the window.

NOTE: If the kite somehow lands nose down but with the tips facing away, pull one of the rear leader lines to help the kite blow around to the correct position then follow the steps above for getting the kite re-launched.

Self Rescue

If you get in trouble out in the water, there is a simple way to self rescue yourself.

Firstly kill the kite’s power with the flag out system by releasing the chicken loop. The kite will flag out and drop to the water.

Lines are dangerous in this situation so make sure you wind the flag out frontline around the bar at least 10x to disable the kite. Then wrap all the lines together onto the bar as you normally would. You will end up at the kite ideally with the lines wrapped tightly and neatly on the bar. Make a few half hitches to secure the lines.

Once you have got hold of the kite you can drop the bar. When you have reached the kite, take hold of the bridle lines at each wingtip. Hold both bridals to use the kite as a sail to get back to shore safely.

Clamcleat Trimmer

To release the line from the cleat teeth, first pull out and down to unlock the line from the teeth, then set the trimmer line to the desired amount.

Pull the trimmer line down to de-power the kite. This is needed if you are overpowered, for unhooked riding, or if you are walking on the beach or snow.

Release the trimmer line away from you to increase kite power.

1: FULL POWER

2: HALF POWER

3: FULL DEPOWER

Trimming For Line Stretch

All lines should be maintained as close to equal length as possible. Flying lines can stretch over time, generally the front lines stretch more as these take the majority of the load.

To check your lines, unwind the lines from the bar and have a partner hold the lines even at the bar end. Taking hold of the lines at the other end, pull on the lines to check they are even. If the lines are not even you may either;

1) Stretch out the shorter lines. Attach the shorter lines to a car hitch or something very solid. Then take hold of the bar and pull with enough force to stretch the line. Do this to any lines that are shorter and re-check that all 4 lines are equal length.

2) Use the Leader Line trimming knots located underneath the bar ends.

Packing

  • Detach the flying lines from the kite, and wrap them around the bar ends in a figure of eight. Use the elastic line retainers to keep them held in place
  • To deflate the kite first release all one pump plastic clips. Then gently open the OUT valve on the leading edge. This large valve dumps the air quickly from the kite.
  • Roll the upwind tip in to the centre. Then roll the opposite side.
  • Screw the inflate/deflate valve in and close the neoprene cover.
  • Fold the kite in 3 sections from trailing edge to fit in bag.

Care & Maintenance

Kites are very technical products and are used in the harsh marine environment. If you use common sense and care for your equipment it will look after you and keep its factory trim for hundreds of hours.

Never pump up your kite on a rough surface which may have sharp objects.

Be very careful with your flying lines. If you catch them on a rock or sharp object thoroughly check each one and we recommend you replace your lines. Also make sure there are no knots in the lines. Knots weaken the line by up to 50%.

Once you have pumped up secure your kite with sand or use sandbags  – Do not use heavy objects or even your board, the fins have been known to rip kites.

Never leave your kite on the beach un-used for long periods of time in the sun and wind. The trailing edge flapping and sand hitting the sail cloth will severely shorten the kite’s life. UV also shortens the lifespan of a kite so pack away when not using your kite.

Never pack away your kite wet, only when 100% dry – This will damage the cloth and its coatings and may lead to dye running. This is not valid for warranty.

Never leave your kite inside your car in direct sunlight.

Always clean your control system with fresh water after every session, and reload/release the Quick Release to check the system is functioning correctly. Store your control system with the Quick Release open. Reload the next time you set up your kite.

When inflating the bladders always inflate slowly and ensure the bladders are inflating correctly in the struts or leading edge. If you see a twist or something looks strange STOP pumping immediately and check bladders. They may need re-inserting to ensure they inflate properly.

Repairs

We supply a repair kit with the following contents:

1. A4 pieces of sail cloth

2. A4 piece of Dacron

3. 1 x length of 50mm wide sticky black repair tape

4. 6” x 3” Tear-Aid bladder repair patch

5. 2 Alcohol wipes

6. One pump clip / hose / hose retainer

If you have a major repair like a tear across panels, struts or the leading edge take the kite to your local sail repair shop. For minor tears and bladder punctures you can easily fix these yourself with the repair kit supplied with the kite.

Watch repair and maintenance videos