EXP V1

EXP V1

Expert and Expeditions

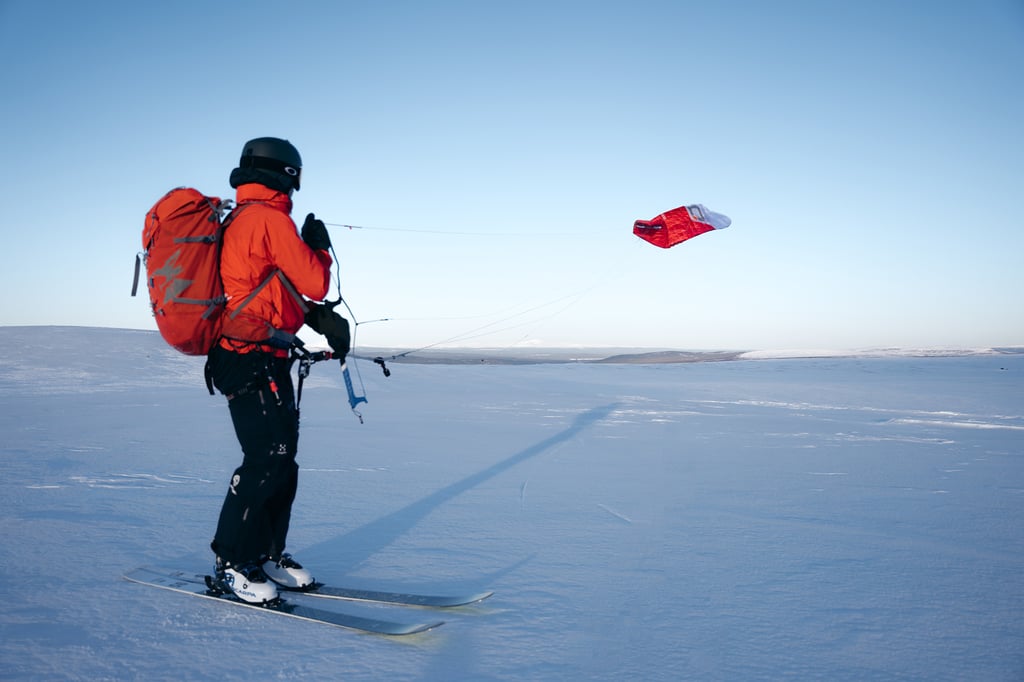
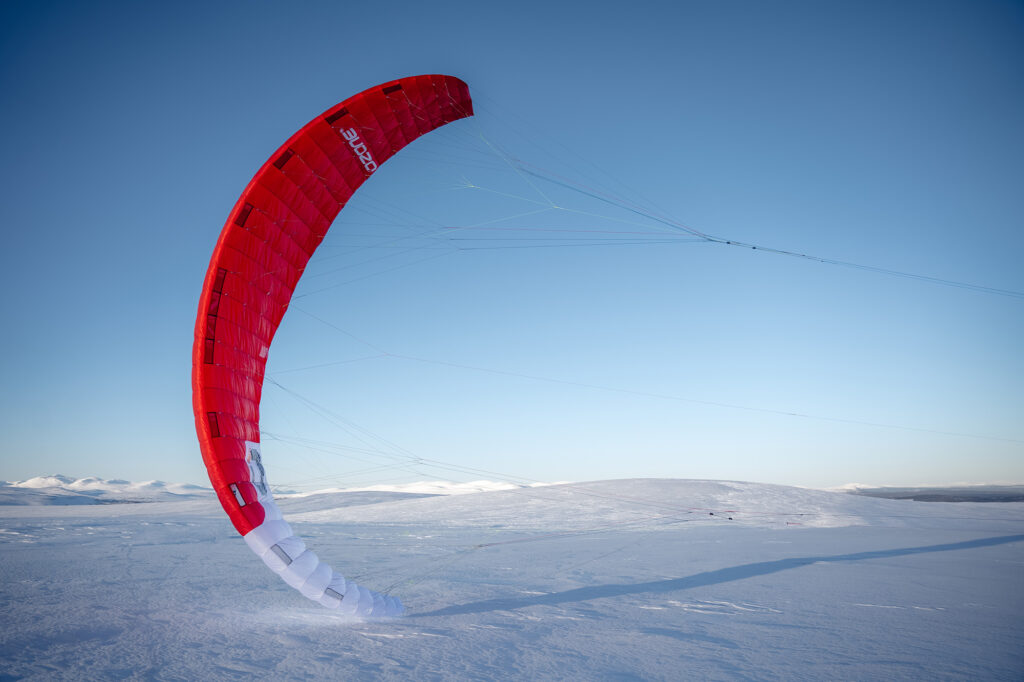
L’EXP V1 è stato sviluppato per gli snowkiters esperti ed esploratori come kite foil a celle aperte di alto livello.

Trova un rivenditore
Estimated current manufacturing time: 36 days

Ultraleggero

  • Progettato per rider esperti ed esplorazione
  • Sistema di sgancio interno Re-Ride leader del settore
  • Materiali Ultra Light
  • Kite foil a celle aperte di alto livello
Ultraleggero

Progettato per rider esperti ed esplorazione
Sistema di sgancio interno Re-Ride leader

Self Land e stai sicuro

Progettato con un bordo d’attacco a celle parzialmente aperte, l’EXP V1 presenta anche il nostro rivoluzionario sistema Internal Re-Ride Release, che offre la capacità cruciale di auto-atterrare in sicurezza un kite in condizioni estreme, mentre ci si avventura in alta montagna o su lunghe distanze sulla neve.

Grazie al prezioso feedback del nostro team di esperti di snowkite, Jonas Lengwiler (vincitore di Vake e Ragnarok) e Håkon Mæland, specialista di spedizioni in Groenlandia e guida, abbiamo sviluppato l’EXP V1 come strumento da sogno per avventure di snowkite senza limiti.

Self Land e stai sicuro
Progettato con un bordo d’attacco a celle parzialmente aperte, l&#8217

Nato leggero, geneticamente forte

Non solo abbiamo progettato l’EXP V1 con la migliore combinazione di materiali per essere il più leggero possibile, ma anche per garantire un’eccellente durata.

Anche le prestazioni erano una priorità fondamentale, quindi abbiamo fatto in modo che le briglie fossero facili da smistare e maneggiare, anche a temperature rigide.

Quando le condizioni si fanno estreme, l’EXP V1 è in grado di affrontare qualsiasi situazione, anche quando traina slitte molto cariche.

PESO RIDOTTO, PRESTAZIONI ALTAMENTE TECNICHE

L’EXP ha un design leggero a doppia superficie, con un rapporto di aspetto medio-alto e combina 38 – 44 celle, a seconda delle dimensioni dell’aquilone.

L’elevato numero di celle fa sì che le nervature siano posizionate più vicine tra loro, producendo una superficie ultra liscia. Ciò corrisponde a una riduzione della resistenza aerodinamica e a un profilo pulito, che si traduce in un’efficienza di volo superiore.

AVVENTURA

L’EXP V1 viene fornito con una leggera Compressor Bag per mantenere il kite imballato e fissato il più piccolo possibile. Si consiglia di aggiungere la Technical Mountain Bag per trasportare più kite e tutta l’attrezzatura essenziale nelle missioni e nelle spedizioni backcountry più lunghe.

Sia che sogniate una breve spedizione per liberare la mente, sia che vogliate navigare in condizioni estreme e raggiungere gli angoli più remoti del pianeta coperti di neve, l’EXP V1 è il vostro compagno di avventura definitivo.

 AVVENTURA 
L’EXP V1 viene fornito con una leggera Compressor Bag per mantenere il kite imball

Rivoluzionario sistema di rilascio interno re-ride

Il nostro esclusivo sistema Internal Re-Ride Release è il sistema di sgancio e atterraggio per snowkite leader del mercato. Ha reso la risalita in montagna e l’imballaggio molto più piacevole, sicuro, facile e veloce per l’utente.

Quando viene attivato, l’aquilone si depotenzia all’istante senza aggrovigliarsi e rimane a terra pronto per essere rilanciato non appena si è pronti a ripartire.

Un altro vantaggio del nostro sistema di rilascio interno Re-Ride è l’opzione terra e sicurezza.

  • Per atterrare il kite basta tirare la 5a linea fino a raggiungere l’Secure Loop che si trova a circa 2 m dalla barra di controllo. Il Kite si blocca e cade a terra senza alcun tiro.
  • Usa il Secure Loop nella 5a linea per mantenere il kite a terra: può essere agganciato alla clip del leash o sopra l’estremità della barra. Ciò rende l’atterraggio e l’imballaggio del kite sicuri e facili anche con venti forti.
  • La maniglia del freno che passa tra le back line del sistema di controllo facilita il lancio reverso e l’atterraggio con vento leggero.
Rivoluzionario sistema di rilascio interno re-ride
Il nostro esclusivo sistema Internal Re-Ride Rele

NOTE IMPORTANTI:

  • I materiali EXP V1 sono stati ampiamente utilizzati sui nostri kite e parapendio Ultra Light dal 2011. L’aquilone deve essere curato con attenzione. Ha bisogno di un pilota esperto che sappia come tenere il kite in aria e come gestirlo delicatamente a terra.
  • Usare sempre la maniglia del freno quando si fa volare un aquilone foil. Si tratta della maniglia/linea che passa tra le back line del sistema di controllo. Questa maniglia facile da afferrare facilita il gonfiaggio, l’auto-atterraggio e il lancio reverso.
  • L’EXP V1 può essere utilizzato con i sistemi di controllo Contact Snow o Snow EXP. Non deve essere utilizzato con un sistema di controllo a 4 linee, in quanto non beneficerebbe del sistema di sgancio interno Re-Ride.
  • L’EXP V1 è realizzato su ordinazione. Contattare il proprio negozio/distributore locale per conoscere i tempi di produzione.
  • Il sistema Speed e le briglie devono essere regolarmente controllati e mantenuti in assetto corretto, altrimenti il kite non funzionerà come previsto. Se sono usurati o non corrispondono alle specifiche di fabbrica (+ o – 15 mm), devono essere sostituiti.

Ultraleggero

  • Progettato per rider esperti ed esplorazione
  • Sistema di sgancio interno Re-Ride leader del settore
  • Materiali Ultra Light
  • Kite foil a celle aperte di alto livello
Ultraleggero

Progettato per rider esperti ed esplorazione
Sistema di sgancio interno Re-Ride leader

Self Land e stai sicuro

Progettato con un bordo d’attacco a celle parzialmente aperte, l’EXP V1 presenta anche il nostro rivoluzionario sistema Internal Re-Ride Release, che offre la capacità cruciale di auto-atterrare in sicurezza un kite in condizioni estreme, mentre ci si avventura in alta montagna o su lunghe distanze sulla neve.

Grazie al prezioso feedback del nostro team di esperti di snowkite, Jonas Lengwiler (vincitore di Vake e Ragnarok) e Håkon Mæland, specialista di spedizioni in Groenlandia e guida, abbiamo sviluppato l’EXP V1 come strumento da sogno per avventure di snowkite senza limiti.

Self Land e stai sicuro
Progettato con un bordo d’attacco a celle parzialmente aperte, l&#8217

Nato leggero, geneticamente forte

Non solo abbiamo progettato l’EXP V1 con la migliore combinazione di materiali per essere il più leggero possibile, ma anche per garantire un’eccellente durata.

Anche le prestazioni erano una priorità fondamentale, quindi abbiamo fatto in modo che le briglie fossero facili da smistare e maneggiare, anche a temperature rigide.

Quando le condizioni si fanno estreme, l’EXP V1 è in grado di affrontare qualsiasi situazione, anche quando traina slitte molto cariche.

PESO RIDOTTO, PRESTAZIONI ALTAMENTE TECNICHE

L’EXP ha un design leggero a doppia superficie, con un rapporto di aspetto medio-alto e combina 38 – 44 celle, a seconda delle dimensioni dell’aquilone.

L’elevato numero di celle fa sì che le nervature siano posizionate più vicine tra loro, producendo una superficie ultra liscia. Ciò corrisponde a una riduzione della resistenza aerodinamica e a un profilo pulito, che si traduce in un’efficienza di volo superiore.

AVVENTURA

L’EXP V1 viene fornito con una leggera Compressor Bag per mantenere il kite imballato e fissato il più piccolo possibile. Si consiglia di aggiungere la Technical Mountain Bag per trasportare più kite e tutta l’attrezzatura essenziale nelle missioni e nelle spedizioni backcountry più lunghe.

Sia che sogniate una breve spedizione per liberare la mente, sia che vogliate navigare in condizioni estreme e raggiungere gli angoli più remoti del pianeta coperti di neve, l’EXP V1 è il vostro compagno di avventura definitivo.

 AVVENTURA 
L’EXP V1 viene fornito con una leggera Compressor Bag per mantenere il kite imball

Rivoluzionario sistema di rilascio interno re-ride

Il nostro esclusivo sistema Internal Re-Ride Release è il sistema di sgancio e atterraggio per snowkite leader del mercato. Ha reso la risalita in montagna e l’imballaggio molto più piacevole, sicuro, facile e veloce per l’utente.

Quando viene attivato, l’aquilone si depotenzia all’istante senza aggrovigliarsi e rimane a terra pronto per essere rilanciato non appena si è pronti a ripartire.

Un altro vantaggio del nostro sistema di rilascio interno Re-Ride è l’opzione terra e sicurezza.

  • Per atterrare il kite basta tirare la 5a linea fino a raggiungere l’Secure Loop che si trova a circa 2 m dalla barra di controllo. Il Kite si blocca e cade a terra senza alcun tiro.
  • Usa il Secure Loop nella 5a linea per mantenere il kite a terra: può essere agganciato alla clip del leash o sopra l’estremità della barra. Ciò rende l’atterraggio e l’imballaggio del kite sicuri e facili anche con venti forti.
  • La maniglia del freno che passa tra le back line del sistema di controllo facilita il lancio reverso e l’atterraggio con vento leggero.
Rivoluzionario sistema di rilascio interno re-ride
Il nostro esclusivo sistema Internal Re-Ride Rele

NOTE IMPORTANTI:

  • I materiali EXP V1 sono stati ampiamente utilizzati sui nostri kite e parapendio Ultra Light dal 2011. L’aquilone deve essere curato con attenzione. Ha bisogno di un pilota esperto che sappia come tenere il kite in aria e come gestirlo delicatamente a terra.
  • Usare sempre la maniglia del freno quando si fa volare un aquilone foil. Si tratta della maniglia/linea che passa tra le back line del sistema di controllo. Questa maniglia facile da afferrare facilita il gonfiaggio, l’auto-atterraggio e il lancio reverso.
  • L’EXP V1 può essere utilizzato con i sistemi di controllo Contact Snow o Snow EXP. Non deve essere utilizzato con un sistema di controllo a 4 linee, in quanto non beneficerebbe del sistema di sgancio interno Re-Ride.
  • L’EXP V1 è realizzato su ordinazione. Contattare il proprio negozio/distributore locale per conoscere i tempi di produzione.
  • Il sistema Speed e le briglie devono essere regolarmente controllati e mantenuti in assetto corretto, altrimenti il kite non funzionerà come previsto. Se sono usurati o non corrispondono alle specifiche di fabbrica (+ o – 15 mm), devono essere sostituiti.
Ozone EXP-V1 Expert and Expeditions

Ozone EXP-V1 Expert and Expeditions

Vantaggio della proprietà in fabbrica

Vantaggio della proprietà in fabbrica

Ozone possiede una fabbrica propria dove vengono prodotti tutti i kite, le ali, le tavole, gli aliscafi, i parapendio, le ali da velocità e gli accessori. Garantendo un controllo di qualità manuale e i migliori materiali in ogni fase, ci sono anche eccellenti condizioni di lavoro per tutti i 1000 dipendenti.

Progettato con OZ-CAD

Progettato con OZ-CAD

Il futuro è adesso. Tutti i kite e le ali di Ozone sono progettati con il nostro software CAD altamente avanzato e personalizzato, che controlliamo e modifichiamo ad ogni nuovo prodotto. Grazie a sviluppi tecnici specifici, i nostri progettisti possono massimizzare le prestazioni e ridurre al minimo gli sprechi.

Sistema di rilascio re-ride interno

Sistema di rilascio re-ride interno

Il nostro esclusivo sistema di rilascio re-ride interno è il sistema di rilascio e atterraggio per lo Snowkite leader del mercato. Ha reso la risalita in montagna e l'imballaggio molto più piacevole, sicuro, facile e veloce per l'utente. Quando attivato il kite si de-potenzia istantaneamente senza aggrovigliarsi, e si siederà a terra pronto per il rilancio quando sarai di nuovo pronto.

Materiali ultraleggeri ad alte prestazioni

Materiali ultraleggeri ad alte prestazioni

I materiali Ultra Light di alta qualità sono stati ampiamente utilizzati sui nostri aquiloni e parapendio dal 2011. L'utilizzo di materiali ultraleggeri si traduce in un vero aumento delle prestazioni: l'aquilone si gonfia più velocemente, vola più velocemente ed è più reattivo anche nella brezza più leggera.

Sistema di velocità a doppia puleggia

Sistema di velocità a doppia puleggia

Utilizzo di pulegge Ronstan Orbit a basso attrito per ridurre l'usura e l'affaticamento del pilota, migliorando al contempo la sensazione e le prestazioni dell'aquilone.

Rinforzi del profilo L.E

Rinforzi del profilo L.E

Il bordo d'attacco è rinforzato con stecche flessibili in plastica leggera per mantenere la forma del profilo durante i cambiamenti dell'angolo di attacco e il flusso d'aria turbolento. Ciò migliora drasticamente le prestazioni complessive in quanto il foil rimane fedele alla forma progettata.

Cinghie interne Diagonali

Cinghie interne Diagonali

Le cinghie interne per campata funzionano all'unisono con nervature diagonali ottimizzate, distribuendo il carico dalle briglie in modo uniforme ed efficace. Ciò aumenta l'equilibrio strutturale interno, consentendo al contempo alle superfici superiore e inferiore di mantenere il profilo progettato senza essere distorte da tensioni o carichi indiretti.

Linee di briglie con guaina

Linee di briglie con guaina

Linee di briglia Dyneema con guaina a bassa elasticità di alta qualità per la massima resistenza e prestazioni. Questa è la stessa linea di briglie che abbiamo utilizzato sulla nostra gamma Snowkite negli ultimi 10 anni.

Pulire i Wing Tips

Pulire i Wing Tips

Le celle sigillate con il Velcro sulle punte possono essere aperte per la pulizia dell'aquilone. Pulisci sempre il tuo aquilone svuotando neve o detriti in quanto ciò prolungherà la vita dell'aquilone e lo aiuterà a volare come progettato.

Tuned Bridle Geometry

Tuned Bridle Geometry

Lavoriamo molto durante il nostro processo di ricerca e sviluppo per sviluppare una gamma di misure in sintonia fra di loro. Ogni aquilone ha un layout a briglia unico, testato individualmente e messo a punto per massimizzare la sensazione e le prestazioni.

Connettori di linea infallibili

Connettori di linea infallibili

I connettori di linea infallibili impediscono il montaggio errato delle linee di volo all'aquilone.

Snow Kite Compressor Bag

Snow Kite Compressor Bag

  • Una borsa semplice, leggera ed efficiente
  • Perfetto per i viaggi e le uscite in Back Country, meno ingombro e peso con una buona protezione per il vostro kite.
  • Impacchettare e comprimere in un volume minimo
  • Da abbinare alla Technical Mountain Bag per trasportare più kite e tutta l'attrezzatura essenziale nelle missioni di backcountry più lunghe.

User Manual

Thank you for purchasing this Ozone product. Our mission is to design and build quality products with cutting edge performance that are easy, fun and safe to use.

At Ozone we are passionate about sports, and it is this passion that drives our design team to perfect and develop products that we love to ride with. We are proud of the quality of our products, and are constantly searching for the best components and materials to use in our designs. We manufacture in our own high-quality production facility in Vietnam, which guarantees a build quality that we are proud to put the Ozone name on. A close look at one of our products reveals that same superior quality and construction that ensures that every Ozone product will enjoy a long life, with consistent performance and aesthetics. To view the factory video visit our website www.flyozone.com. Many dynamic action sports carry inherent risks but with common sense and education from qualified instructors means you can easily enjoy these incredible sports. Accidents generally happen due to a lack of experience, changing weather conditions or from using equipment not suited to the riders’ ability and/or conditions. Always take the time to learn safely with qualified instruction and you will progress far quicker. Ride safe Team Ozone

Release of Liability

OZONE KITESURF LTD / OZONE KITES LTD RELEASE OF LIABILITY, CLAIM WAVIER, ASSUMPTION OF RISK

By assembling and/or using this Ozone product, you agree that you have read and understood the entire Ozone product owners manual, including all instructions and warnings contained in that manual, prior to using the Ozone product in any way. You additionally agree that you will ensure any additional or subsequent user of your Ozone product will read and understand the entire Ozone product owners manual, including all instructions and warnings contained in that manual, prior to allowing that person to use your Ozone product.

ASSUMPTION OF RISK

Use of the Ozone product and any of its components involve certain risks, dangers, and hazards which can result in serious personal injury and death to both the user and to non-user third parties. In using this Ozone product, you freely agree to assume and accept any and all known and unknown risks of injury to you and third parties while using this equipment. The risks inherent in this sport can be greatly reduced by abiding by the warning guidelines listed in this owner manual and by using common sense.

RELEASE AND WAIVER OF CLAIMS

In consideration of the sale of the Ozone product to you, you herby agree to the fullest extent permitted by law, as follows;

TO WAIVE ANY AND ALL CLAIMS that you have or may in the future have against Ozone Kitesurf LTD or Ozone Kites LTD and all related parties resulting from use of the Ozone product and any of its components.

TO RELEASE Ozone Kitesurf LTD or Ozone Kites LTD and all related parties from any and all liability for any loss, damage, injury or expense that you or any users of you Ozone product may suffer, or that your next of kin may suffer, as a result of the use of the Ozone product, due to any cause whatsoever, including negligence or breach of contract on the part of Ozone Kitesurf LTD or Ozone Kites LTD and all related parties in the design or manufacture of the Ozone product and any of its components.

In the event of your death or incapacity, all provisions contained herein shall be effective and binding upon your heirs, next of kin, executors, administrators, assigns, and representatives. Ozone Kitesurf LTD or Ozone Kites LTD related parties have not made and expressly deny and oral or written representations other than what is set forth herein and the Ozone product owners manual.

Warranty

Ozone warrants this product according to the laws in force against any major manufacturing defect. This warranty is subject to the following limitations:

  • The warranty is valid only when the product is used for its intended use, and does not cover products used in rental or teaching operations.
  • Ozone will make the final warranty determination, which may require inspection and/or photos of the equipment, which clearly show the defect(s). If necessary, this information must be sent to the Ozone dealer, postage prepaid.
  • If a product is deemed to be defective by Ozone, the warranty covers the repair or replacement of the defective product only.
  • Ozone will not be responsible for any costs, losses, or damages incurred as a result of loss of use of this product. The warranty does not cover damage caused by misuse, abuse, neglect or normal wear and tear including but not limited to; assembling with other than Ozone components, damage due to excessive sun exposure, damage caused by improper handling or storage, and damage caused by anything other than defects in material and workmanship.
  • This warranty is voided if any unauthorized repair, change or modification has been made to any part of the equipment. The warranty for any repaired or replaced equipment is good from the date of the original purchase only. The original purchase receipt must accompany all warranty claims.
  • The name of the retailer and date of purchase must be clear and legible.
  • There are no warranties that extend beyond the warranty specified herein.

WARRANTY CLAIMS

  • Warranty claims must be sent to Ozone by an official Ozone dealer or country distributor.
  • Warranty claims must be processed and be issued a return authorization prior to shipping to the Ozone dealer the product was purchased from.

Warnings & Safety Precautions

This manual refers to the current product it comes with. No information contained herein applies to previous and/or other products or components. Always read and understand all warnings and instructions for any other product or component being used. To read previous product manuals go to www.flyozone.com

Read the following points before assembling and/or using this product:

General Warnings:

  • Before using this product you must take lessons from a certified instructor/school.
  • Always wear a Coast Guard approved Personal Flotation Device when using this product near or on the water.
  • Always carefully inspect all of your equipment before using it.
  • The use of this product exposes the user to many unavoidable and unexpected risks, dangers and hazards.
  • Always use extreme caution when using this product.
  • Misuse of this product can cause serious injury or death.
  • Only use this product if you are in good physical health.
  • Never act in a careless manner when using this product.
  • You are responsible for your own safety and the safety of others around you when using this product.
  • If you are under the age of 18 you should have your parents or legal guardian read all warnings and instructions. You should not use this product unless you are under proper guidance and supervision.
  • Do not use this product if you are under the influence of alcohol, drugs or medications.

Kite and Control System Warnings:

  • Always have a partner when launching and landing your kite.
  • Always learn to use a small trainer kite before attempting to use a larger power kite.
  • Never allow anyone who is not familiar with power kites to use this product.
  • Never use this product without a safety leash system. A loose kite is extremely dangerous.
  • The kite/control system is equipped with passive safety systems, which need to be activated by the user for them to work.
  • The leash system is not a permanent attachment to this product. Never permanently attach yourself to the kite or any of its components.
  • Never use this kite with another control system or safety leash. Only use the control system that is supplied with this kite. Other brands are not compatible with this design therefore and the safety system will not work.
  • Always wear protective equipment when using this product, for example; helmet, gloves, shoes, protective eyewear etc.
  • Always use a high quality and well maintained kite specific harness.
  • Get yourself used to the way all quick release devices work by testing them often in a non-emergency situation.
  • Rinse all quick release devices in fresh water after each use. Quick release devices have a limited lifetime and must be checked and replaced often.
  • Always activate and re-load all safety systems to familiarize yourself with how they work. This is the only way to be sure that you know how to use them in all situations, and that they are correctly loaded and safe for use.
  • The quick release trim loop and kite leash equipped with a quick release must be replacement after 250hours of use. Replace them before if you see any sign of wear. The wearing of quick release devices is not considered a warranty issue.
  • Never touch the flying lines when the kite is in use. Flying lines are extremely dangerous while under tension and can cause serious injury or death.
  • Never use this product with worn lines. A line that breaks while under tension can cause serious injury or death.
  • Always check your flying lines for knots before each use. Knots greatly reduce the strength of the lines.
  • Stay away from tangled flying lines unless the kite is secured to the ground. An unsecured kite can self launch unexpectedly, and can cause serious injury or death.
  • Never allow yourself, or anyone else, to get between the control bar and the kite when using this product.

Choose safe weather conditions and locations:

  • Be aware of the general risks associated with action sports.
  • Ensure you understand all weather forecasts and prepare for changes in weather.
  • Never learn to use this product in more than 10 knots of wind.
  • We highly recommend you purchase a wind speed indicator to be able to measure wind speeds. Study the wind guide to understand wind speeds.
  • Never use this product in high winds.
  • Never use this product in thunderstorm and lightning conditions.
  • Only use this product when you can remain in a standing position.
  • Never use this product in wind conditions that are above your ability level.
  • Never use this product near or on the water in offshore wind condition unless you are an expert swimmer.
  • Always observe local rules and regulations when using this product.
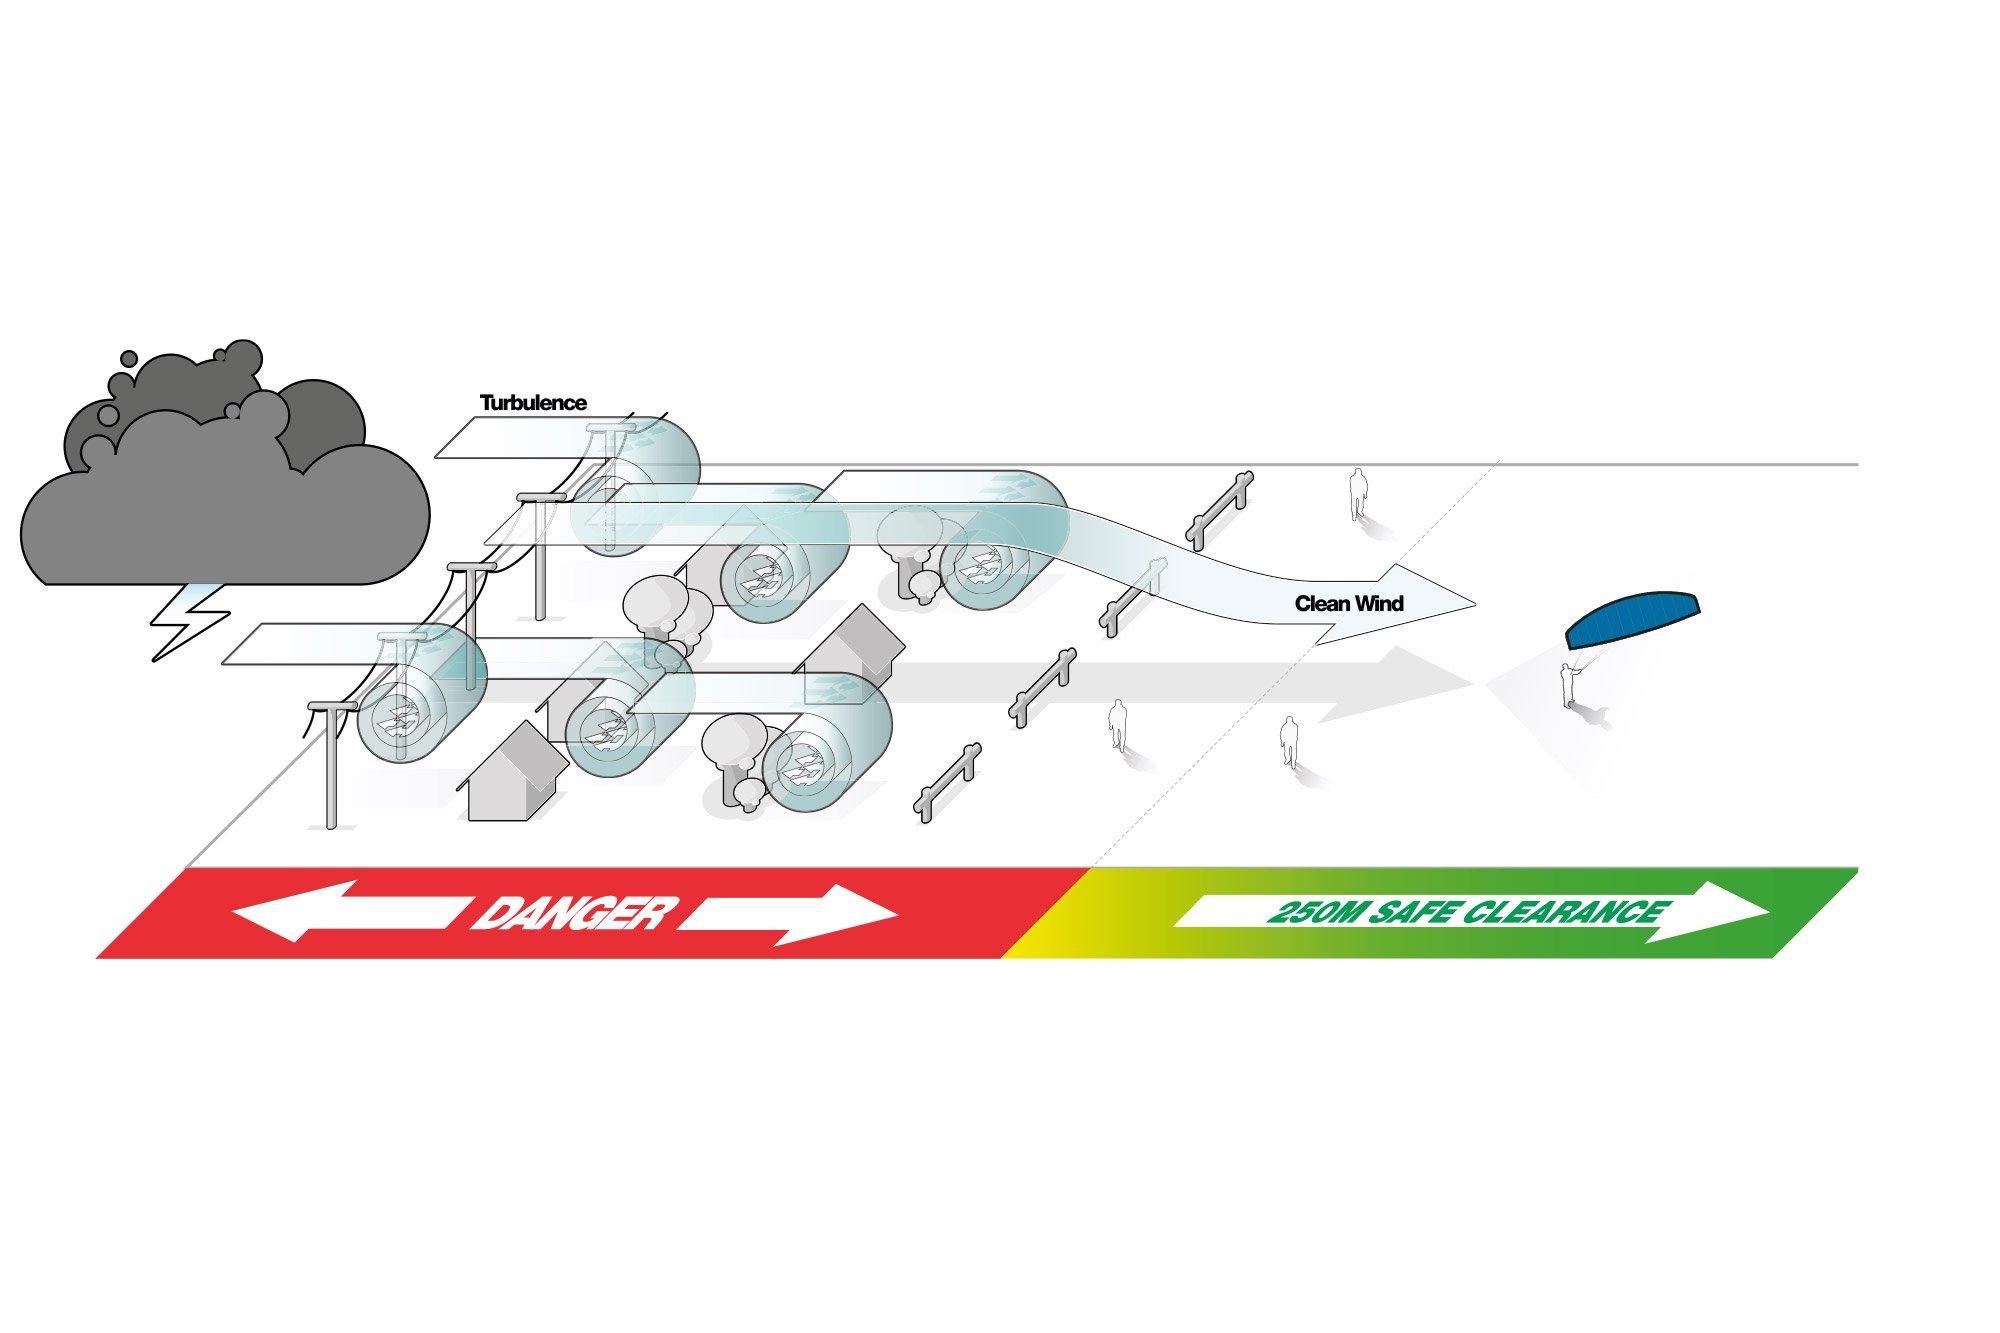
  • Never use this product near power lines, telephone poles, trees, bushes, roads, automobiles or airports.
  • Only use this product when you have at least 100m of clear space downwind, and on both sides of your launching position. The power of the kite can pull you downwind unexpectedly with great force.
  • Do not fly your kite over other people or pets. Spectators should remain upwind of you when using this product.
  • Never use this product on crowded beaches or fields.
  • Practice launching and landing procedures, and self rescue techniques before using this product near the water.


Set Up:

1: Speed System

2: Line Label System

3: Back Lines

4: Front Lines

5: Brake handle

6: Clamcleat Trimmer

7: De-Power line

8: Flag-out Line

9: Quick Release Handle

10: Quick Release loop

11: Flag-out Loop

12: Finger

Kite Set Up

IMPORTANT: Set up your kite for the first time in wind less than 12kph  to ensure your safety and the safety of others.

  • Unfold the kite on the ground, in the direction of the wind.
  • Fold over the upwind wing tip and put some snow, sand, or your board on the tip to secure the kite.
  • Take the speed system from the Velcro retainer and lay out on the ground. Untangle if necessary.
  • Take the bar and unwind the lines at 90 deg to the kite. (Bars are delivered with the flying lines already connected.)
  • Connect the lines to the kite following the numbered label system ensuring all lines are free from each other.

Now you’re ready to fly!

Bar Set Up

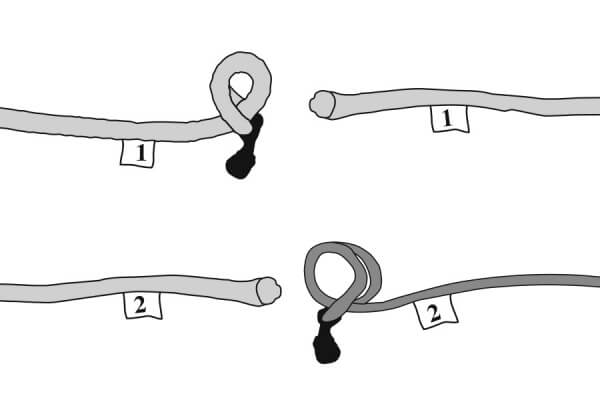
All line to kite connections are made using a “LARKS HEAD” knot.

Always double check your lines before launching. Wrongly attached lines will stop the kite flying correctly and could therefore mean you have no control of the kite putting yourself in a dangerous situation.

Security

IMPORTANT: All Ozone release systems require the user to operate them manually in the case of an emergency. It is imperative the kite is set-up as shown in the manual, incorrect setup will compromise the operation of the release system.  All lines and de-power systems must be tangle free and the kite leash connected in the right way, see pictures.

Quick Release Connection

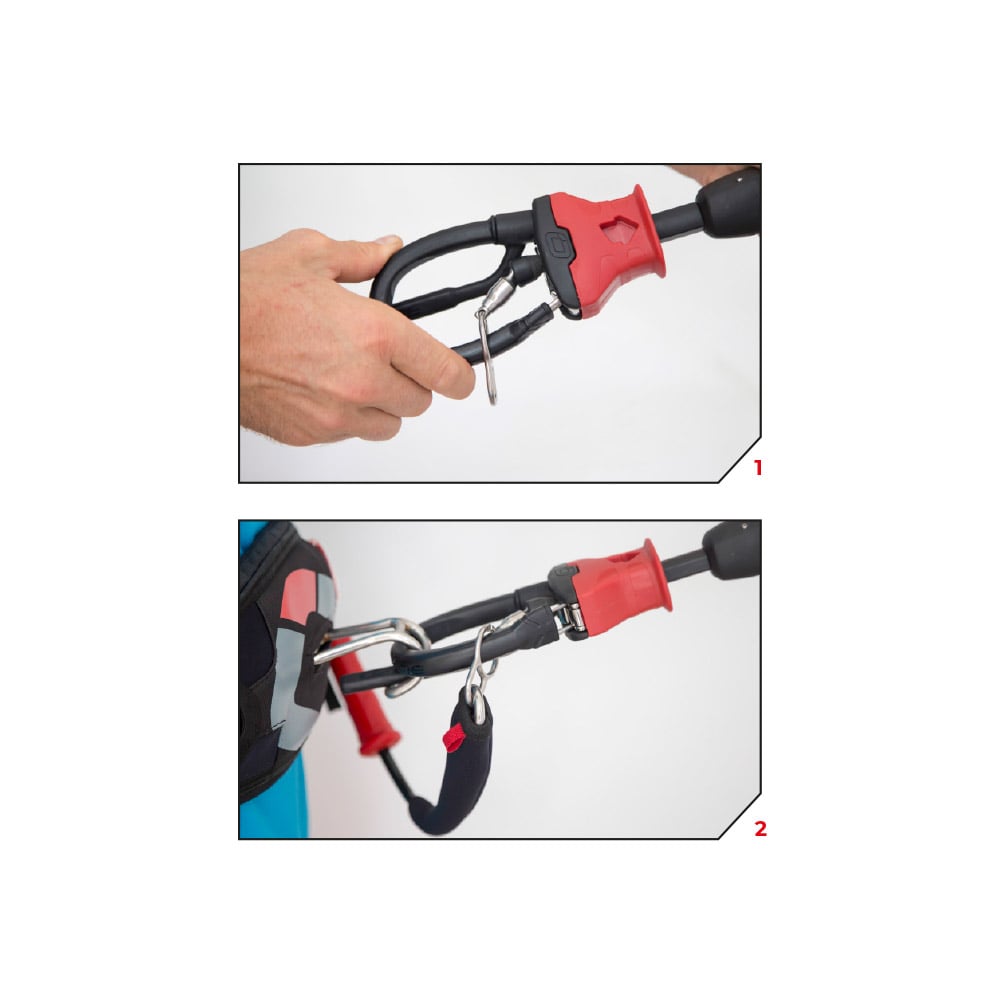
The Quick Release is the primary connection to the kite. Make sure you connect to the Quick Release using the finger as shown in the pictures.

Below the Bar Release (Recommended Mode)

All riders should attach their Kite Leash to the Flag Out System. This is the small eyelet on the Stainless Steel Swivel Ring.
When the release is activated, the kite will flag out and fall to the water/ground.

In all situations make sure that all lines are clear of all working release systems and the kite leash is connected in the right way.

Advanced Riders (Use at your own risk, not recommended) 

Riders performing unhooked tricks or who are more confident and have spent many hours Kiting can attach in Expert mode, where the loop part runs through the large eye of the steel ring. When letting go of the bar in Expert mode (without activating the release e.g. missed handle pass) the kite will depower but WILL NOT flag out.

Be aware in this situation, the Quick Release will be out of reach and can therefore not be released. When hooked in and activating the Quick Release the steel ring automatically slips off and the kite will flag out.

1st Stage of  Release

Activate the Quick Release as shown in the pictures. Providing your leash is attached to the flag out system the kite will 100% depower.

Reloading the Quick Release

Final Stage of Release (in an extreme emergency)

In the case of an extreme emergency where you need to completely release from the kite, use the quick release on the kite leash. This will completely detach the kite and control system from the user, and could therefore hit anything or anyone downwind causing damage, serious injury or death. RIDE RESPONSIBLY.

1st FLY 

WARNING: 
Never fly your kite in strong wind for the 1st time. Do not attempt to fly a kite without being taught by a certified kite instructor.

Light Winds

If the wind is light (less than 12 kph) lay trailing edge directly into the wind with sand/snow to secure kite. Place yourself directly in front of the kite. Hook into the Quick Release.

Step backwards while pushing the bar forward. The kite will inflate and take off.
In light winds, to assist launching, gently grab and pull on the front lines.

Strong Winds

If the wind is strong (more than 12 kph), lay kite directly downwind with sand/snow or board securing the upwind tip.

Place yourself at 45 deg to the kite upwind. Hook into the Quick Release. Step backwards while pulling the down wind side of the bar to ease kite into the air.  The kite will inflate and take off on the side of the wind window.

Landing

Option 1:

Release the Primary Security.

Ensure the safety leash is connected to the total flag out line (see pictures, this is the recommended safety option). Activate the Quick Release and the kite will flag out completely and fall to the ground. (see SECURITY)

Option 2:

Pull the 5th line quickly through the Quick Release for about 2m. The kite will loose its power and stall to the ground. The more you pull, the less power. To secure the kite on the ground, hook the loop you find in the 5th line about 2m up, into your spreader hook, ground stake or bar horn.

Option 3:

Grab the Brake Handle with one hand then pull it behind your back and HOLD.

  • The kite will stall evenly and reverse to the ground.
  • Take care not to release the Brake Handle until the kite has been secured with sand or snow.

Option 4:

Fly the kite to the edge of the window and lower it gently and controlled.

  • Have a friend catch and take control of the kite.
  • Run towards the kite to take all tension from the lines.

Reverse Relaunch

When the kite is landed face down, take the Brake Handle  firmly, pull and hold. The kite will reverse from the ground, turn over, and land leading edge up. The kite is now ready to launch normally.
See “LAUNCHING”.

Clamcleat Trimmer

To release the line from the cleat teeth, first pull out and down to unlock the line from the teeth, then set the trimmer line to the desired amount.

Pull the trimmer line down to de-power the kite. This is needed if you are overpowered, for unhooked riding, or if you are walking on the beach or snow.

Release the trimmer line away from you to increase kite power.

Triming for Line Stretch

All lines should be maintained as close to equal length as possible. Flying lines can stretch over time, generally the front lines stretch more as these take the majority of the load.

To check your lines, unwind the lines from the bar and have a partner hold the lines even at the bar end. Taking hold of the lines at the other end, pull on the lines to check they are even. If the lines are not even you may either;

1)
Stretch out the shorter lines. Attach the shorter lines to a car hitch or something very solid. Then take hold of the bar and pull with enough force to stretch the line. Do this to any lines that are shorter and re-check that all 4 lines are equal length.

2) Use the Leader Line trimming knots..

Packing

  • Land and safely secure your kite with sand, snow or your board.
  • Wind the lines around the bar horns. Secure the lines with the elastic.
  • Put the bar next to the trailing edge, and secure lines with velcro retainer.
  • Fold your kite from the tips to the centre.
  • Fold the sail from the trailing edge to the leading edge with the bar inside. Avoid folding close to the leading edge if your kite has plastic reinforcements there.
  • Fasten the webbing tie around the folded kite.

Maintenance

Speed System and Bridle lines should be regularly checked and maintained in the correct trim or the kite will not perform as designed. If they are worn or not to factory specification (+ or – 15mm) they must be replaced. How To videos and a Bridle Check PDF with all measurements can be found at www.ozonekites.com

You must inspect all your equipment before and after every use. Check the entire kite including upper and lower surfaces, line attachment points, speed system and bridles. Immediately replace any worn or damaged parts with original parts only.

Pre and post use check list.

  • Control System and Quick Release: Check for abrasion/wear, if any part is damaged replace it immediately. Reload/release the Quick Release to check the system is functioning correctly. Store your Control System with the Quick Release open. Reload the next time you set up your kite.
  • Lines: Check them every time you wind and unwind the lines. If one of them is damaged, change the corresponding pair.
  • Speed System: Check the pulleys and lines for abrasion, if any are damaged change them immediately.
  • Bridle Lines: Check the bridle lines for abrasion, if any are damaged change them immediately.
  • Sail: Check there are no holes or tears in the sail. If your sail is torn, you can repair it with the sticky cloth, provided in repair kit. To repair the sail, make sure it is clean and dry. Prepare two pieces of sticky cloth, one for each side of the damaged area. The patch should cover the hole by at least 2cm all round. Lay flat and stick on both sides.
  • Packing: Dry your kite after use away from the sun and direct heat. Never leave a wet kite in its bag. Store your kite in a dry place out of the sun. Never wash or clean it with detergent.

Anything is Possible…

Get your own branded kite – the ultimate advertising billboard

Millions of people go to the beach every year and kitesurfing is the most visually spectacular beach sport around, drawing the eyes of attention from everyone. Kites are huge and kites with a customized design can be amazing advertising spaces.

Flying up and down the beach, park or snow all day long, these spaces can be used to advertise local and international businesses, kite-schools or simply for your own kite with a design that suits you perfectly and makes you stand out a little more from the crowd. If you have your own company you can add your company logo to your kites which allows them to be written off as a business operating expense. How cool is that!

For mainstream companies the opportunity to invest in a flying Billboard is obvious at a fraction of the cost to normal advertising. So far we have worked with many of the World’s leading brands making them kites or making kites for riders sponsored by mainstream brands that see the benefit in Kite sports.

Check out some of the custom kite designs we’ve made for customers: custom kite gallery

Anything is Possible…
Get your own branded kite – the ultimate advertising billboard
Mil

How do I Order?

  • That’s easy, contact your nearest Ozone dealer or country importer by clicking the link below…
  • Our dealer will then email us the info and we will obtain a quote with 5 working days.
  • Once agreed you pay for the Kite & Logo cost so production of the kite can commence.
  • Your order will ship within 2-4 weeks (depending on how busy the factory is) from date payment is received.

FIND A DEALER

How do I Order?

That’s easy, contact your nearest Ozone dealer or country importer by clickin

What does it Cost?

Quotes vary depending on the complexity and size of the logo or design. We can only give a quote once we have the info (see above)

LOGO STUCK:

For logos to be stuck onto only 1-2 kites, we print the logo onto the white rip-stop sticky-back material. Then the logo is cut out and then stuck on the kite. The stickers typically stick very well however we cannot guarantee them for the life of the kite.

CUT INTO SAIL:

If the logo is not too complicated we can cut into the sail as its single surface (or both surfaces of foil kites). The logos look amazing and the light shines through beautifully. Price depends on the size and how complicated the logo is. Please note that we can only use our standard colour fabrics. Ask your local distributor for feasibility.

find your local distributor

A lightweight control system designed specifically for the EXP - it is a must-have addition.

Trova un rivenditore