- Kite
- Wing
- Race
- Snow
- More Ozone
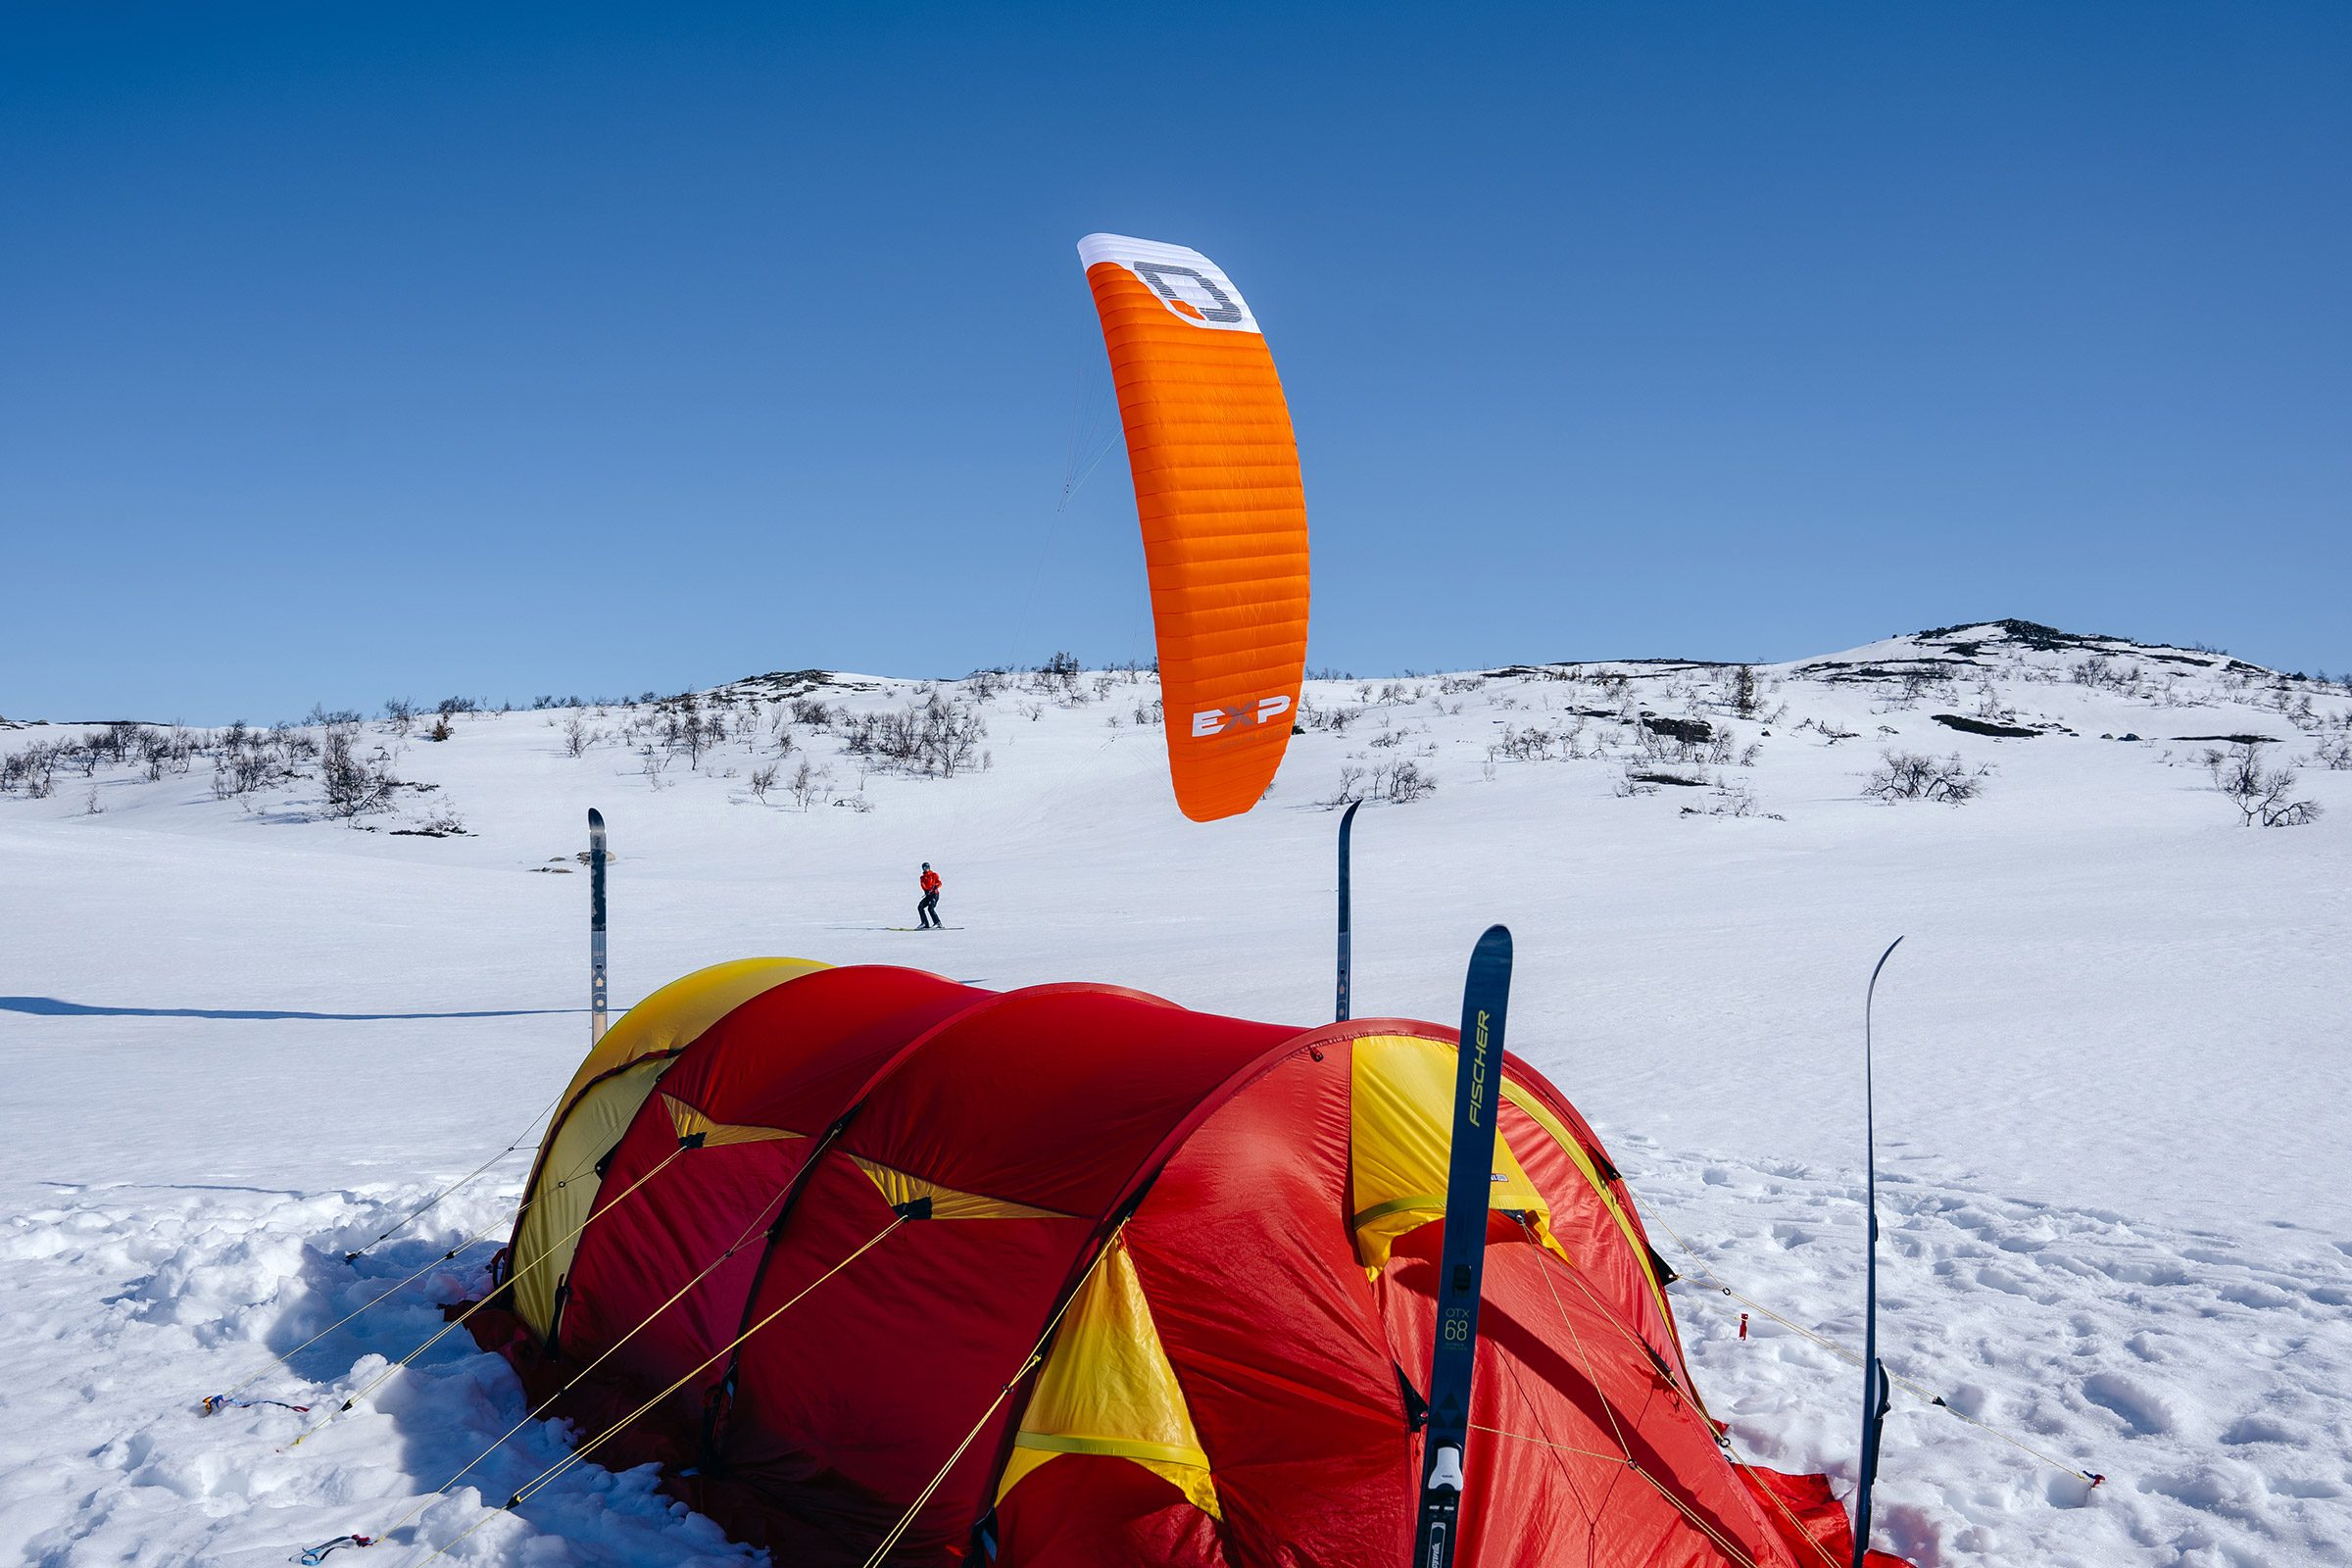
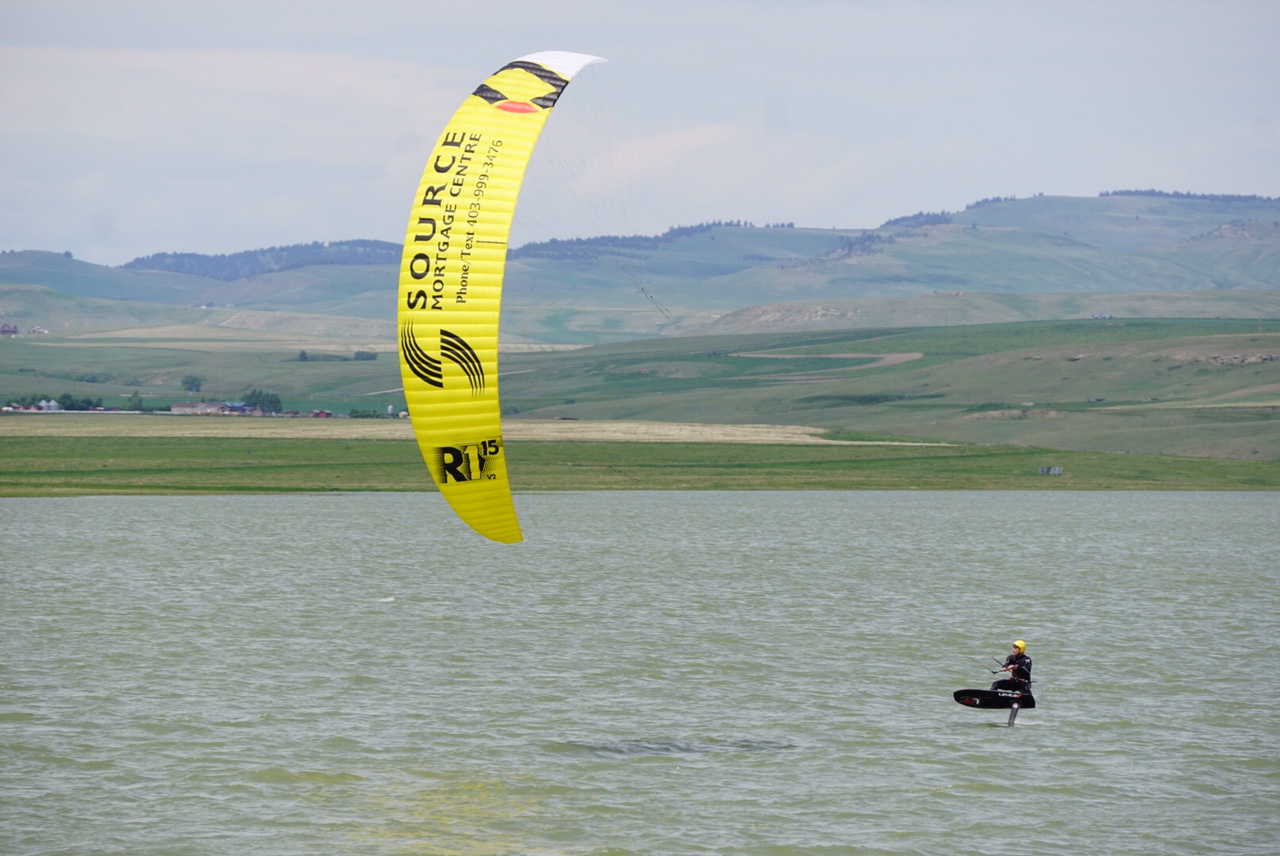
The EXP V1 has been developed for expert and expedition snowkiters as the ultimate high-level open cell foil kite
Find a dealer
Snowkites are not for flying or soaring and all Ozone harnesses are not designed for flying. Keep your skis on the snow.
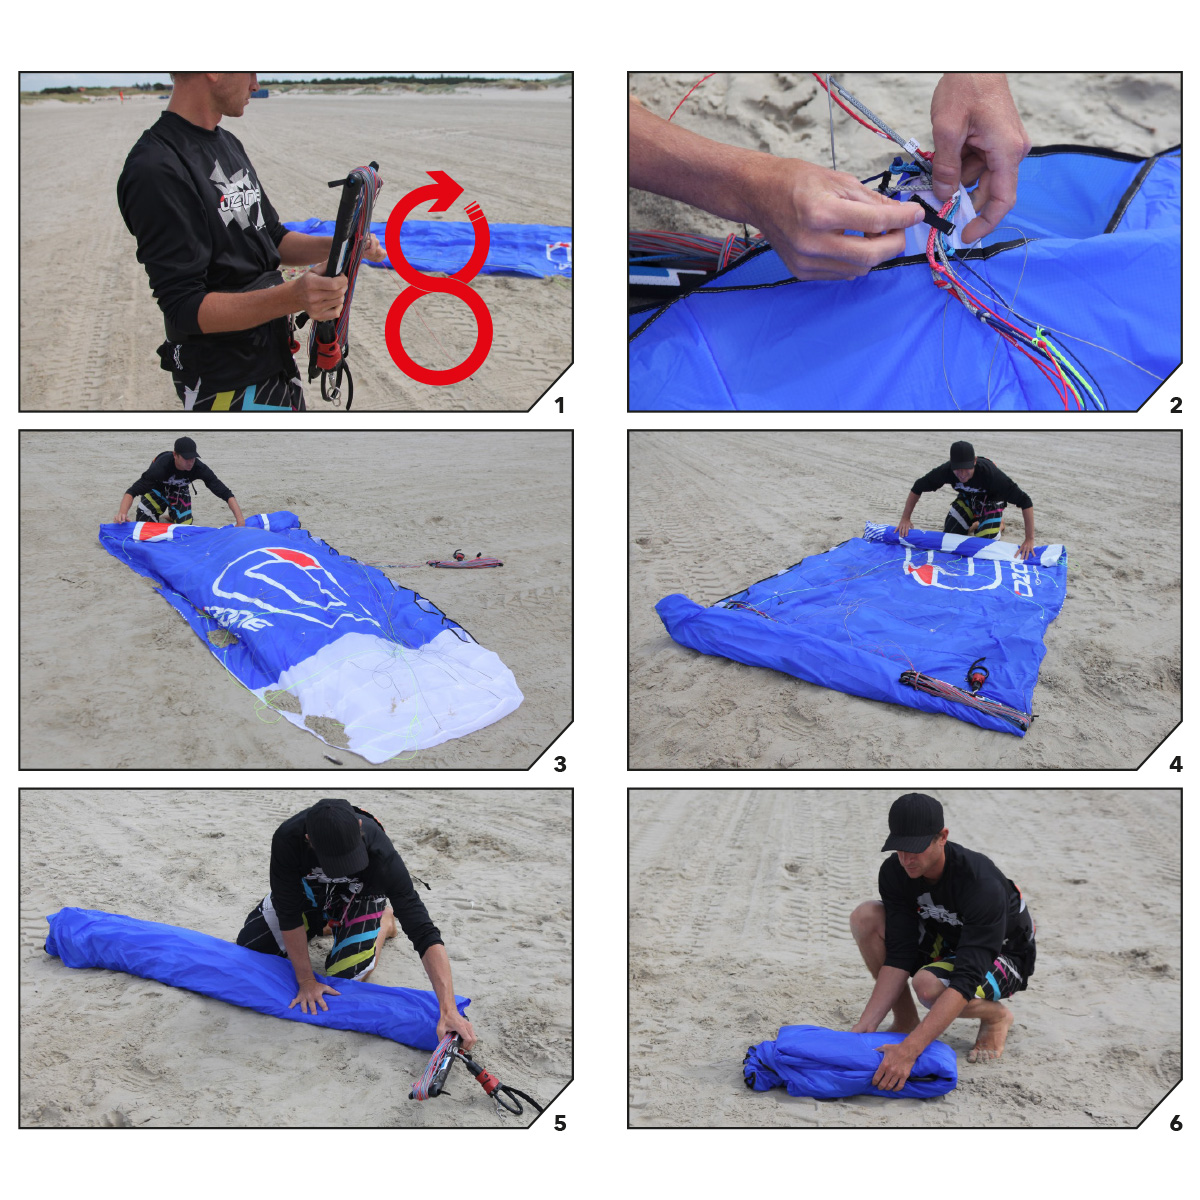
We highly recommend packing the kite away using the concertina method in order to prolong its life. If you can’t do straight after your session, pack it away as carefully as you can, and remember to re-pack it in the concertina method when convenient. Do not store your kite with the Leading Edge battens deformed.
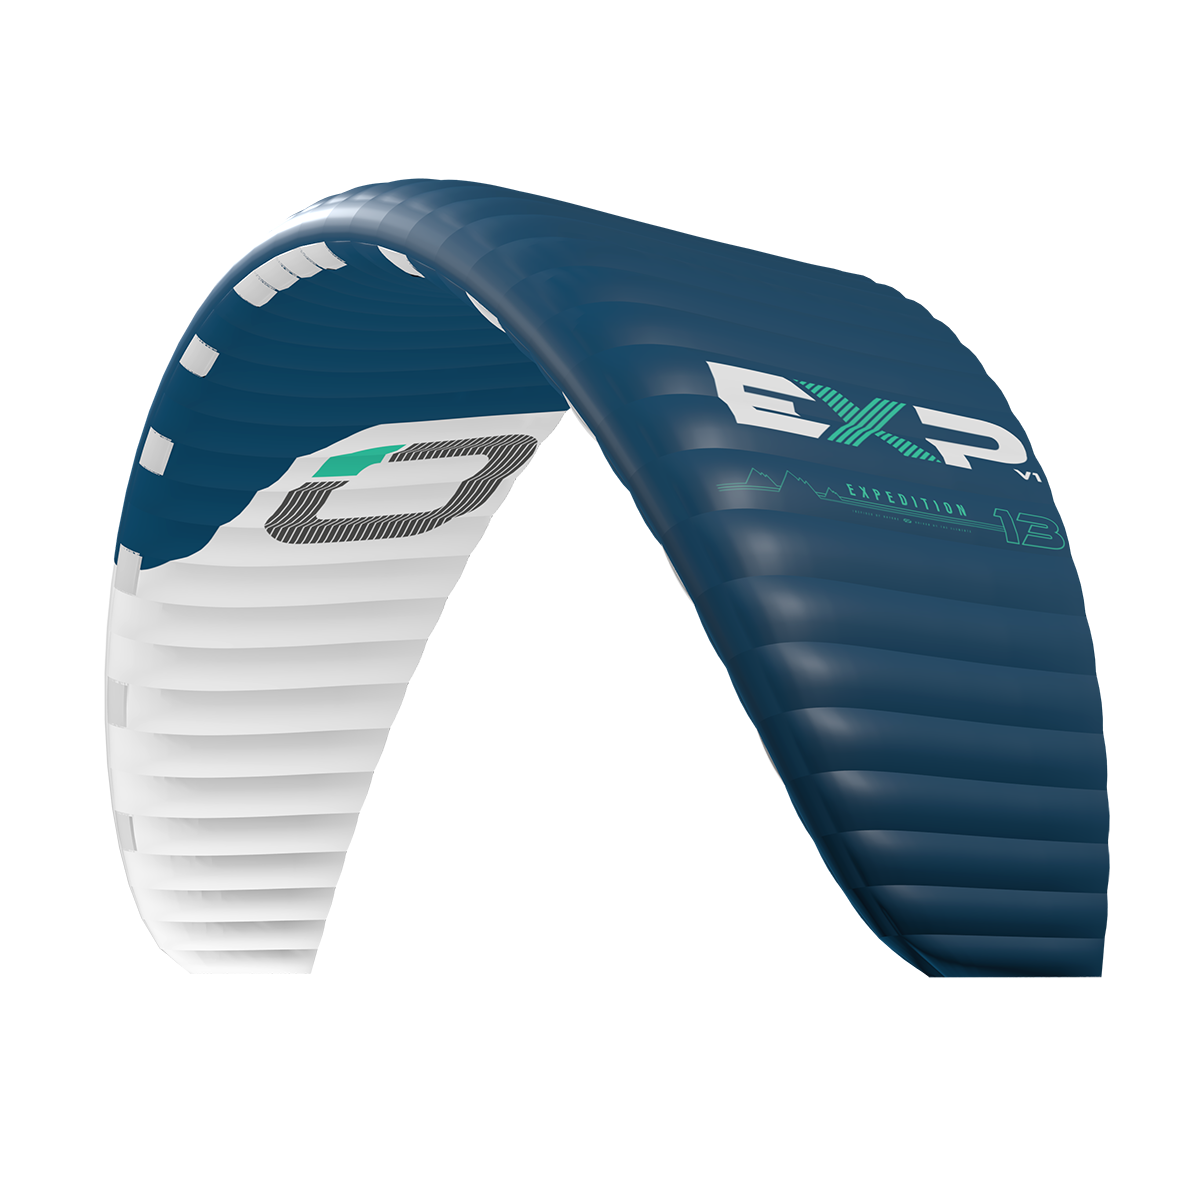
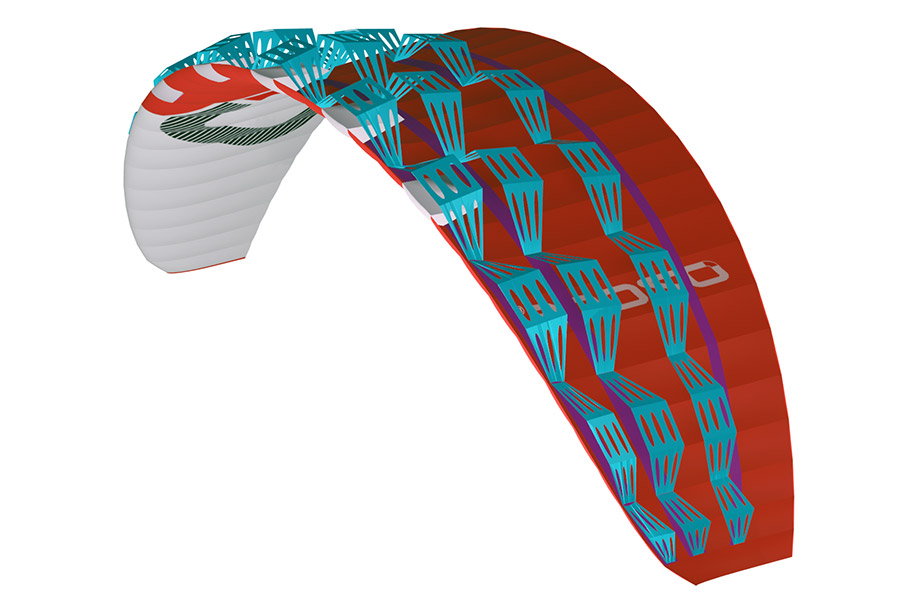
Designed with a partially open cell leading edge, the EXP V1 also features our revolutionary Internal Re-Ride Release system, offering the crucial ability to safely self-land a kite in extreme conditions while adventuring high in the mountains, or over long distances on the snow.
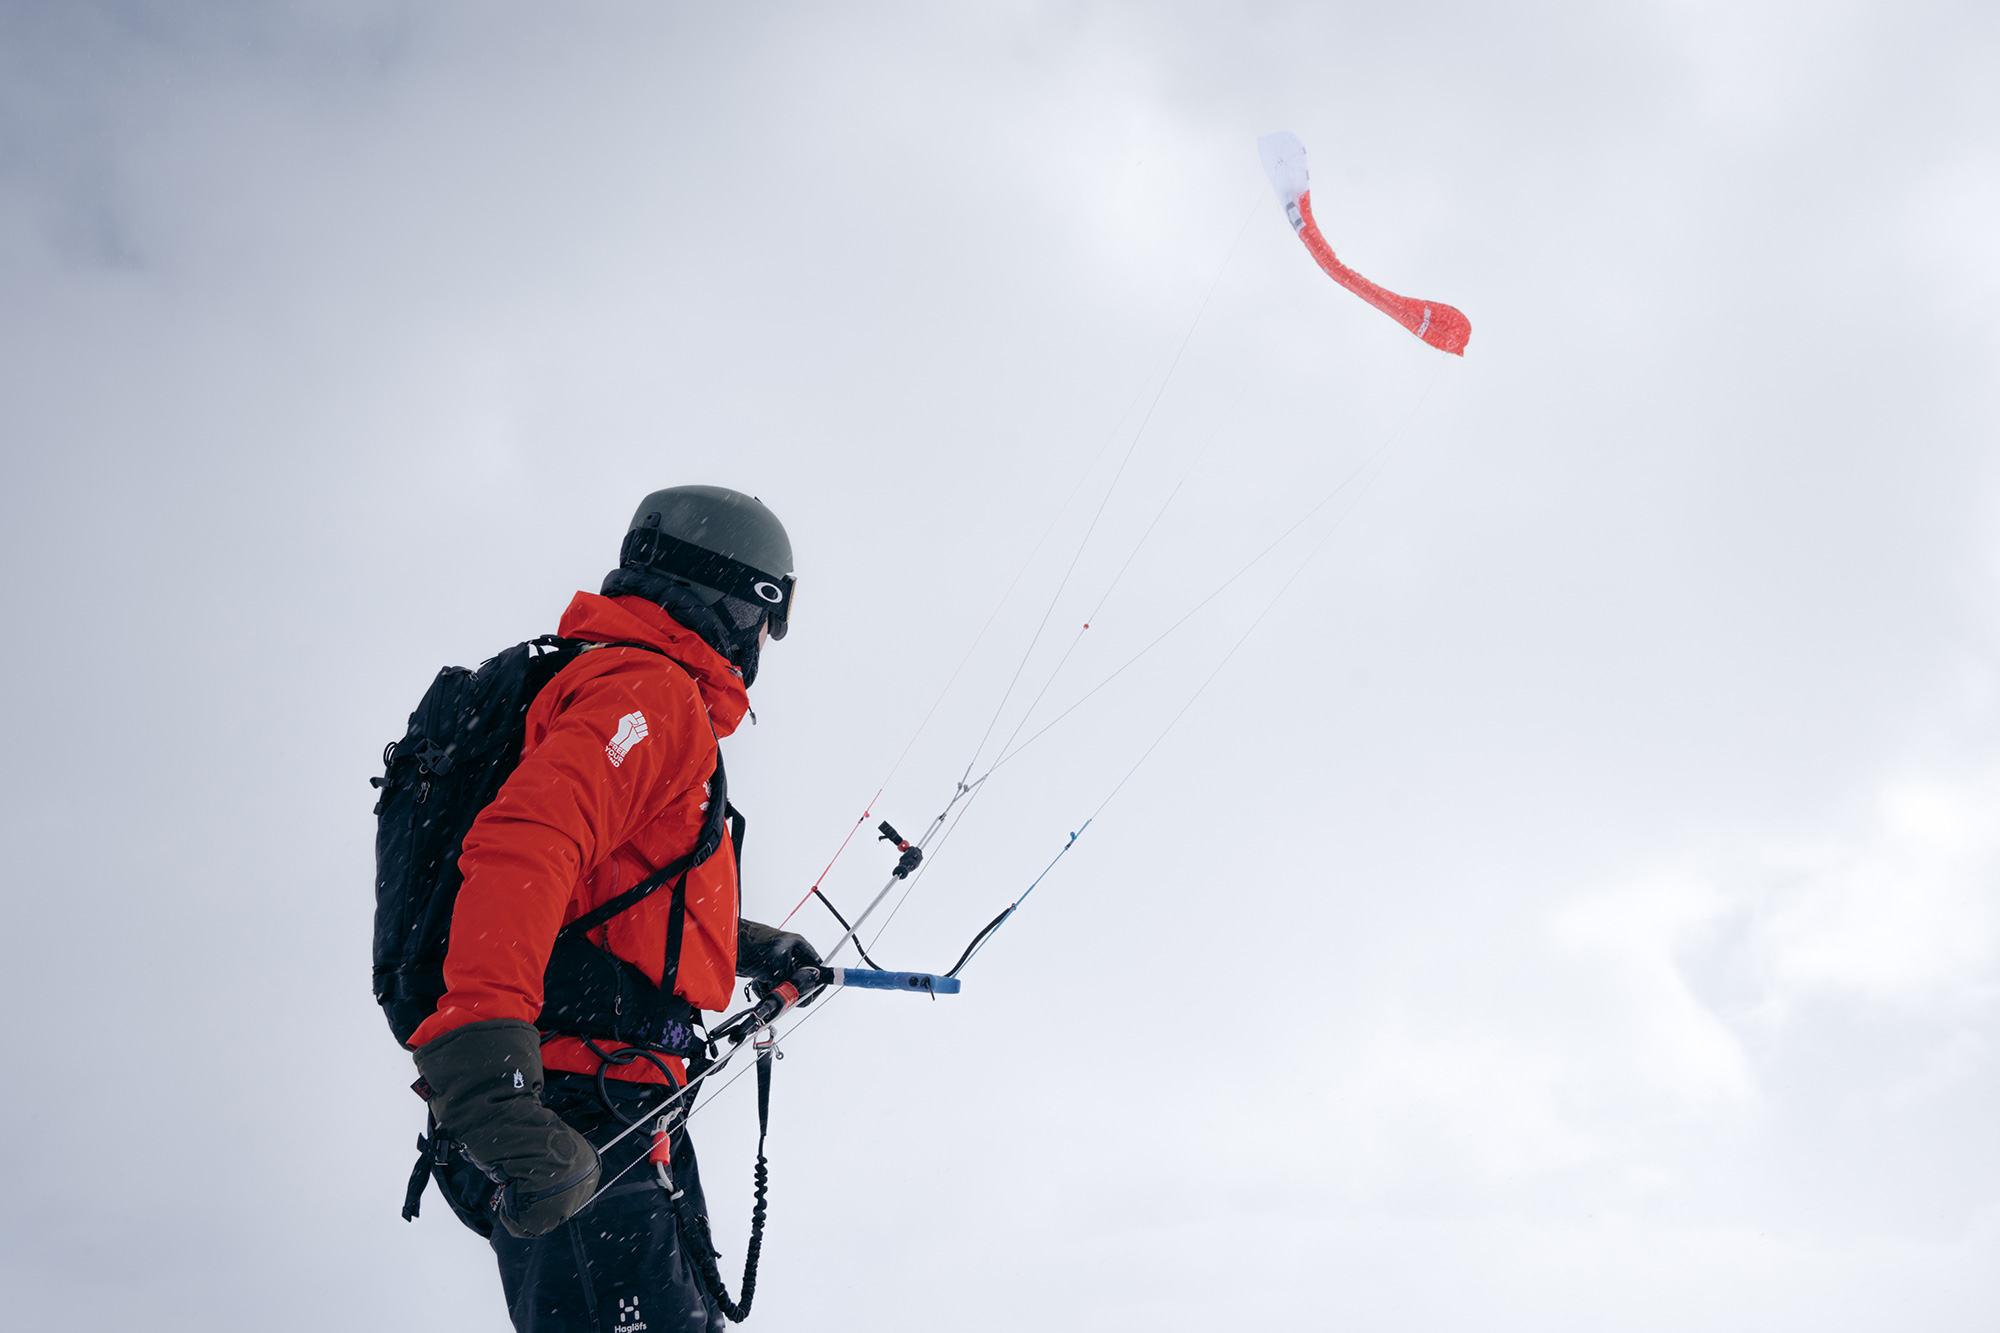
Using the invaluable feedback of our experienced adventure snowkite team, Jonas Lengwiler (winner of Vake and Ragnarok), and Greenland expedition specialist and guide, Håkon Mæland, we developed the EXP V1 to be the dream tool for truly unrestricted snowkite adventures.
We not only designed the EXP V1 with the best material combination to be as light as possible, but also to ensure excellent durability.
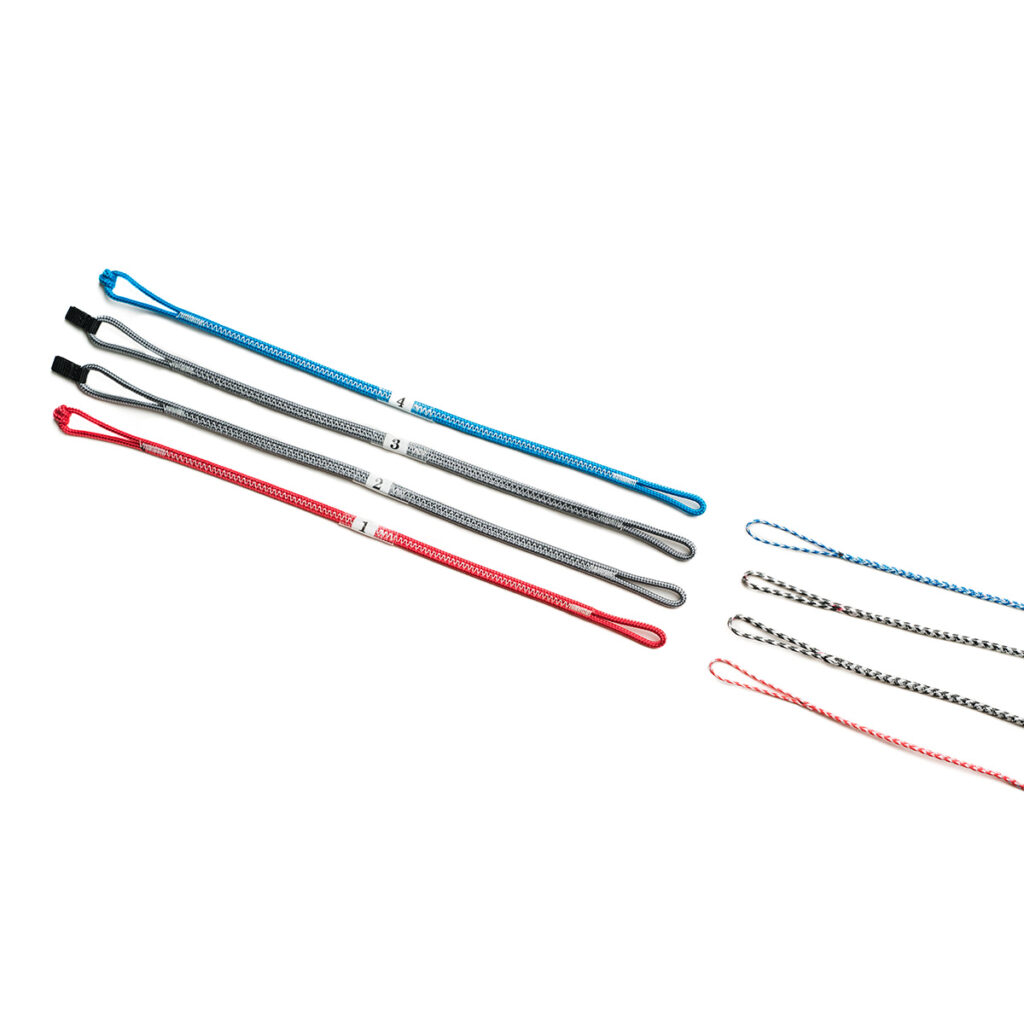
Practical performance was also a key priority, so we’ve also made sure that the bridle lines are easy to sort and handle, even in freezing temperatures.
When conditions become extreme, be sure that the EXP V1 can handle whatever comes your way, even when pulling heavily loaded sleds.

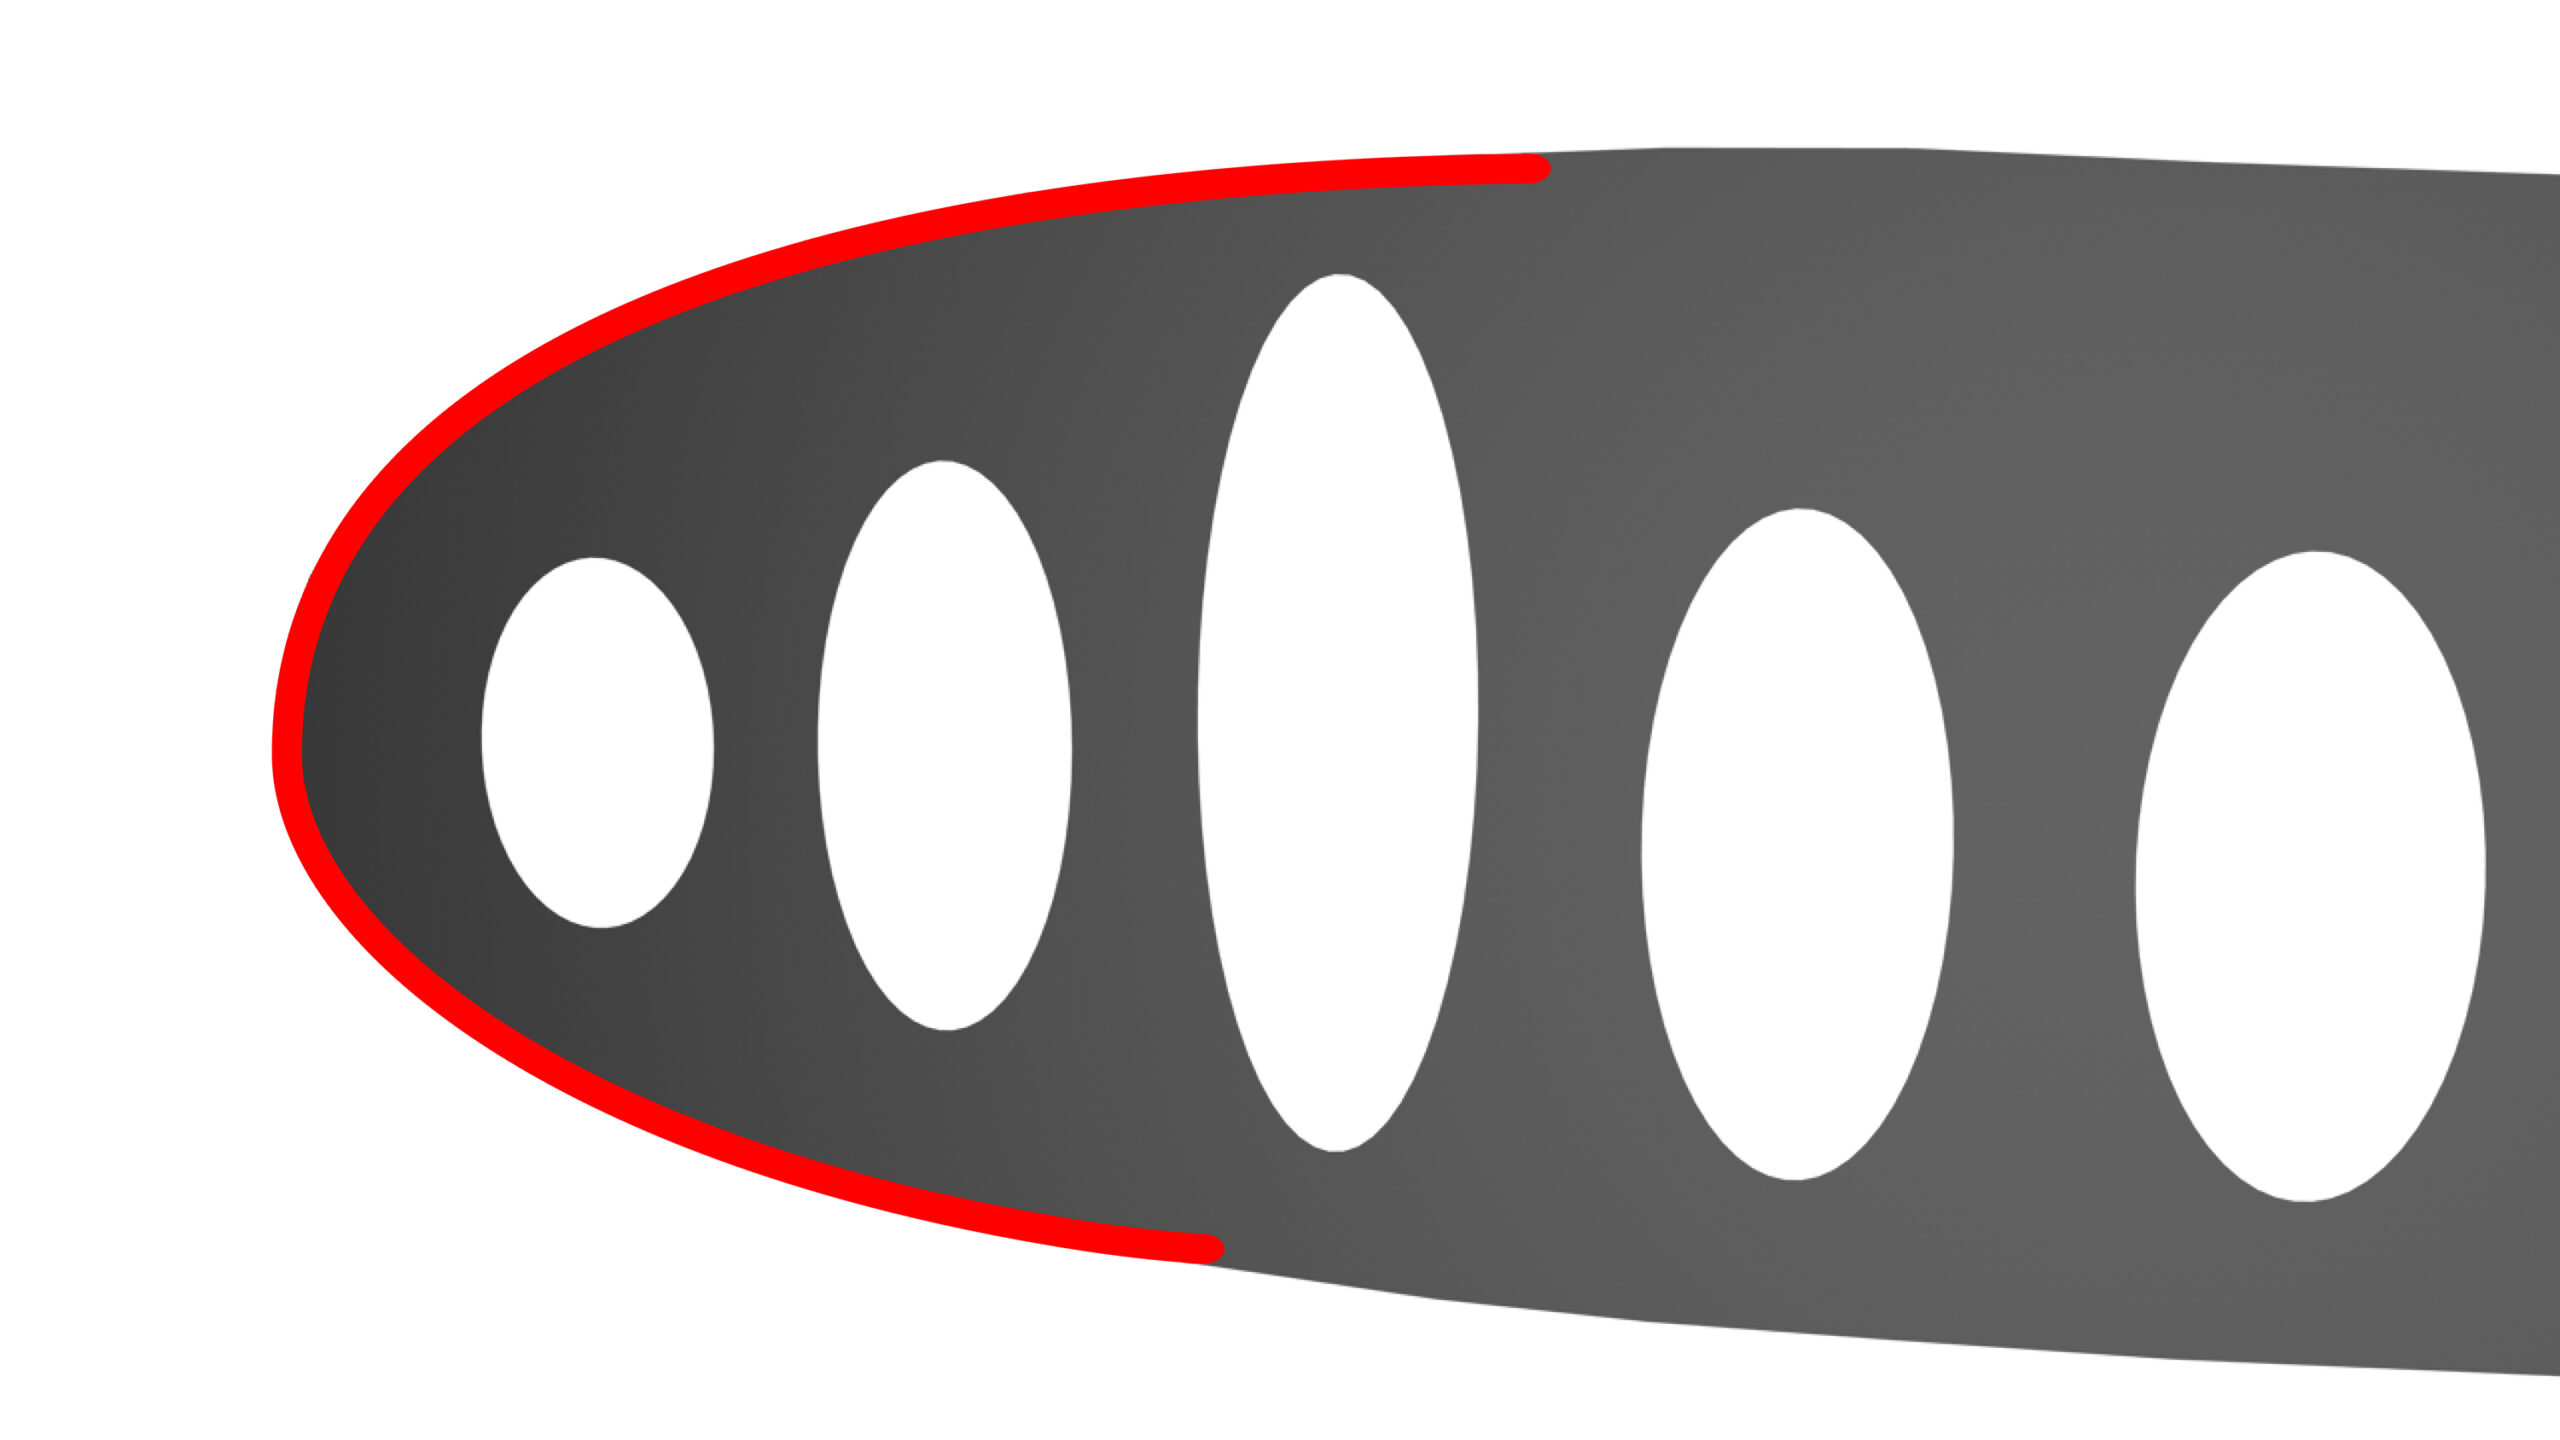
The EXP has a light weight double surface design that is mid high-aspect-ratio and combines 38 – 44 cells – depending on the kite size.
The high number of cells means the ribs are positioned closer together, producing an ultra smooth surface. This corresponds to reduced drag and a clean profile, resulting in superior flight efficiency.
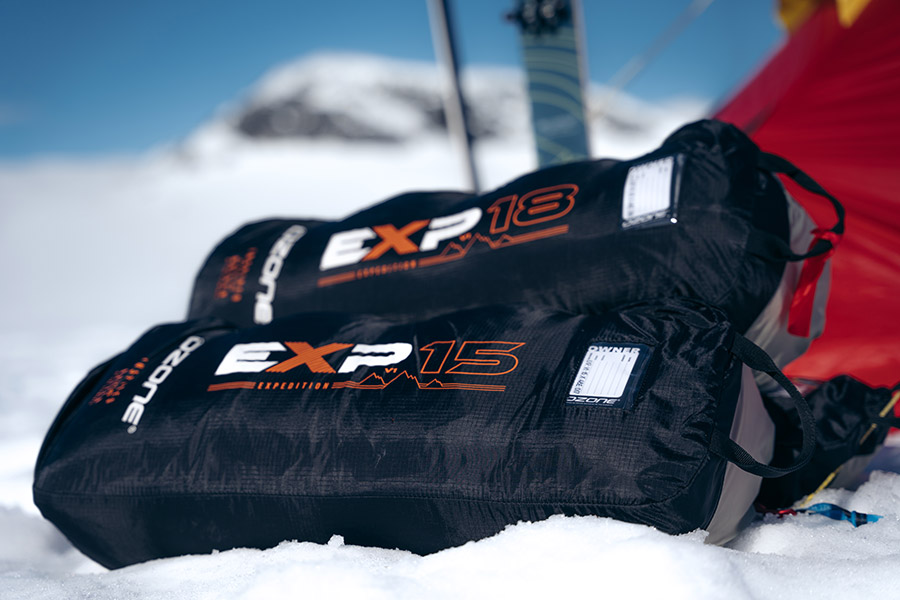
The EXP V1 ships with a lightweight Compressor Bag to keep the kite packed and secured as small as possible. We recommend adding the Technical Mountain Bag to carry multiple kites and all your essential gear on longer backcountry missions and expeditions.
Whether you dream of a short expedition to free your mind, or to navigate extreme conditions and reach the furthest snow capped corners of the world, the EXP V1 is your ultimate, no-nonsense, adventure partner.

Our unique Internal Re-Ride Release system is the market leading snowkite release and landing system. It has made mountain climbing and packing so much more enjoyable, safe, easy and quick for the user.
When activated the kite de-powers instantly without tangling, and will sit on the ground ready to re-launch as soon as you’re ready to go again.
Another advantage of our Internal Re-Ride Release system is the land and secure option.
Snowkites are not for flying or soaring and all Ozone harnesses are not designed for flying. Keep your skis on the snow.
We highly recommend packing the kite away using the concertina method in order to prolong its life. If you can’t do straight after your session, pack it away as carefully as you can, and remember to re-pack it in the concertina method when convenient. Do not store your kite with the Leading Edge battens deformed.
Designed with a partially open cell leading edge, the EXP V1 also features our revolutionary Internal Re-Ride Release system, offering the crucial ability to safely self-land a kite in extreme conditions while adventuring high in the mountains, or over long distances on the snow.
Using the invaluable feedback of our experienced adventure snowkite team, Jonas Lengwiler (winner of Vake and Ragnarok), and Greenland expedition specialist and guide, Håkon Mæland, we developed the EXP V1 to be the dream tool for truly unrestricted snowkite adventures.
We not only designed the EXP V1 with the best material combination to be as light as possible, but also to ensure excellent durability.
Practical performance was also a key priority, so we’ve also made sure that the bridle lines are easy to sort and handle, even in freezing temperatures.
When conditions become extreme, be sure that the EXP V1 can handle whatever comes your way, even when pulling heavily loaded sleds.
The EXP has a light weight double surface design that is mid high-aspect-ratio and combines 38 – 44 cells – depending on the kite size.
The high number of cells means the ribs are positioned closer together, producing an ultra smooth surface. This corresponds to reduced drag and a clean profile, resulting in superior flight efficiency.
The EXP V1 ships with a lightweight Compressor Bag to keep the kite packed and secured as small as possible. We recommend adding the Technical Mountain Bag to carry multiple kites and all your essential gear on longer backcountry missions and expeditions.
Whether you dream of a short expedition to free your mind, or to navigate extreme conditions and reach the furthest snow capped corners of the world, the EXP V1 is your ultimate, no-nonsense, adventure partner.
Our unique Internal Re-Ride Release system is the market leading snowkite release and landing system. It has made mountain climbing and packing so much more enjoyable, safe, easy and quick for the user.
When activated the kite de-powers instantly without tangling, and will sit on the ground ready to re-launch as soon as you’re ready to go again.
Another advantage of our Internal Re-Ride Release system is the land and secure option.


Ozone uniquely owns its own factory where all kites, wings, boards, hydrofoils, paragliders, speed wings and accessories are made. Guaranteeing hand checked quality control and the finest materials at every step, there are also excellent working conditions for all 1000 employees.
The future is now. All Ozone kite and wings are designed with our own highly advanced custom built CAD software that we control and modify with each new product design. Allowing for specifically tailored technical developments, our designers can maximise performance while also minimising waste.
Our unique Internal Re-Ride Release System is the market leading Snowkite release and landing system. It has made mountain climbing and packing so much more enjoyable, safe, easy and quick for the user. When activated the kite de-powers instantly without tangling, and will sit on the ground ready to re-launch when you’re ready again.

High quality Ultra Light materials have been used extensively on our Kites and Paragliders since 2011. Using Ultra Light materials translates to true performance increases - the kite inflates quicker, flies faster and is more reactive even in the lightest breeze.
Using high spec low friction Ronstan Orbit pulleys to reduce wear and rider fatigue while improve feeling and performance of the kite.
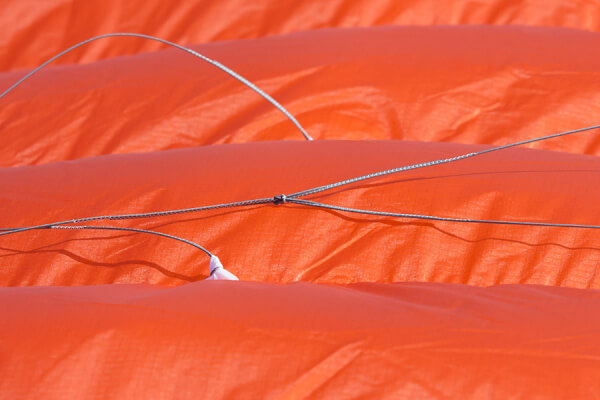
The Leading Edge is reinforced with flexible lightweight plastic battens to maintain the shape of the profile during angle of attack changes and turbulent airflow. This drastically improves overall performance as the foil remains true to the designed shape.
Internal span-wise straps work in unison with optimized diagonal ribs, distributing load from the bridles evenly and effectively. This increases the internal structural balance, while allowing the top and bottom surfaces to maintain the designed profile without being distorted from indirect tension or loads.
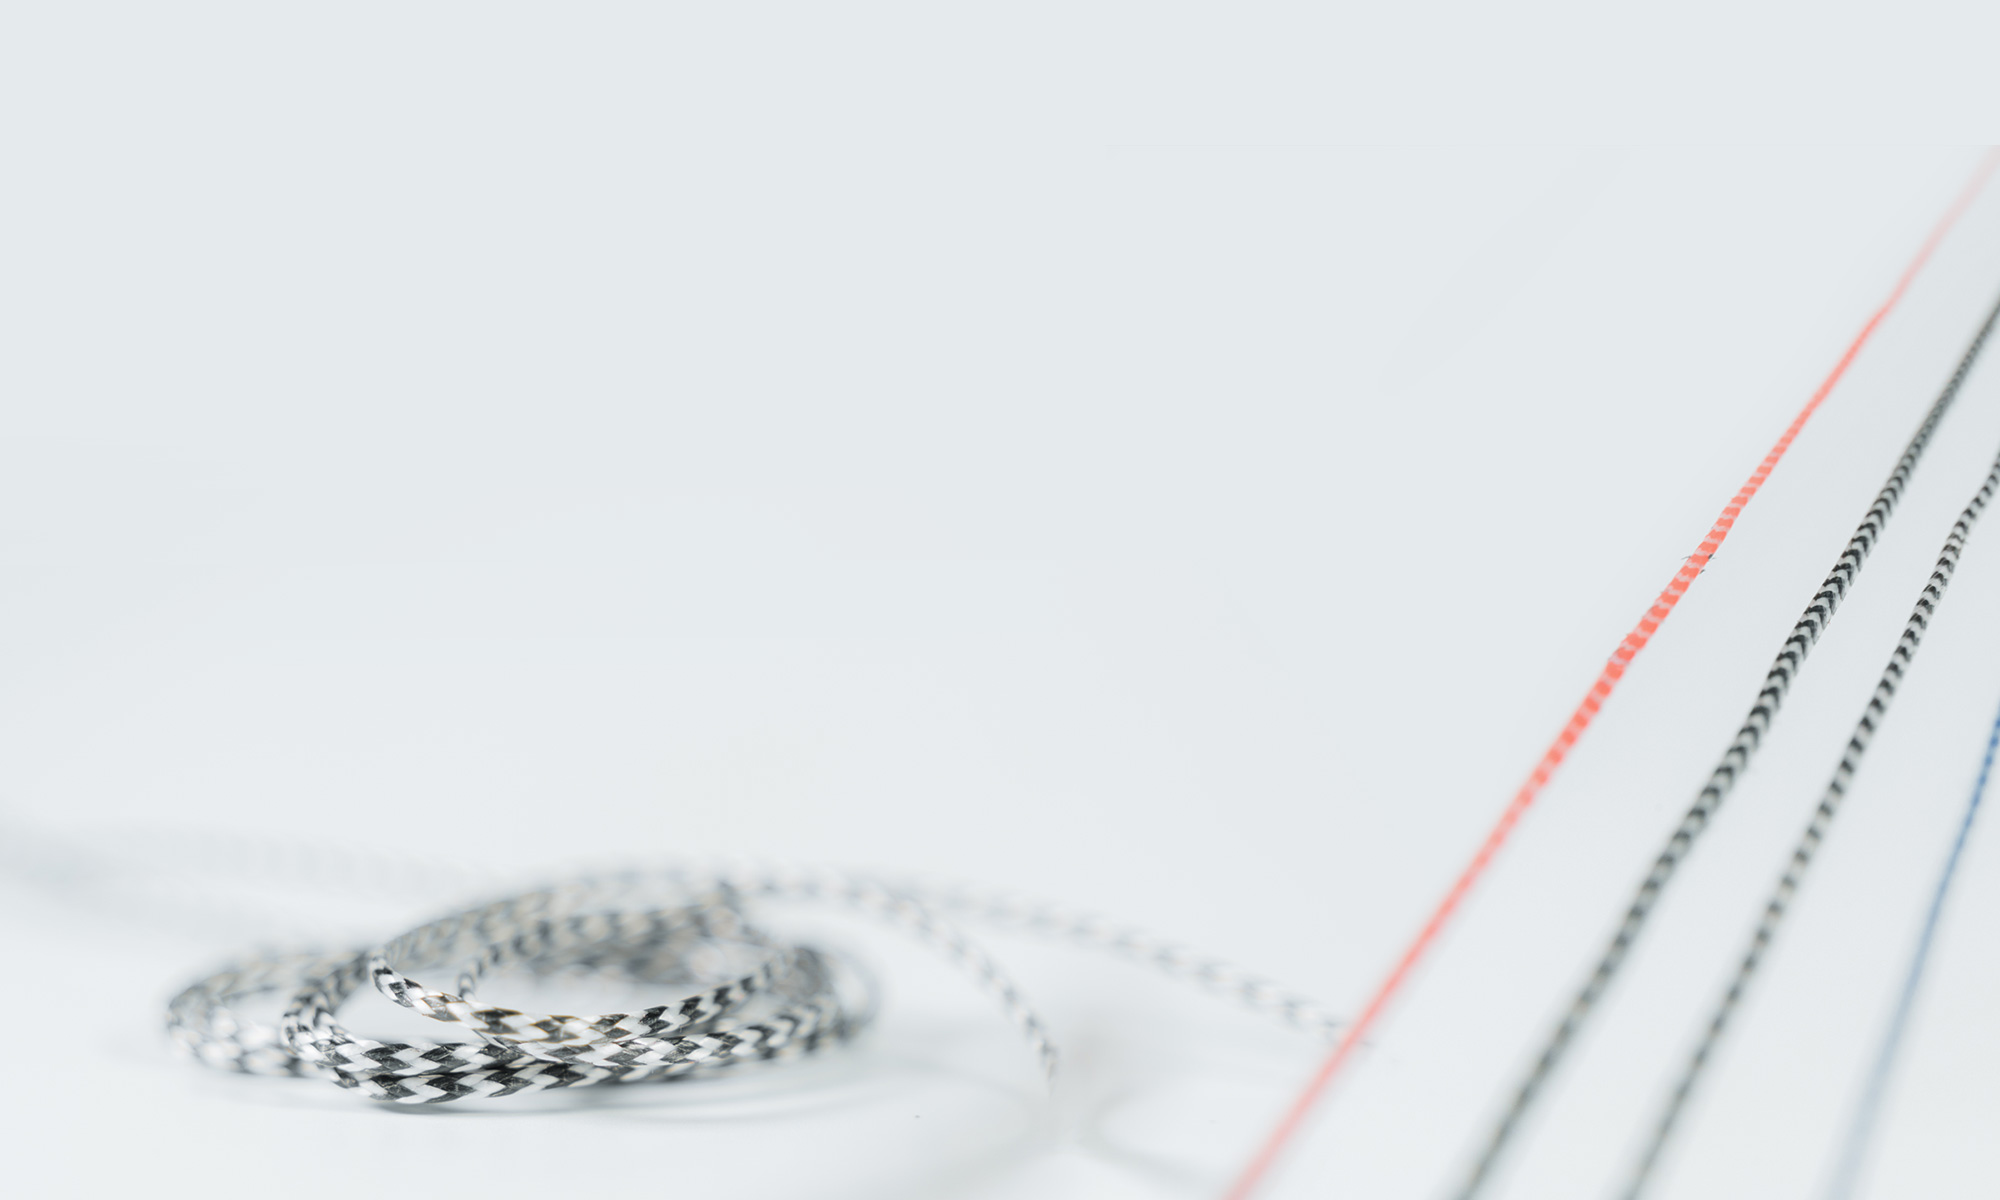
High quality, low stretch sheathed bridle lines for maximum strength and performance. This is the same line we have used on our Snowkite range for over 10 years

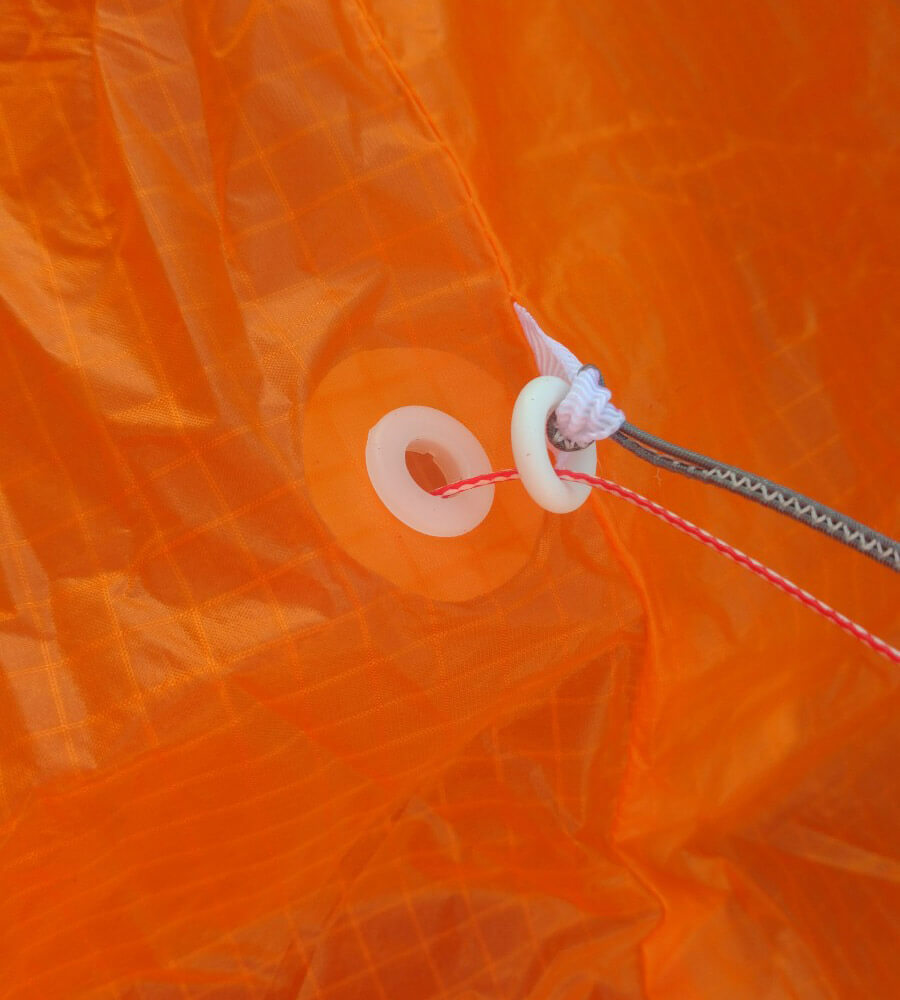
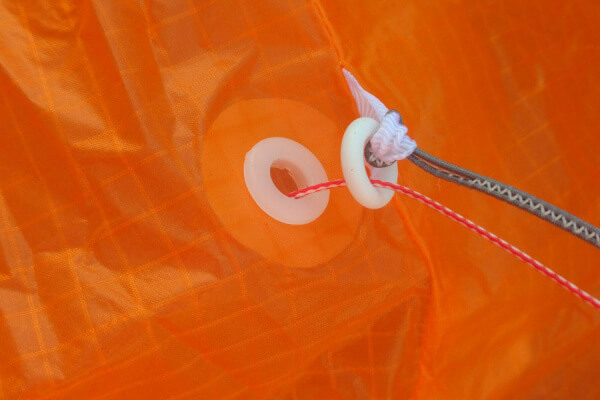
The Velcro sealed cells at the tips can be opened for cleaning the kite. Always clean your kite by emptying any snow or debris as this will prolong the life of the kite and help it fly as designed.
We work extensively during our R&D process to develop the size range to feel in tune with each other. Every kite has a unique bridle layout, individually tested and fine-tuned to maximize the feeling and performance.
Fool proof line connectors prevent incorrect rigging of the flying lines to the kite.
At Ozone we are passionate about sports, and it is this passion that drives our design team to perfect and develop products that we love to ride with. We are proud of the quality of our products, and are constantly searching for the best components and materials to use in our designs. We manufacture in our own high-quality production facility in Vietnam, which guarantees a build quality that we are proud to put the Ozone name on. A close look at one of our products reveals that same superior quality and construction that ensures that every Ozone product will enjoy a long life, with consistent performance and aesthetics. To view the factory video visit our website www.flyozone.com. Many dynamic action sports carry inherent risks but with common sense and education from qualified instructors means you can easily enjoy these incredible sports. Accidents generally happen due to a lack of experience, changing weather conditions or from using equipment not suited to the riders’ ability and/or conditions. Always take the time to learn safely with qualified instruction and you will progress far quicker. Ride safe Team Ozone
By assembling and/or using this Ozone product, you agree that you have read and understood the entire Ozone product owners manual, including all instructions and warnings contained in that manual, prior to using the Ozone product in any way. You additionally agree that you will ensure any additional or subsequent user of your Ozone product will read and understand the entire Ozone product owners manual, including all instructions and warnings contained in that manual, prior to allowing that person to use your Ozone product.
Use of the Ozone product and any of its components involve certain risks, dangers, and hazards which can result in serious personal injury and death to both the user and to non-user third parties. In using this Ozone product, you freely agree to assume and accept any and all known and unknown risks of injury to you and third parties while using this equipment. The risks inherent in this sport can be greatly reduced by abiding by the warning guidelines listed in this owner manual and by using common sense.
In consideration of the sale of the Ozone product to you, you herby agree to the fullest extent permitted by law, as follows;
TO WAIVE ANY AND ALL CLAIMS that you have or may in the future have against Ozone Kitesurf LTD or Ozone Kites LTD and all related parties resulting from use of the Ozone product and any of its components.
TO RELEASE Ozone Kitesurf LTD or Ozone Kites LTD and all related parties from any and all liability for any loss, damage, injury or expense that you or any users of you Ozone product may suffer, or that your next of kin may suffer, as a result of the use of the Ozone product, due to any cause whatsoever, including negligence or breach of contract on the part of Ozone Kitesurf LTD or Ozone Kites LTD and all related parties in the design or manufacture of the Ozone product and any of its components.
In the event of your death or incapacity, all provisions contained herein shall be effective and binding upon your heirs, next of kin, executors, administrators, assigns, and representatives. Ozone Kitesurf LTD or Ozone Kites LTD related parties have not made and expressly deny and oral or written representations other than what is set forth herein and the Ozone product owners manual.
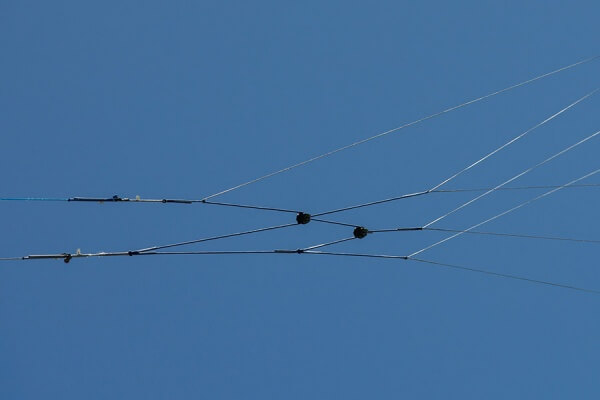
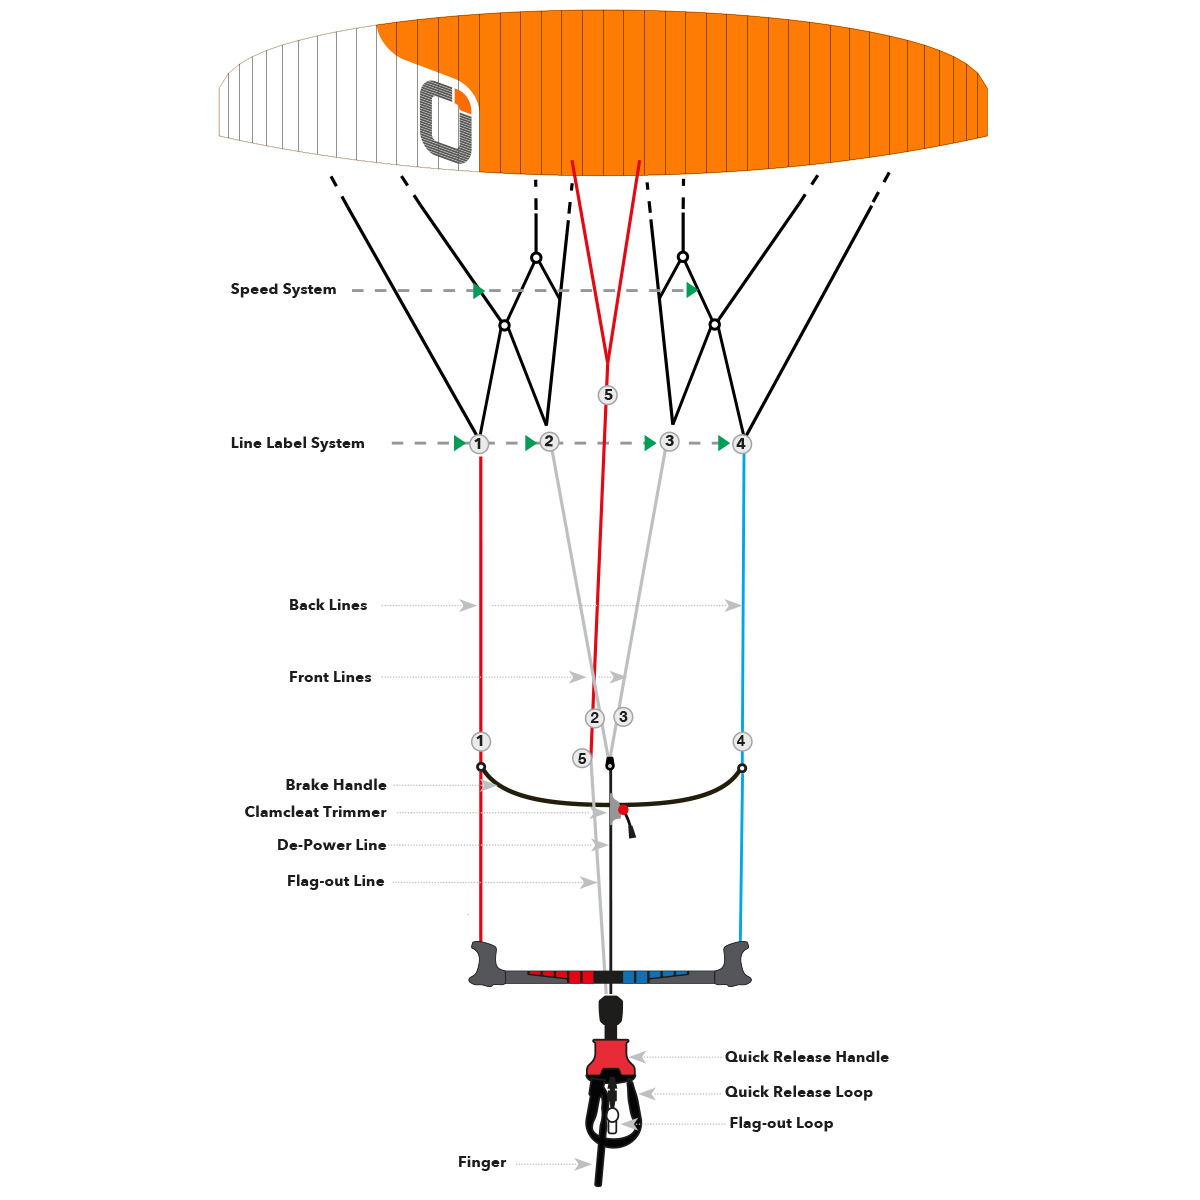
1: Speed System
2: Line Label System
3: Back Lines
4: Front Lines
5: Brake handle
6: Clamcleat Trimmer
7: De-Power line
8: Flag-out Line
9: Quick Release Handle
10: Quick Release loop
11: Flag-out Loop
12: Finger
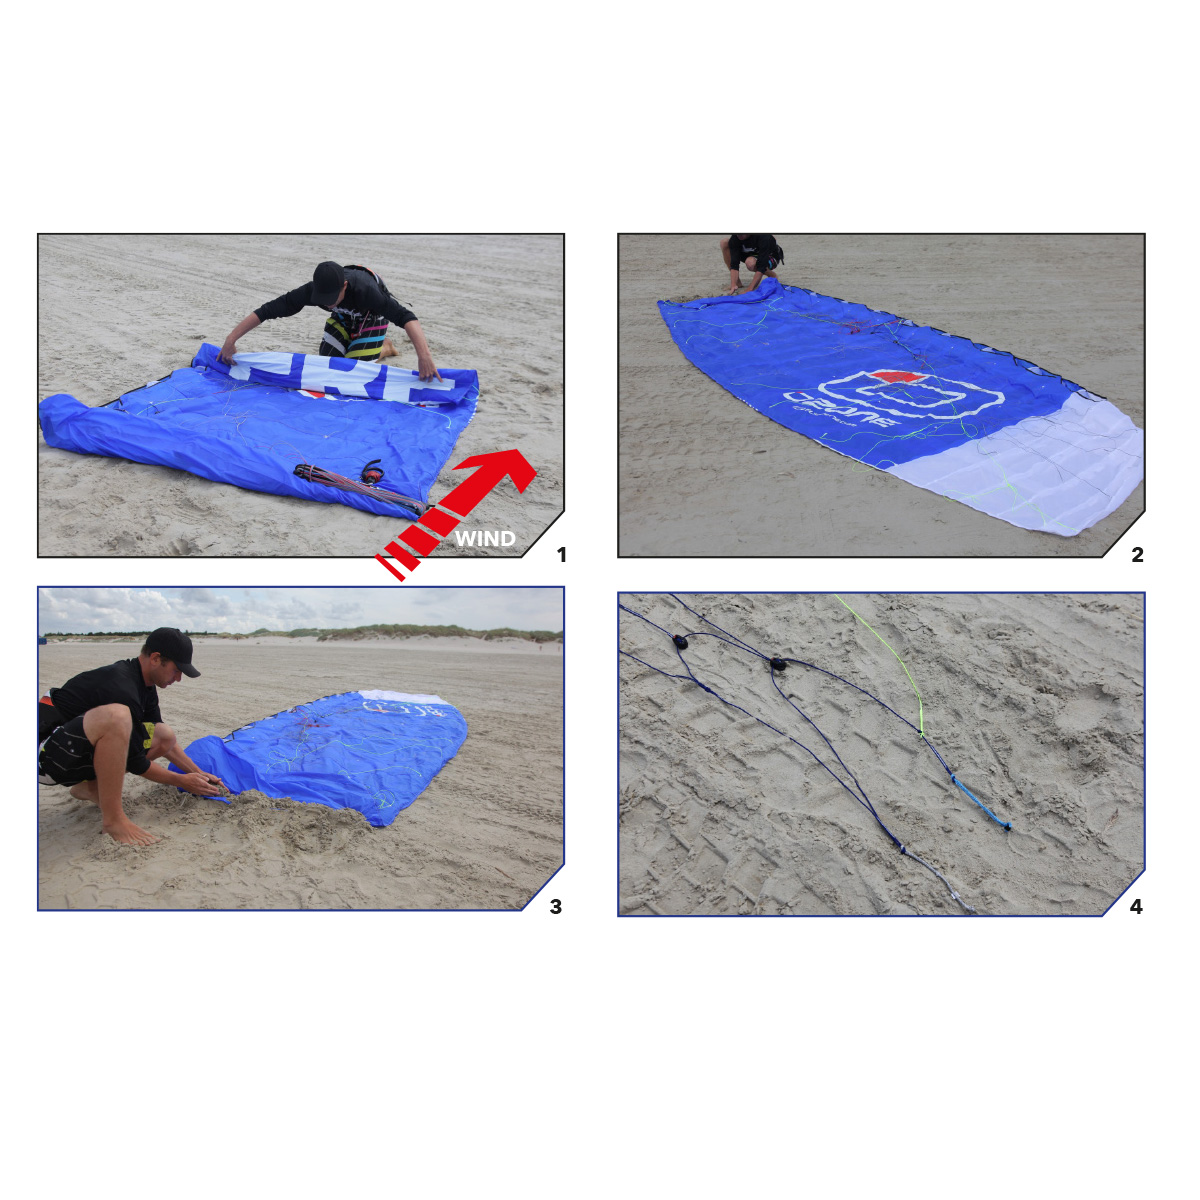
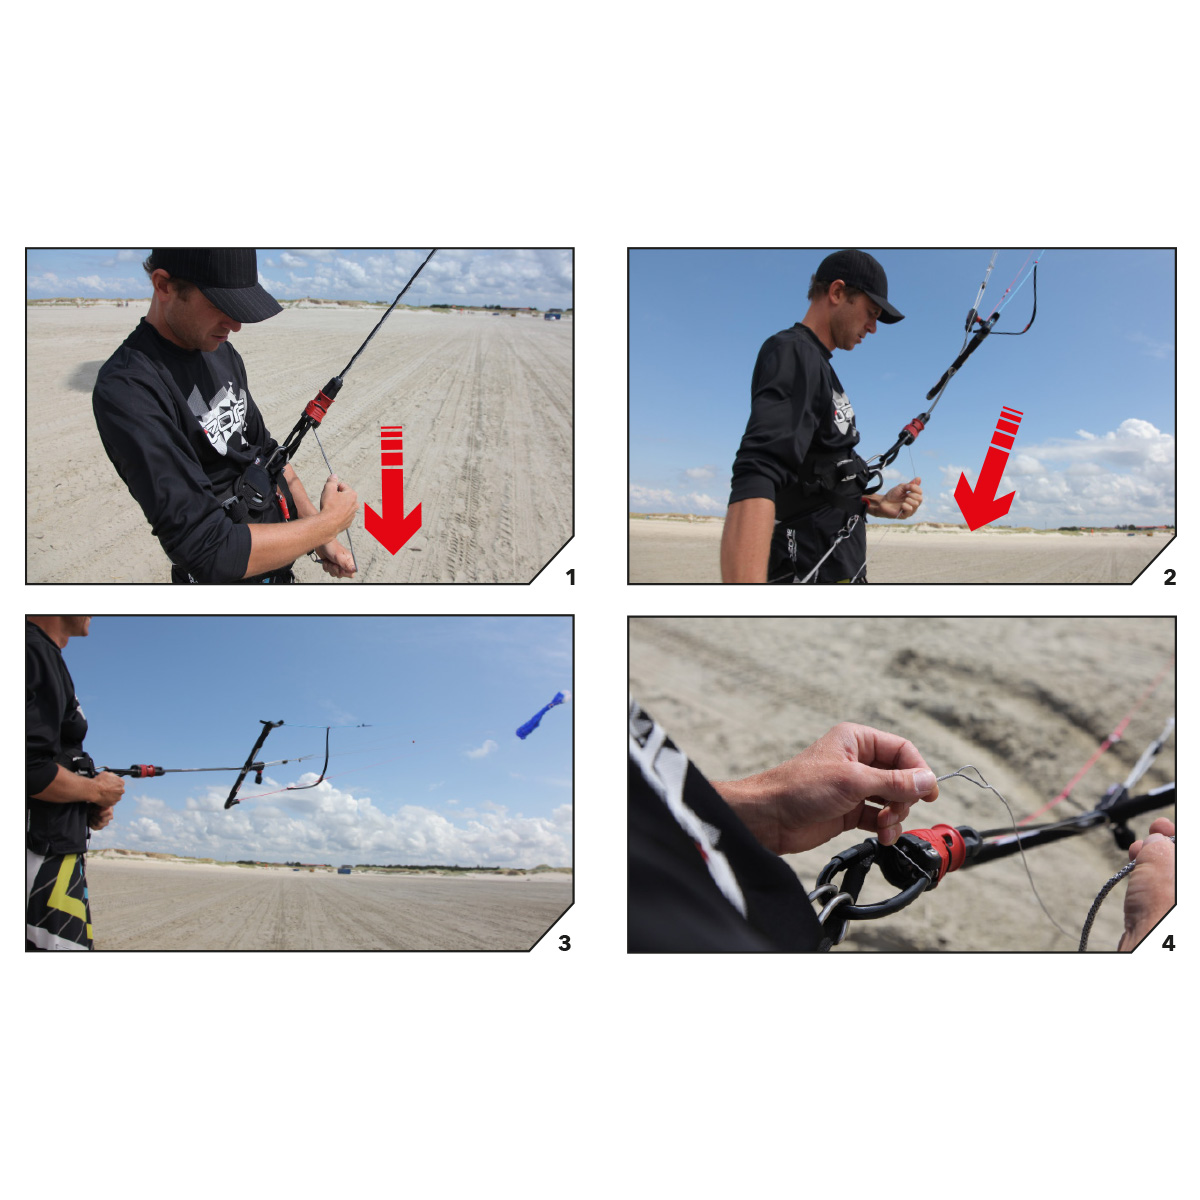
IMPORTANT: Set up your kite for the first time in wind less than 12kph to ensure your safety and the safety of others.
Now you’re ready to fly!
Always double check your lines before launching. Wrongly attached lines will stop the kite flying correctly and could therefore mean you have no control of the kite putting yourself in a dangerous situation.

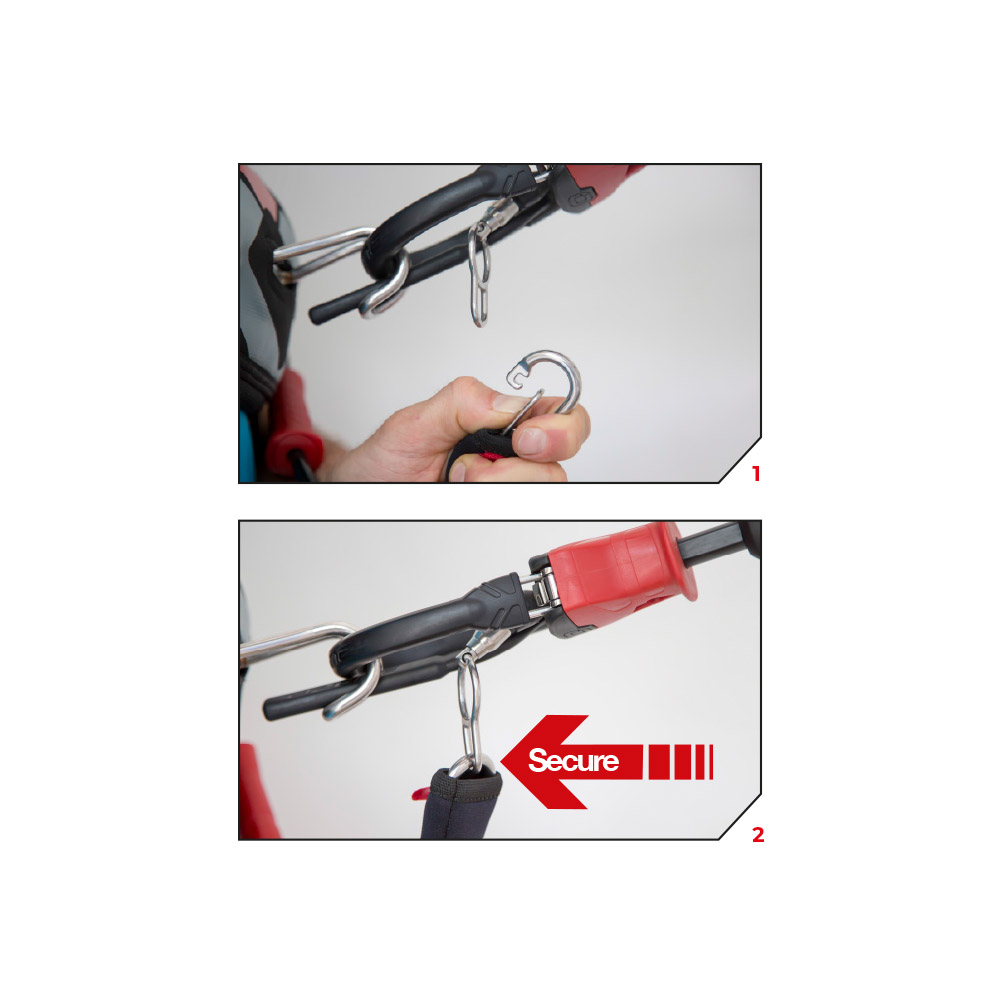
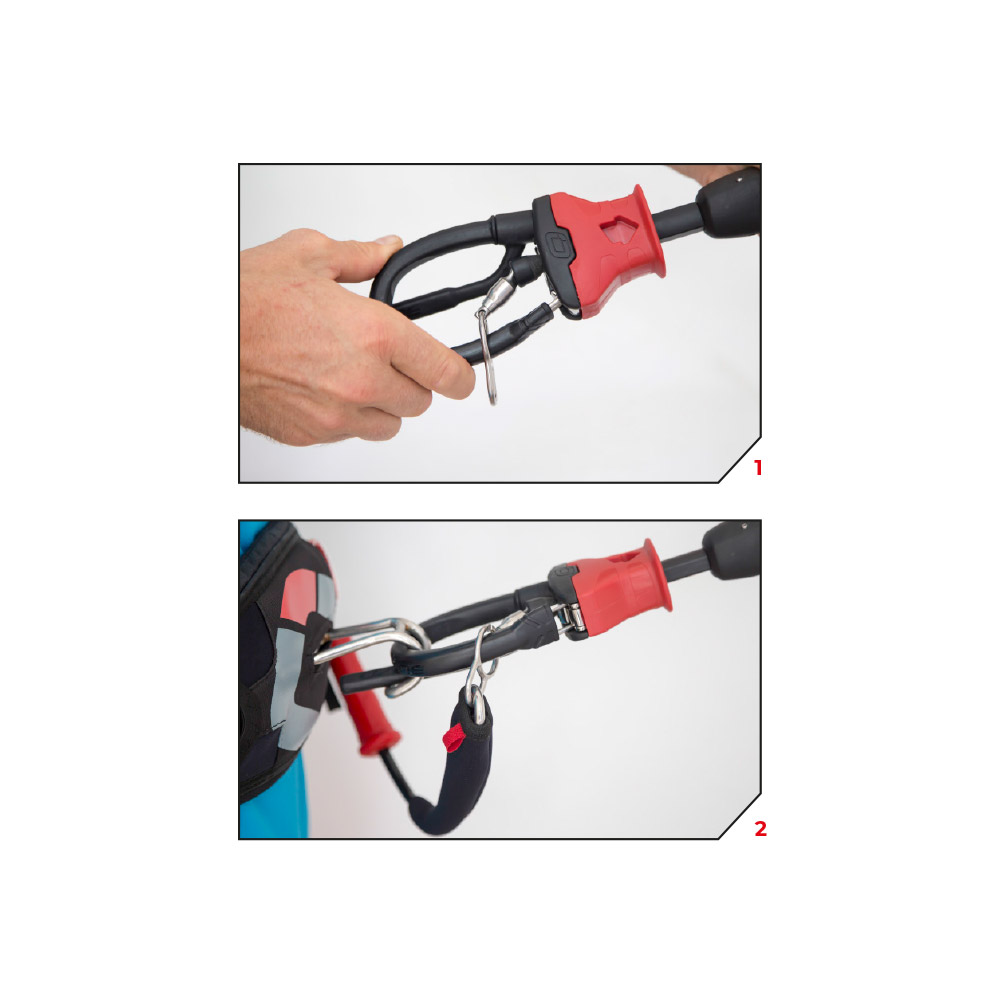
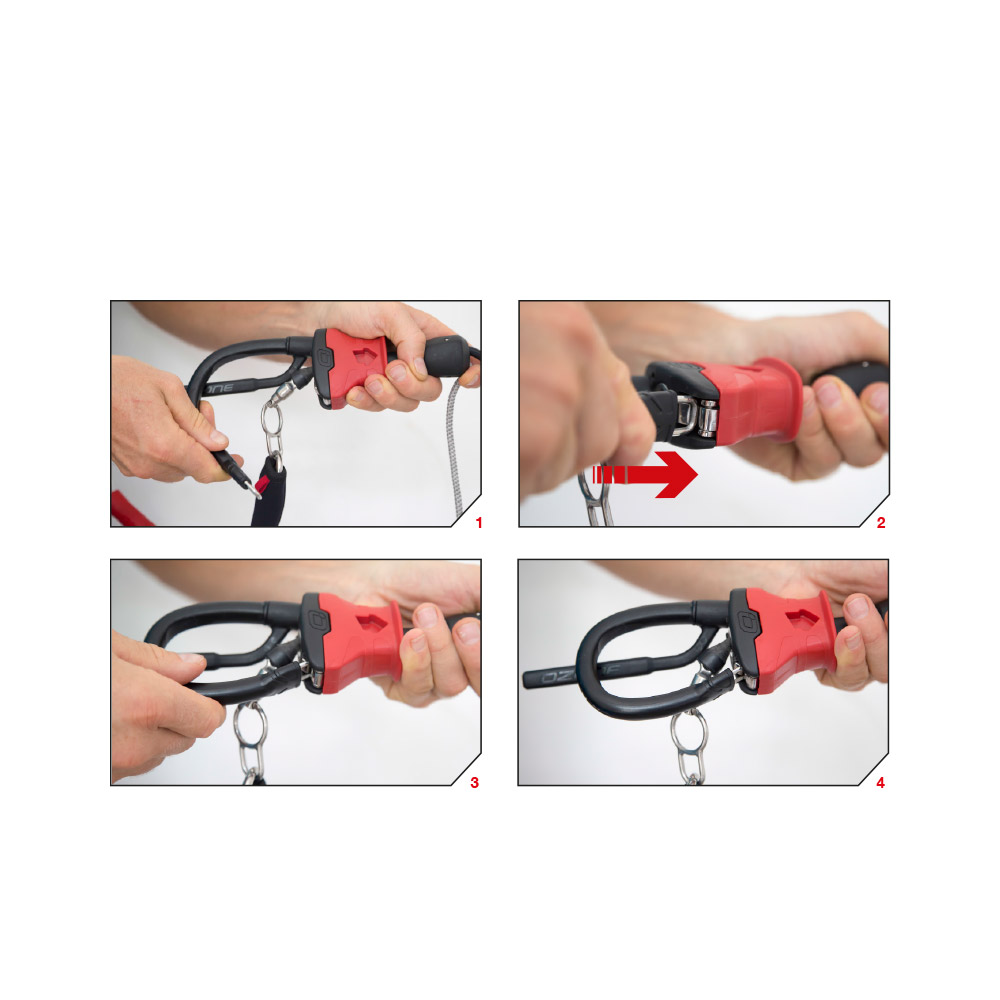
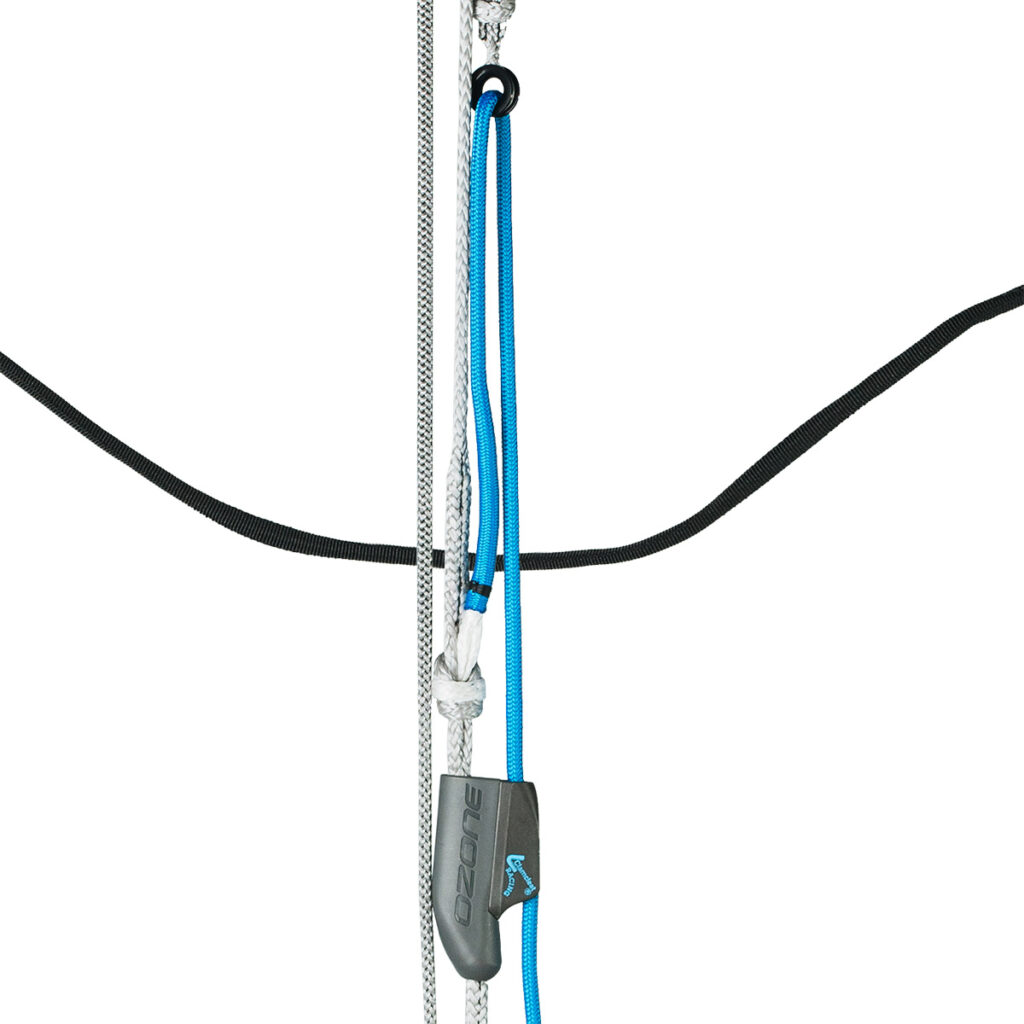
IMPORTANT: All Ozone release systems require the user to operate them manually in the case of an emergency. It is imperative the kite is set-up as shown in the manual, incorrect setup will compromise the operation of the release system. All lines and de-power systems must be tangle free and the kite leash connected in the right way, see pictures.
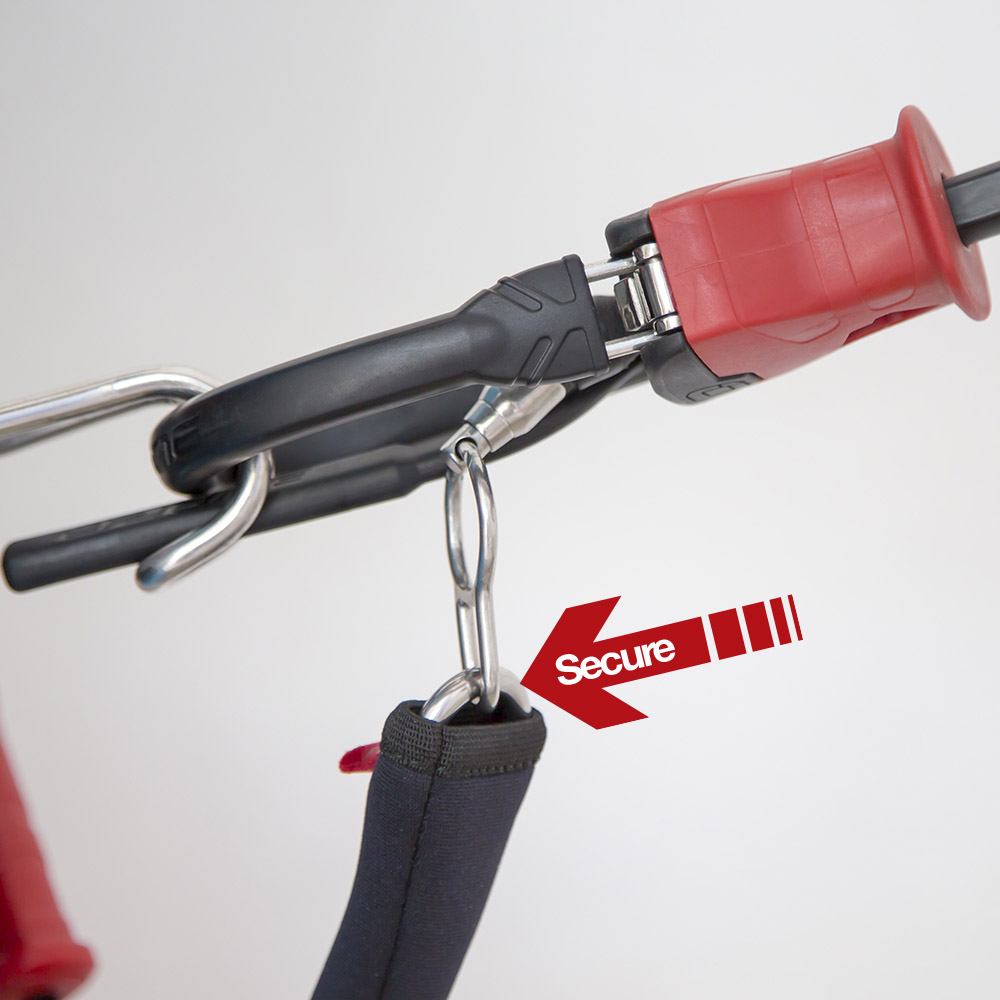
The Quick Release is the primary connection to the kite. Make sure you connect to the Quick Release using the finger as shown in the pictures.

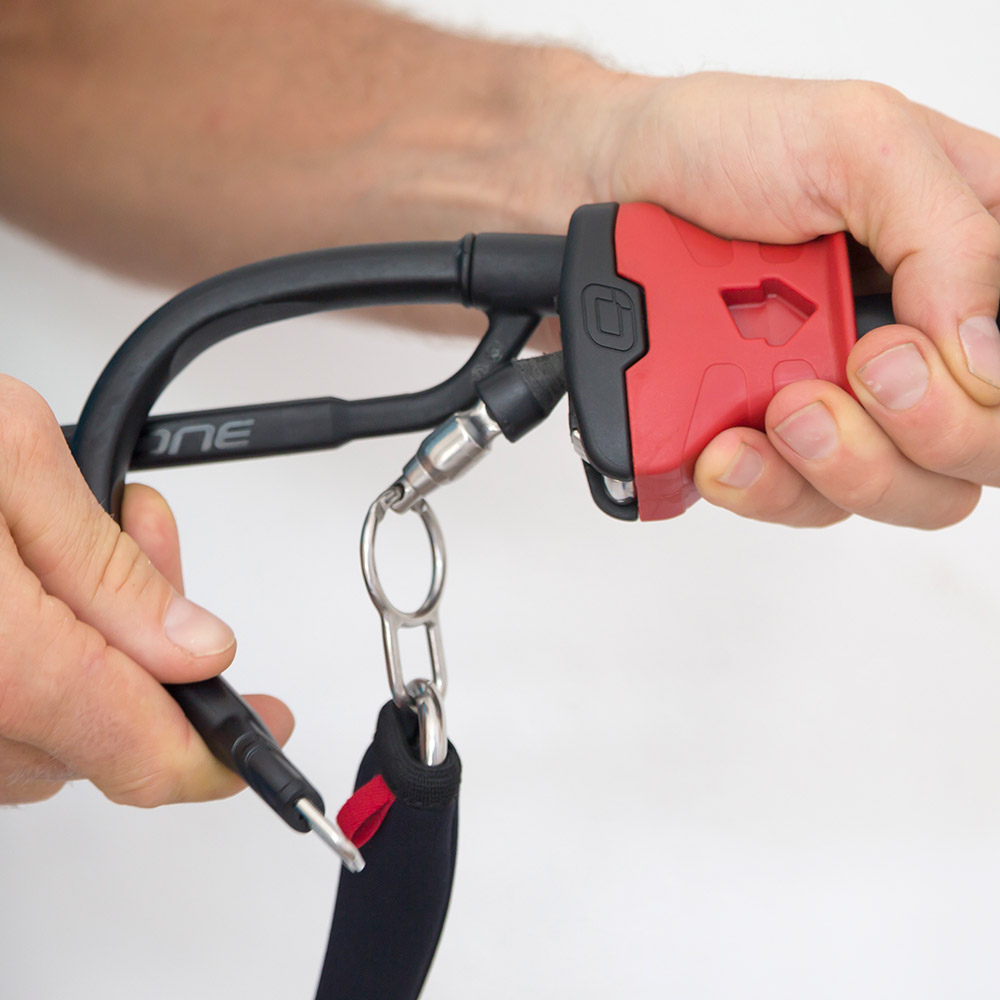
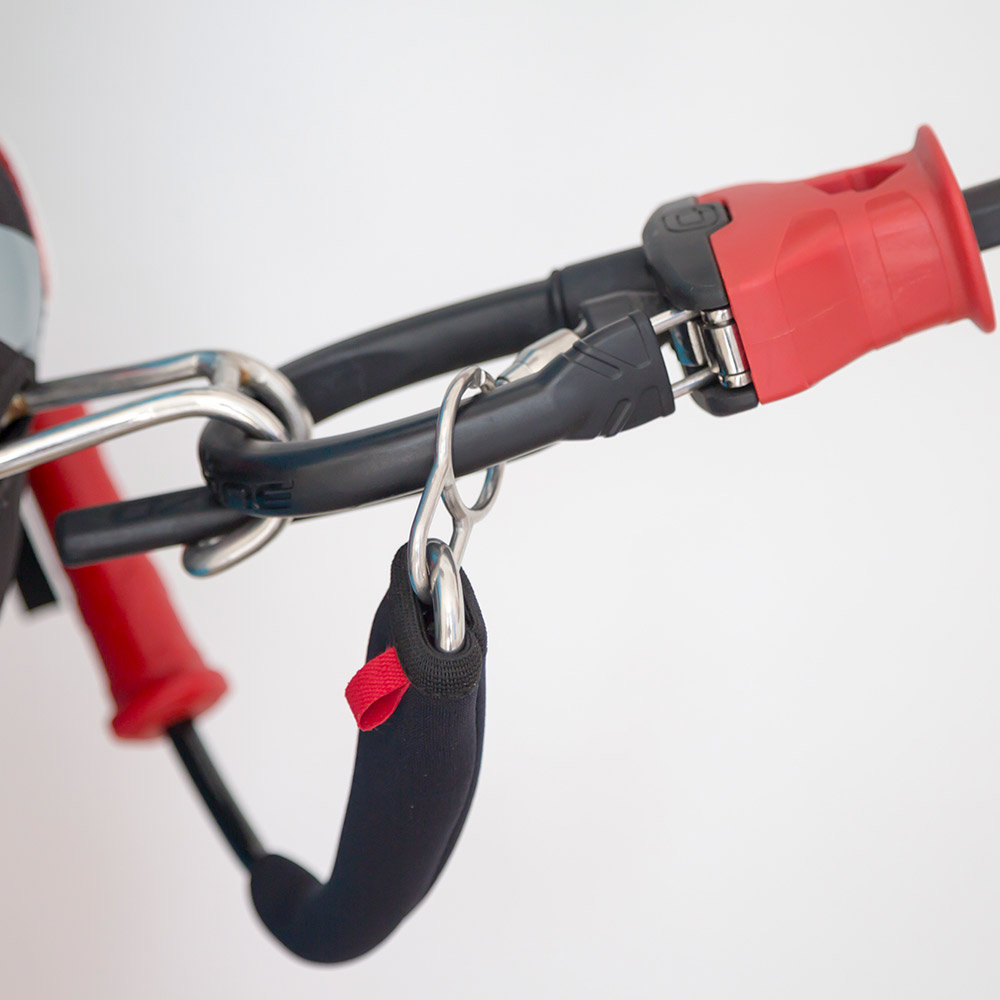
All riders should attach their Kite Leash to the Flag Out System. This is the small eyelet on the Stainless Steel Swivel Ring.
When the release is activated, the kite will flag out and fall to the water/ground.
In all situations make sure that all lines are clear of all working release systems and the kite leash is connected in the right way.
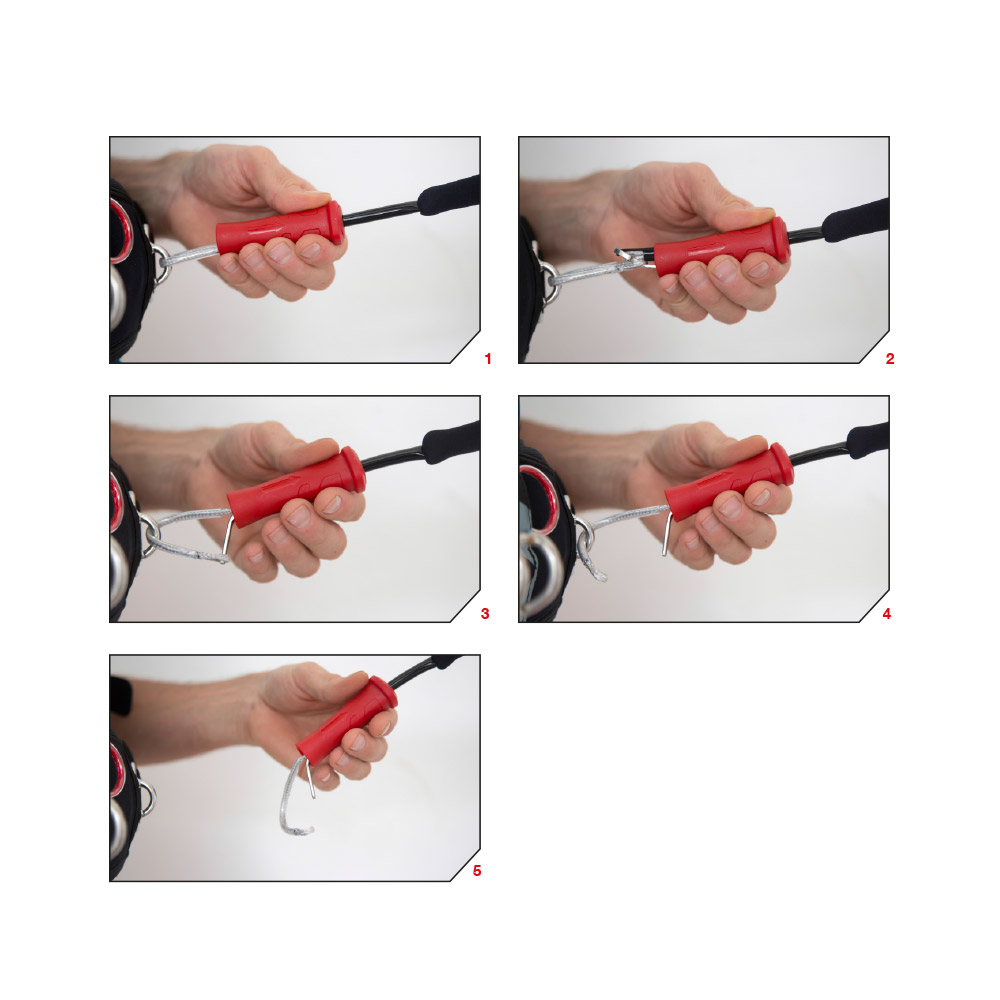
Riders performing unhooked tricks or who are more confident and have spent many hours Kiting can attach in Expert mode, where the loop part runs through the large eye of the steel ring. When letting go of the bar in Expert mode (without activating the release e.g. missed handle pass) the kite will depower but WILL NOT flag out.
Be aware in this situation, the Quick Release will be out of reach and can therefore not be released. When hooked in and activating the Quick Release the steel ring automatically slips off and the kite will flag out.
Activate the Quick Release as shown in the pictures. Providing your leash is attached to the flag out system the kite will 100% depower.
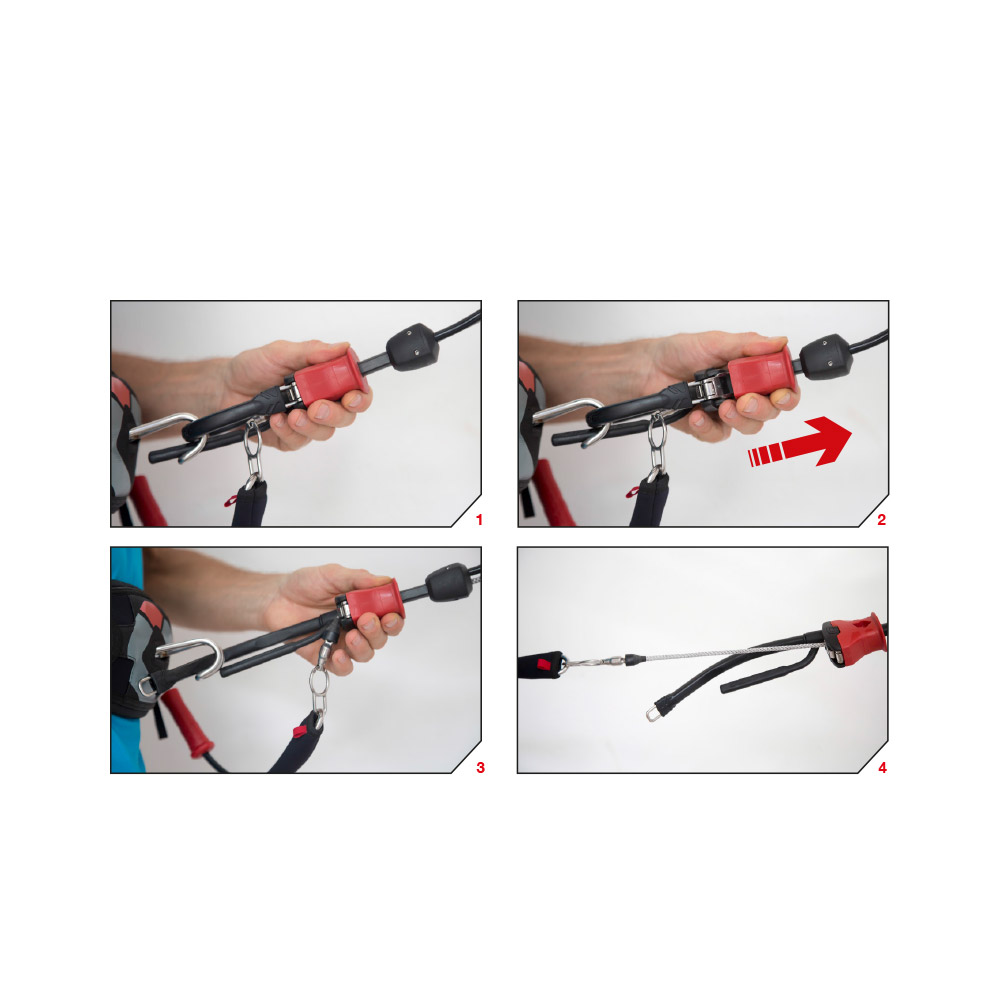
In the case of an extreme emergency where you need to completely release from the kite, use the quick release on the kite leash. This will completely detach the kite and control system from the user, and could therefore hit anything or anyone downwind causing damage, serious injury or death. RIDE RESPONSIBLY.
WARNING:
Never fly your kite in strong wind for the 1st time. Do not attempt to fly a kite without being taught by a certified kite instructor.
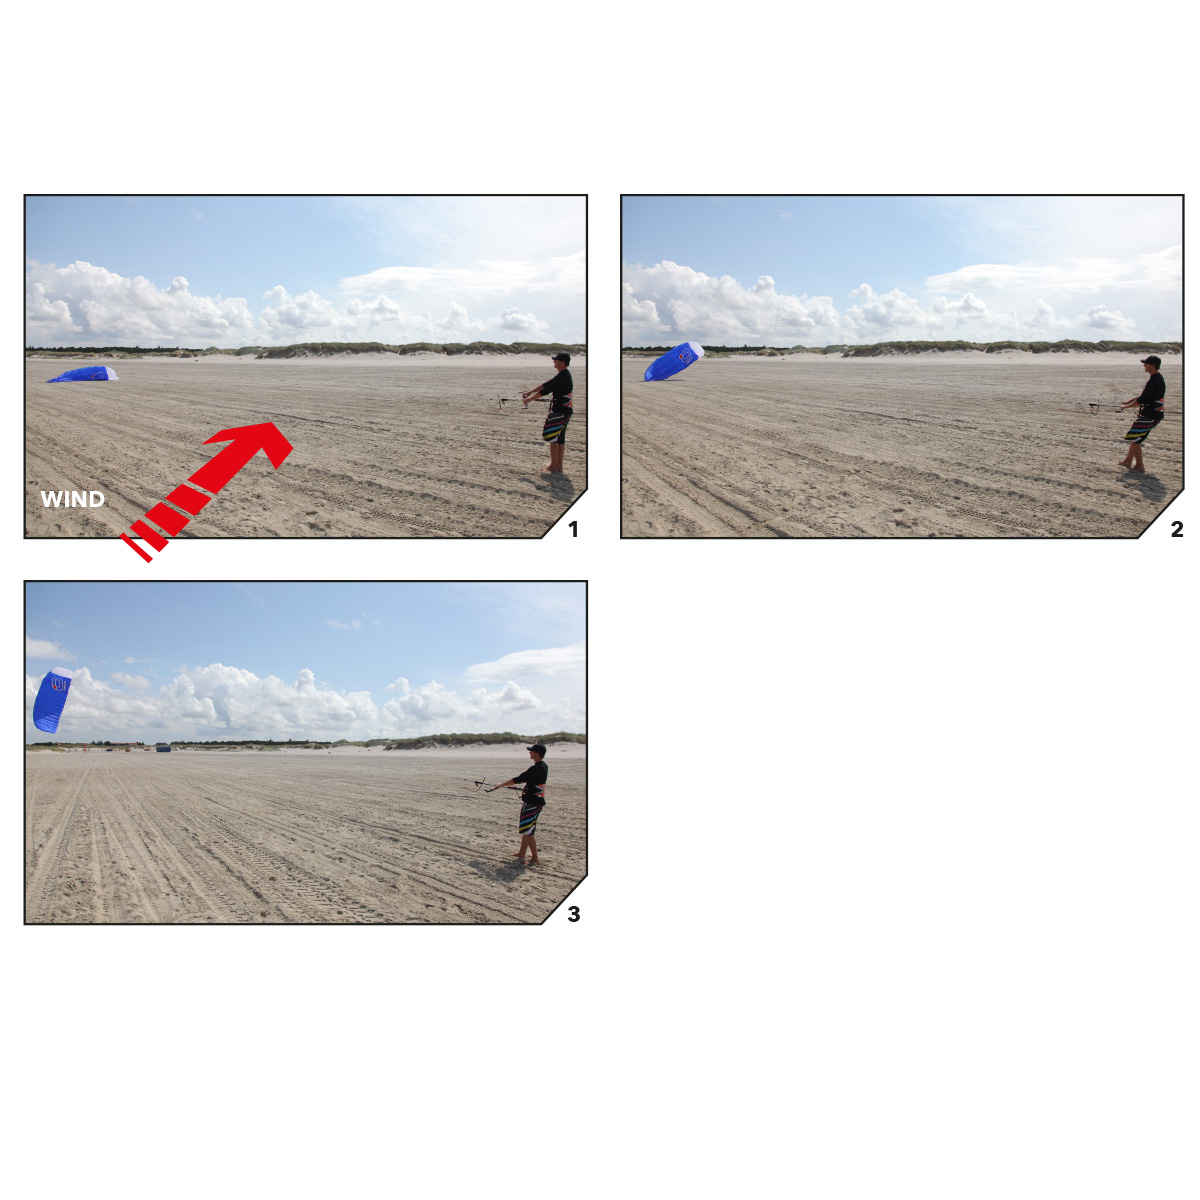
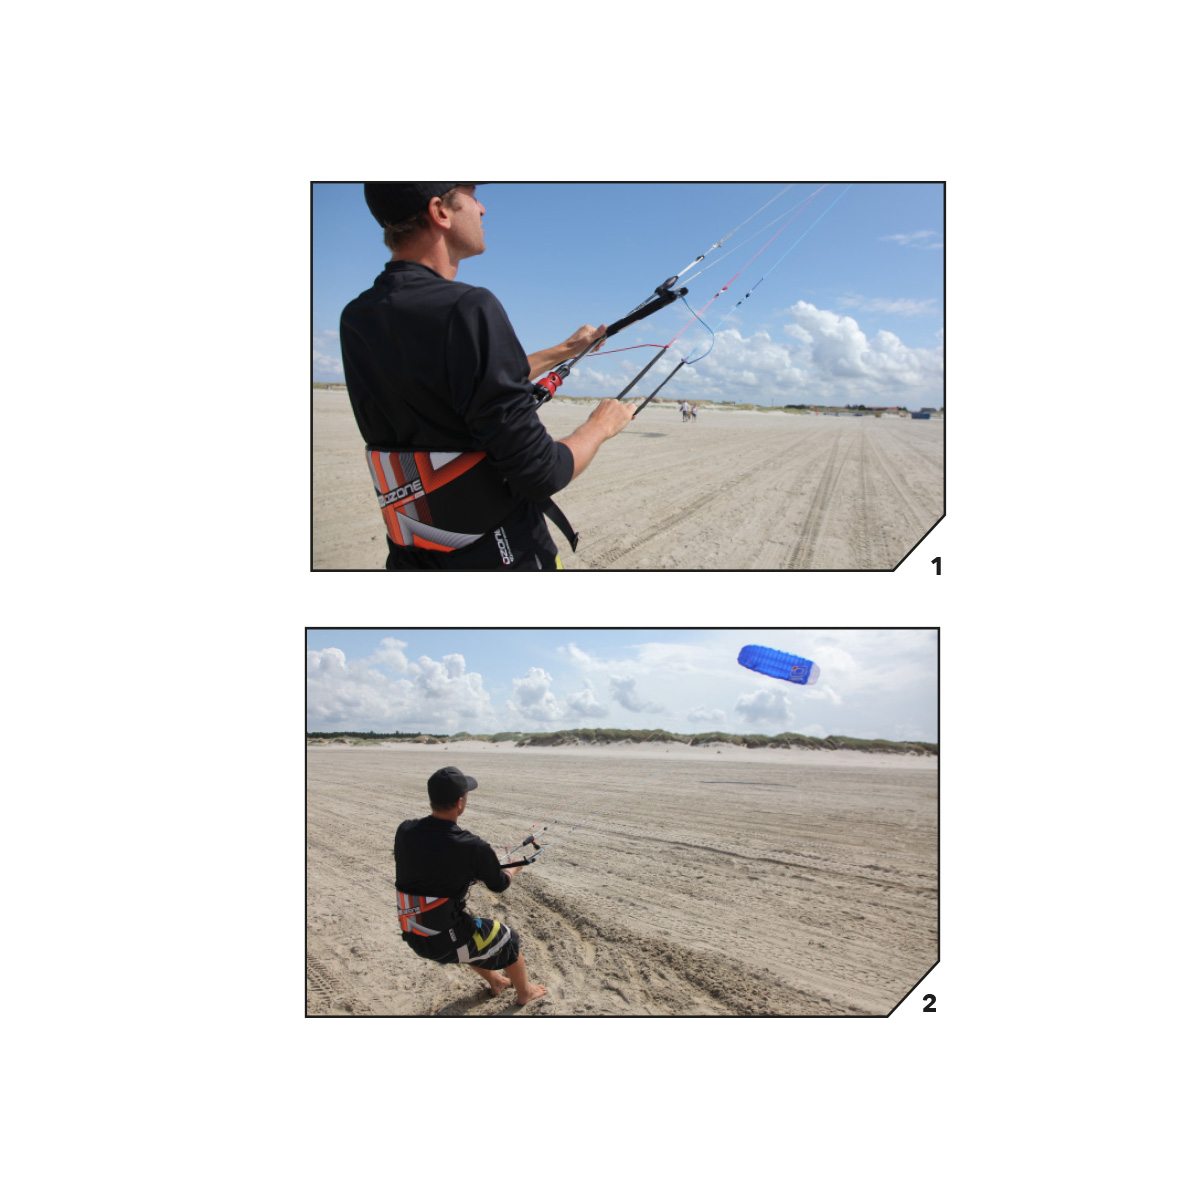
If the wind is light (less than 12 kph) lay trailing edge directly into the wind with sand/snow to secure kite. Place yourself directly in front of the kite. Hook into the Quick Release.
Step backwards while pushing the bar forward. The kite will inflate and take off.
In light winds, to assist launching, gently grab and pull on the front lines.
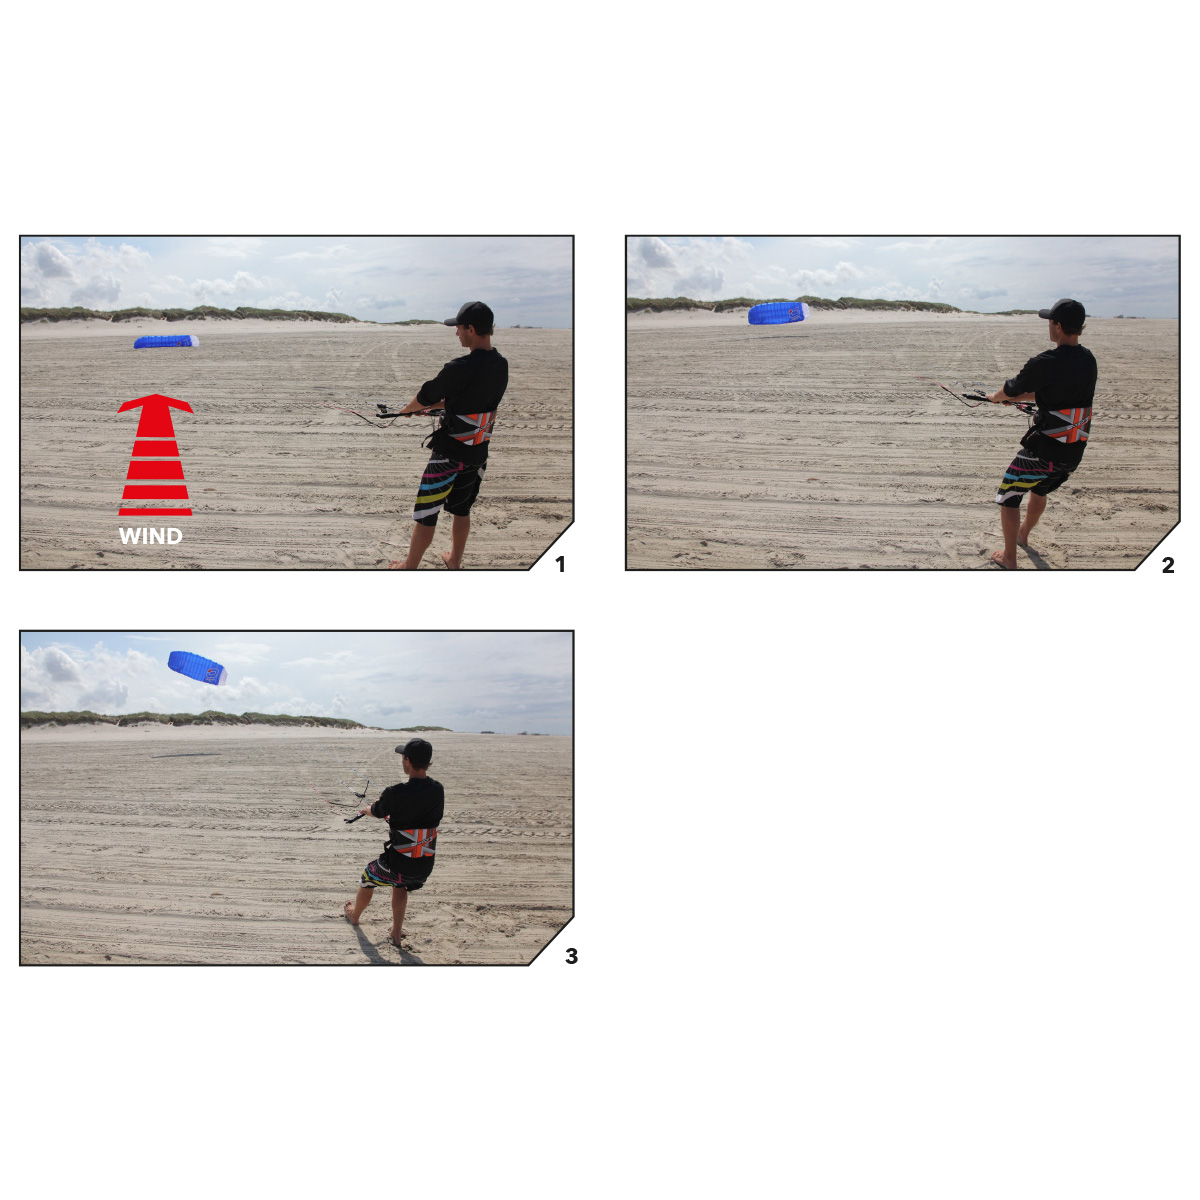
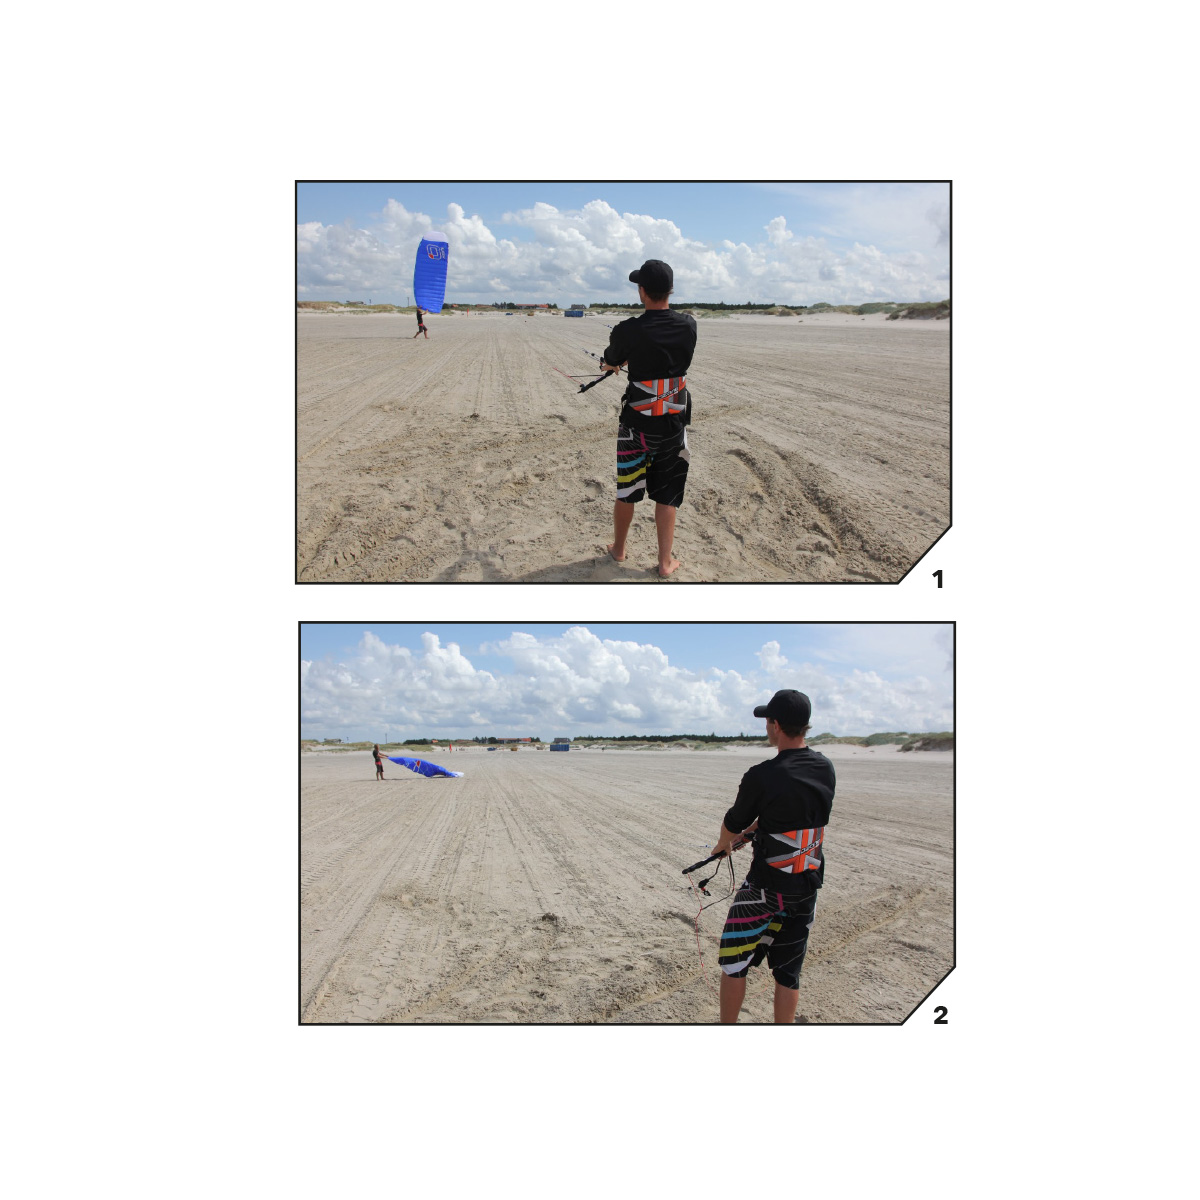
If the wind is strong (more than 12 kph), lay kite directly downwind with sand/snow or board securing the upwind tip.
Place yourself at 45 deg to the kite upwind. Hook into the Quick Release. Step backwards while pulling the down wind side of the bar to ease kite into the air. The kite will inflate and take off on the side of the wind window.
Release the Primary Security.
Ensure the safety leash is connected to the total flag out line (see pictures, this is the recommended safety option). Activate the Quick Release and the kite will flag out completely and fall to the ground. (see SECURITY)
Pull the 5th line quickly through the Quick Release for about 2m. The kite will loose its power and stall to the ground. The more you pull, the less power. To secure the kite on the ground, hook the loop you find in the 5th line about 2m up, into your spreader hook, ground stake or bar horn.
Grab the Brake Handle with one hand then pull it behind your back and HOLD.
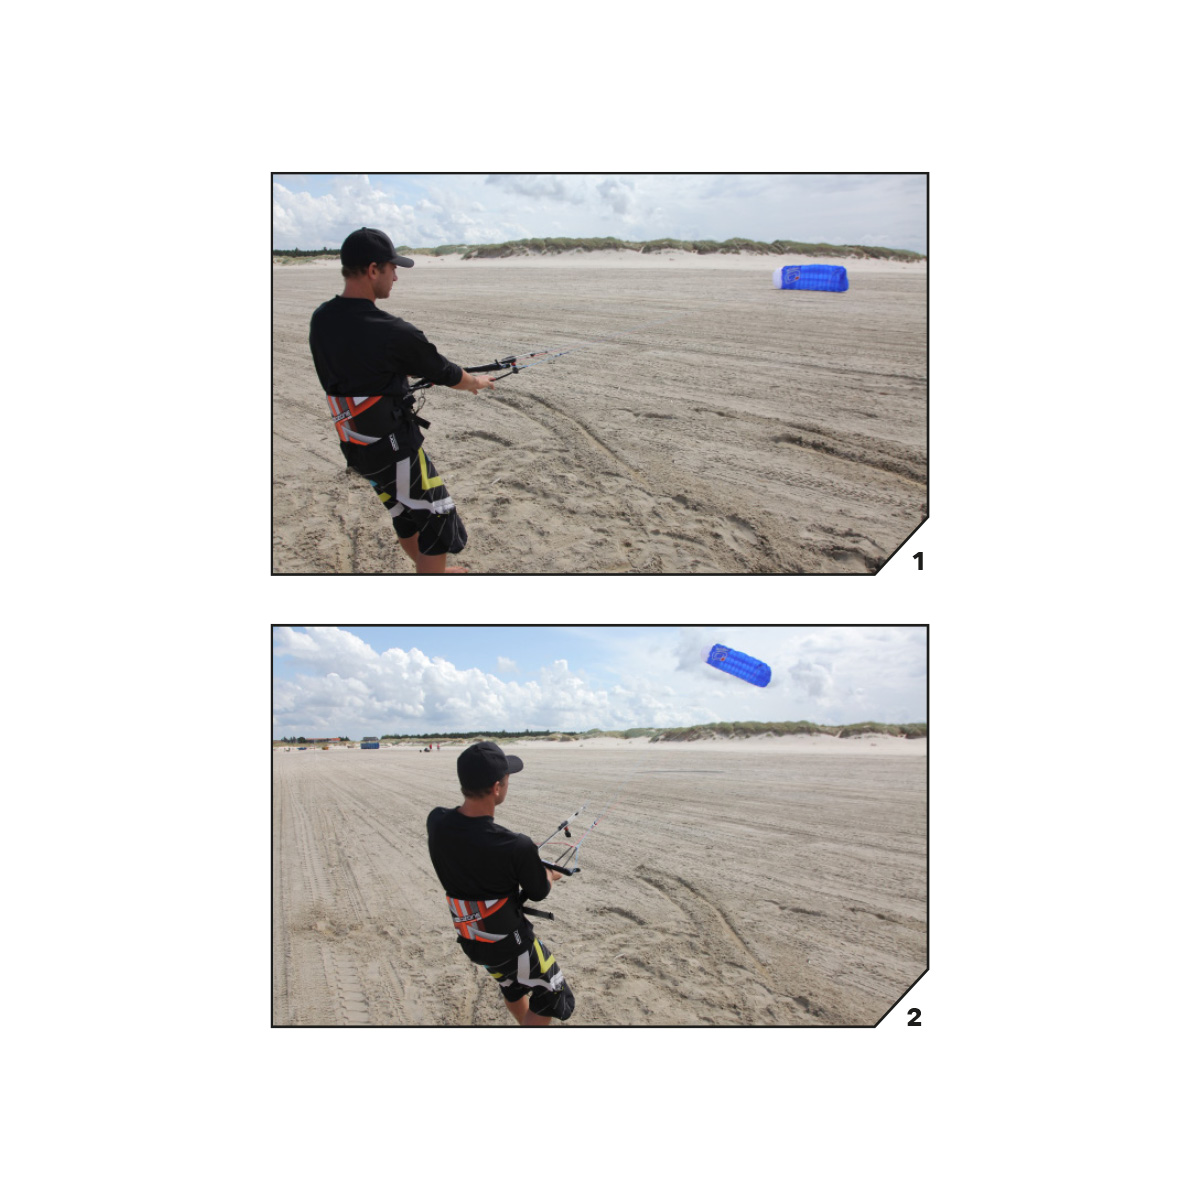
Fly the kite to the edge of the window and lower it gently and controlled.
When the kite is landed face down, take the Brake Handle firmly, pull and hold. The kite will reverse from the ground, turn over, and land leading edge up. The kite is now ready to launch normally.
See “LAUNCHING”.
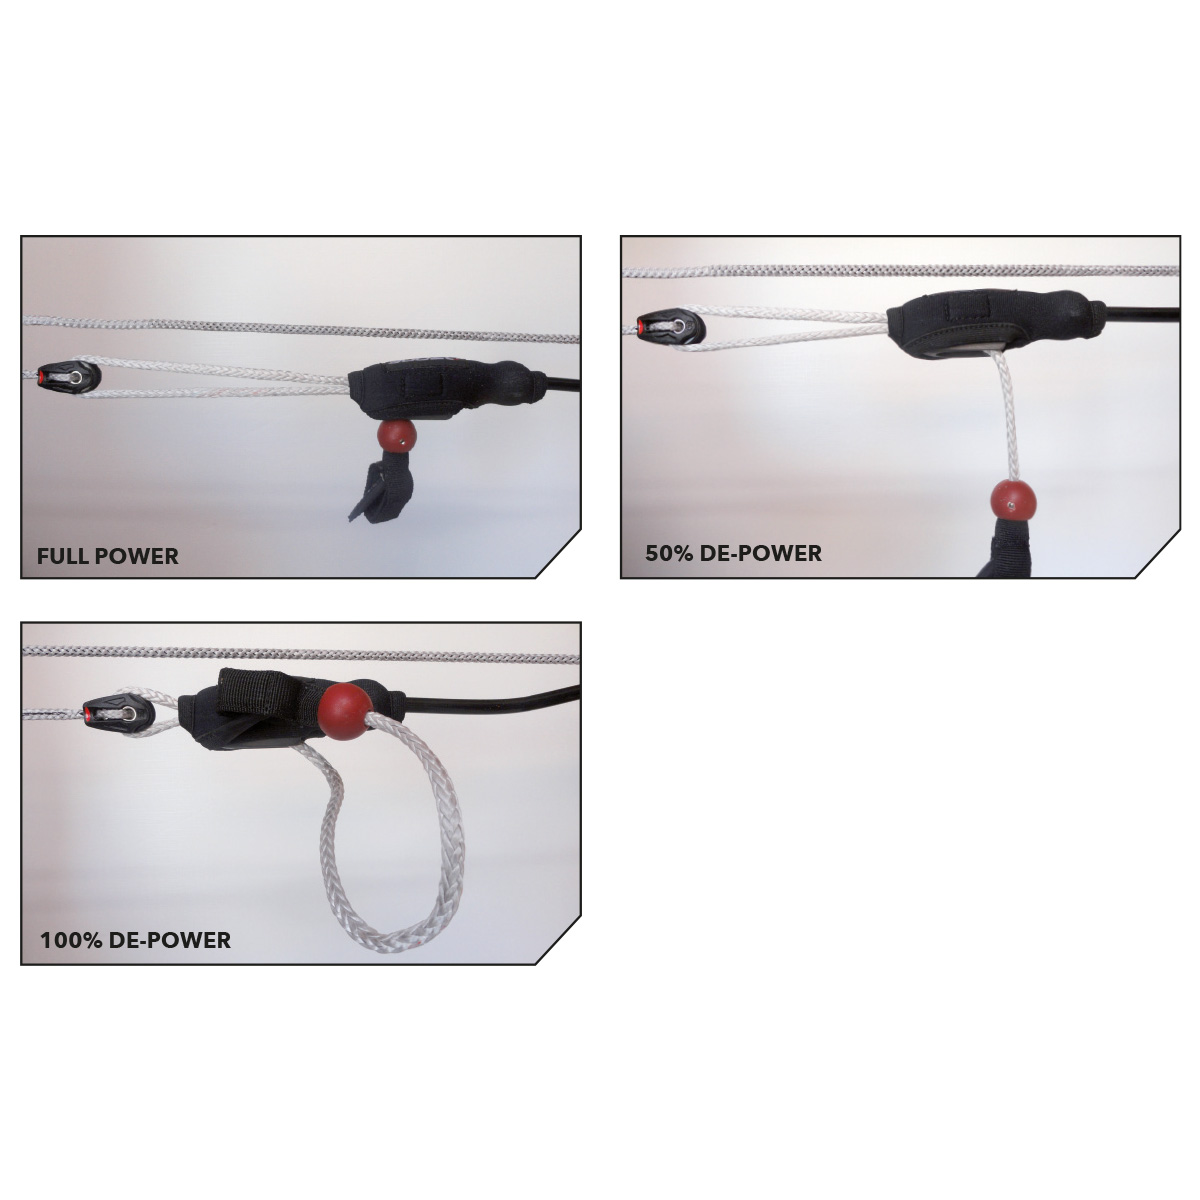
To release the line from the cleat teeth, first pull out and down to unlock the line from the teeth, then set the trimmer line to the desired amount.
Pull the trimmer line down to de-power the kite. This is needed if you are overpowered, for unhooked riding, or if you are walking on the beach or snow.
Release the trimmer line away from you to increase kite power.
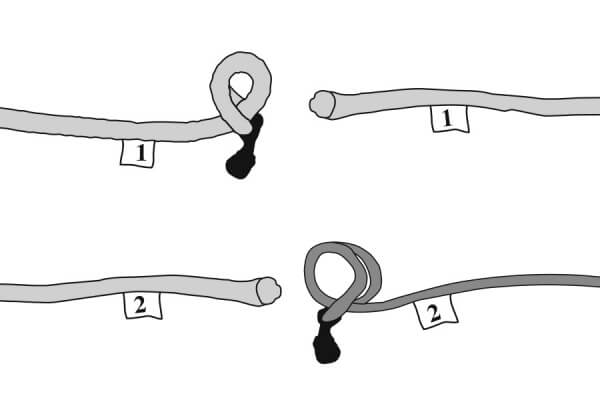
All lines should be maintained as close to equal length as possible. Flying lines can stretch over time, generally the front lines stretch more as these take the majority of the load.
To check your lines, unwind the lines from the bar and have a partner hold the lines even at the bar end. Taking hold of the lines at the other end, pull on the lines to check they are even. If the lines are not even you may either;
1)
Stretch out the shorter lines. Attach the shorter lines to a car hitch or something very solid. Then take hold of the bar and pull with enough force to stretch the line. Do this to any lines that are shorter and re-check that all 4 lines are equal length.
2) Use the Leader Line trimming knots..
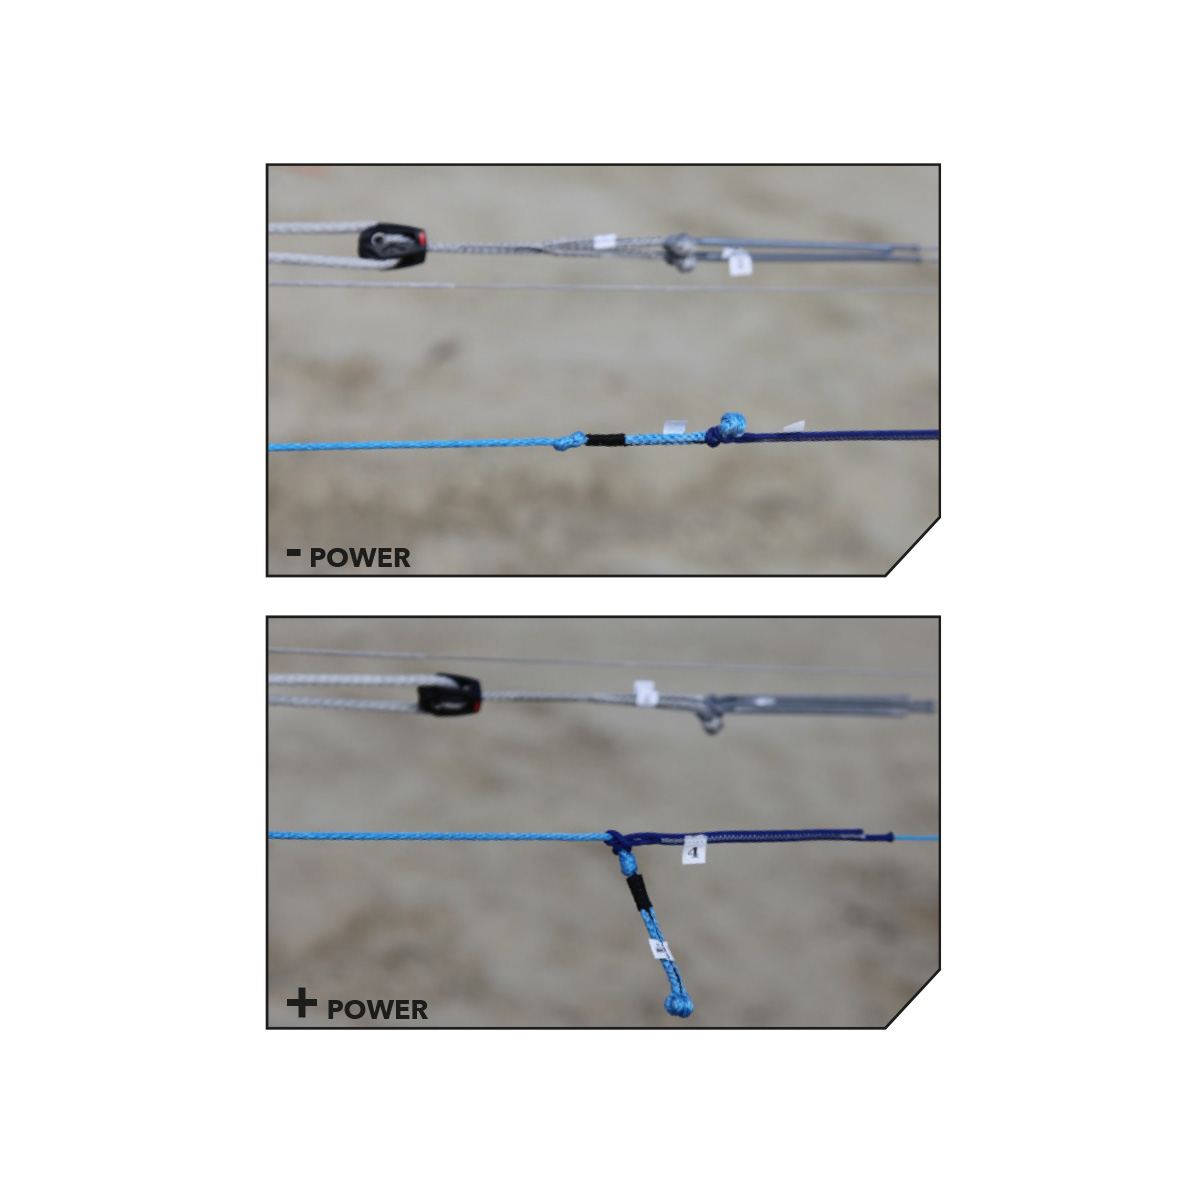
Speed System and Bridle lines should be regularly checked and maintained in the correct trim or the kite will not perform as designed. If they are worn or not to factory specification (+ or – 15mm) they must be replaced. How To videos and a Bridle Check PDF with all measurements can be found at www.ozonekites.com
You must inspect all your equipment before and after every use. Check the entire kite including upper and lower surfaces, line attachment points, speed system and bridles. Immediately replace any worn or damaged parts with original parts only.
Millions of people go to the beach every year and kitesurfing is the most visually spectacular beach sport around, drawing the eyes of attention from everyone. Kites are huge and kites with a customized design can be amazing advertising spaces.
Flying up and down the beach, park or snow all day long, these spaces can be used to advertise local and international businesses, kite-schools or simply for your own kite with a design that suits you perfectly and makes you stand out a little more from the crowd. If you have your own company you can add your company logo to your kites which allows them to be written off as a business operating expense. How cool is that!
For mainstream companies the opportunity to invest in a flying Billboard is obvious at a fraction of the cost to normal advertising. So far we have worked with many of the World’s leading brands making them kites or making kites for riders sponsored by mainstream brands that see the benefit in Kite sports.
Check out some of the custom kite designs we’ve made for customers: custom kite gallery
Quotes vary depending on the complexity and size of the logo or design. We can only give a quote once we have the info (see above)
We screen print any colour – our standard stock fabrics’ or any other pantone – onto white sticky-back rip-stop material. The logo is then cut out, stuck & sewn on the kite or wing. This technique is suitable for mid sized logos that span over a few panels. Please note that it adds some extra weight
We can cut logos into the sail on any single surface kite or wing and even on both surfaces of foil kites. The logos look amazing and the light shines through beautifully. We can either use our standard colour fabrics, or screen print any colour onto white fabric. Price depends on the custom design surface area and how complicated the logo is – not all details of your dream design are possible to build. Ask your local distributor for feasibility and quote
A cutting-edge digital printing technique that’s fast, cost-effective and precise. The process allows ink to be embedded directly into the fabric, resulting in rich, vivid designs with endless colour possibilities. While some minor colour bleed can occur on very close inspection, the stunning results make this a fantastic choice for high-impact graphics on a kite or wing
A lightweight control system designed specifically for the EXP - it is a must-have addition.
Find a dealer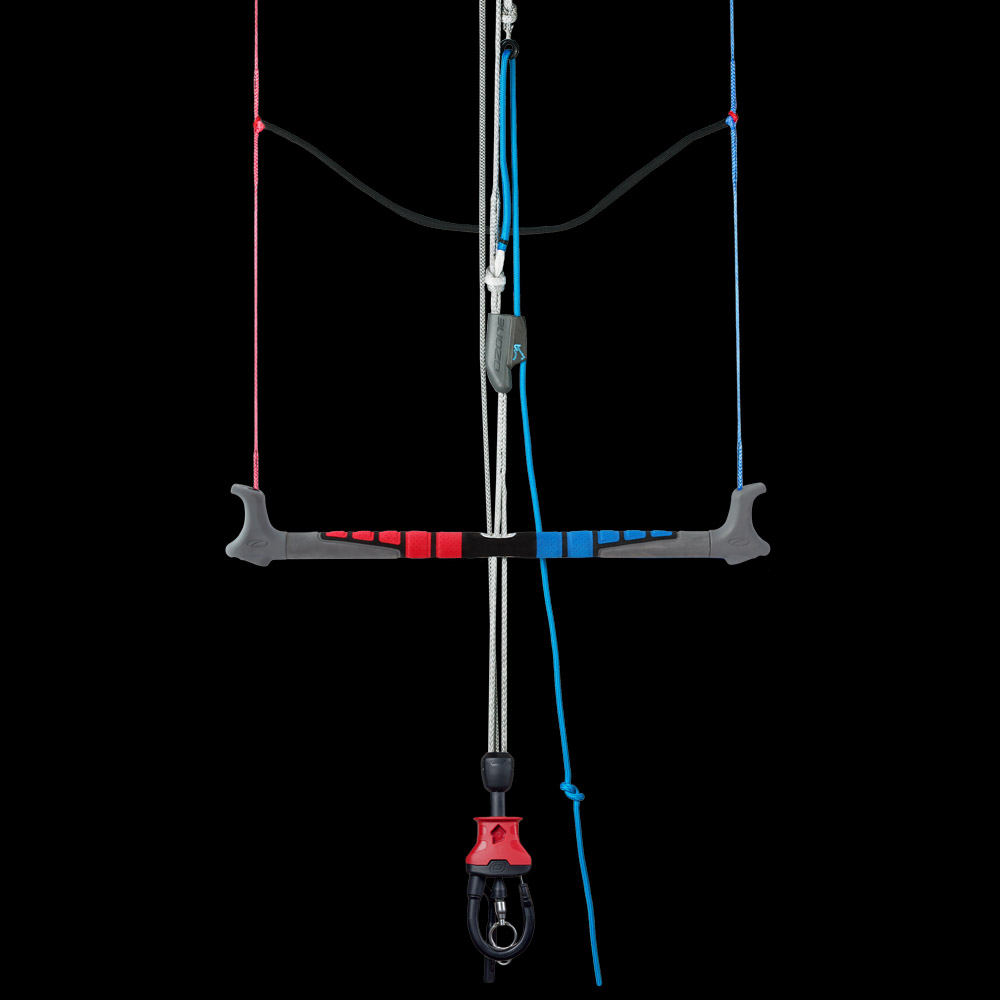
Based on the Contact Snow V5 control system featuring our innovative Click-in-loop, combined with a double low friction ring trim system similar to our Race V5 control system. Trimming the kite as you ride is made easy and comfortable and the 6mm trim line is easy to grip even when wearing polar gloves.
Push-away quick release with an innovative one-step Click-In reload function that is incredibly intuitive. The release handle fits comfortably in the hand, it is quick and easy to activate the release by pushing the handle away. A self-positioning release mechanism locates automatically, ready to be re-loaded by simply ‘clicking’ in the loop. The Click-In Loop is AFNOR NF S52-503 certified.
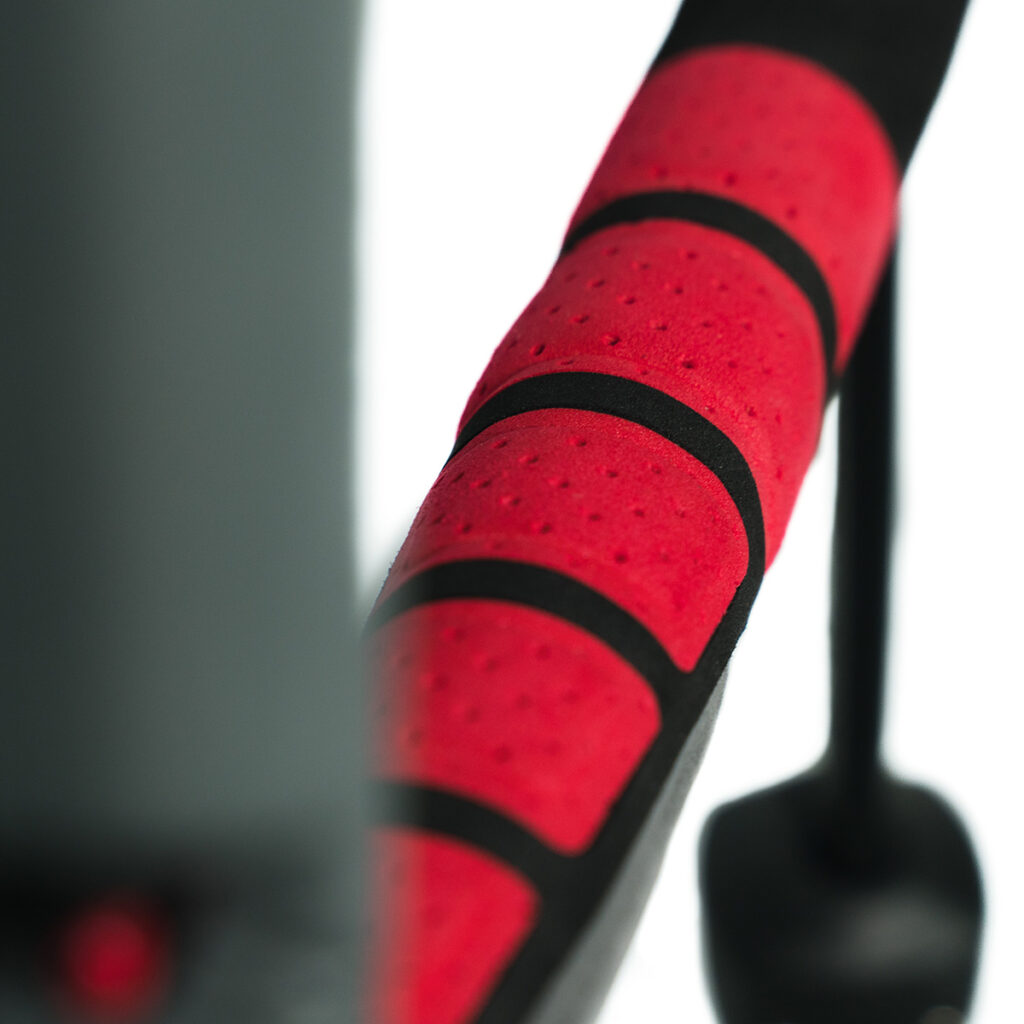
3D pressed EVA with ergonomic shaping and a lightly sanded finish provide the ultimate bar grip. It is colour coded with the leader lines and flying lines for an added visual safety feature.
Colour coded 500kg front / 300kg back lines are precision cut, pre-stretched, spliced and sewn in our own production facility to guarantee accuracy. We use the highest quality Bio-based Dyneema® – this material has the same performance as conventional Dyneema® with a carbon footprint that is 90% lower than generic HMPE fiber.
Our modular design makes adding or removing extensions quick and easy via removable pigtail end connectors.
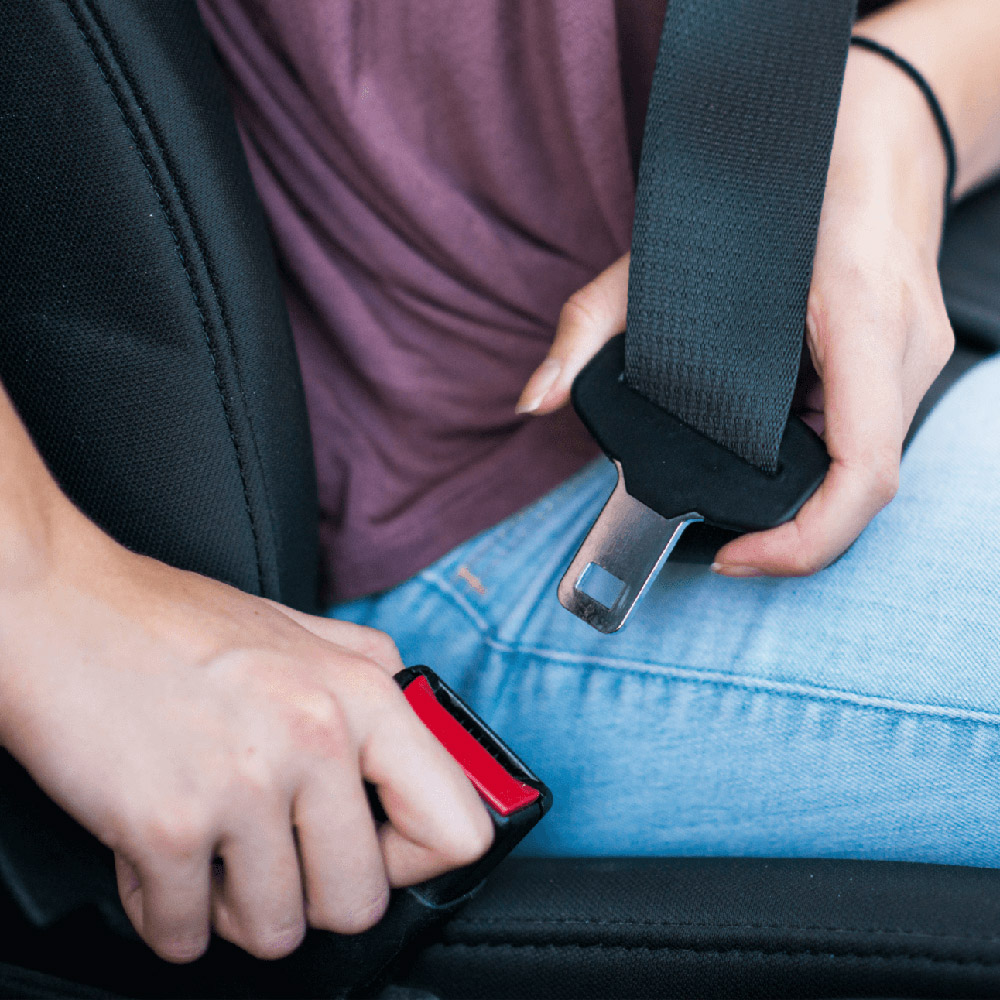
What’s the first thing you do when you get in a car? You click in your seatbelt, hearing that ‘click’ sound makes you feel secure that you are safely buckled up, and you know instinctively how to release it. The design of our innovative quick release system, the Click-In Loop, was inspired by the same principle. In the same way fastening your seatbelt has become a natural action when getting into a car, riders should activate and reload their release systems before and after every use. Although this important safety check is often overlooked, checking your release before each session will ensure it is functioning properly. We developed the Click-In function to be simple and intuitive, so activating and reloading will become second nature.
All riders should attach their Kite Leash to the Flag Out System. This is the small eyelet on the Stainless Steel Swivel Ring.
When the release is activated, the kite will flag out and fall to the water/ground.
Riders performing unhooked tricks or who are more confident and have spent many hours Kiting can attach in Expert mode, where the loop part runs through the large eye of the steel ring. When letting go of the bar in Expert mode (without activating the release e.g. missed handle pass) the kite will depower but WILL NOT flag out.
Be aware in this situation, the Quick Release will be out of reach and can therefore not be released. When hooked in and activating the Quick Release the steel ring automatically slips off and the kite will flag out.
In all situations make sure that all lines are clear of all working release systems and the kite leash is connected in the right way.
Always clean your control system with fresh water after every session, and reload/release the Click-In Loop to check the system is functioning correctly. Store your control system with the Click-In Loop release open. Reload the next time you set up your kite.